Page 250 of 665 FirstFirst ... 150200240248249250251252260300350 ... LastLast
Results 2,491 to 2,500 of 6650

Thread: Use of X-ray film: technical discussion with example images

  1. #2491

    Join Date
    Dec 2011
    Location
    Massachusetts
    Posts
    268

    Re: Images shot on X-ray film

    Thanks, Stone. I may look into this further. Problem is the Epson scanner cover comes in contact with the 11x14 negative when closed so I don't really consider the v750 a viable option but I'd still like to know how to stitch. I also recently discovered we have a Microtek scanner at work that I think will cover 11x14. Software support is getting sketchy for these older scanners but it may be fun to try before they consider putting it out to pasture.

    FWIW, I have yet to try contact printing any of the x-ray negatives (in any size) but, like dev. by inspection (no darkroom), that's another thing high on my agenda.

    Quote Originally Posted by StoneNYC View Post
    Well, when I scanned them with the essence software, the only thing that I make sure that I write down the black, white, and neutral number information that show up in the chart area, so that each scan will match up identically in terms of contrast and exposure level, I generally let the system automatically shoot it for me, but I do purposefully selected area first that I've chosen as my spot meter exposure area when shooting and notate that for later.

    Anyway, once I have them all scanned, I had to Google it to figure it out, but you simply open up Photoshop, I happened to have CS6 even though I have only used it a few times, I got a great deal on it when upgrading the light room and said what the heck let me get it just in case.

    Anyway you simply open up all the files at once I mean within Photoshop you open them they show up as Tabs. Then you go to the top of the screen and I believe it's under the file, you then scroll down to select the automate option, and there is some kind of selection or stitching, but it's not called stitching it's called something else, and of course the word escaped my mind at this time, but it's obvious, like "combine" or something, anyway I select auto and it just figures it out for me, I don't have to collage it or anything. It uses pattern recognition.

    Best of luck! The file is huge and I usually saved it as TIFF but I've just learned from an ULF photographer about a "large document" option, I'll try that next time.

    Hope that helped

  2. #2492

    Join Date
    Oct 2012
    Location
    Connecticut, USA
    Posts
    5,308

    Re: Images shot on X-ray film

    Quote Originally Posted by Carl J View Post
    Thanks, Stone. I may look into this further. Problem is the Epson scanner cover comes in contact with the 11x14 negative when closed so I don't really consider the v750 a viable option but I'd still like to know how to stitch. I also recently discovered we have a Microtek scanner at work that I think will cover 11x14. Software support is getting sketchy for these older scanners but it may be fun to try before they consider putting it out to pasture.

    FWIW, I have yet to try contact printing any of the x-ray negatives (in any size) but, like dev. by inspection (no darkroom), that's another thing high on my agenda.
    Welcome, I'm told that both Viewscan and SilverFast support a lot of old model scanners (even some with SCSI ports for cables) so if ever Epson or anyone else fails to support an OS upgrade, I think it's still a safe bet to use those other programs for many years.

    However at the quality if my iPhone camera, I've wondered if designing a simpler system where you deposit your phone into a machine and it "docks" with it and using that can scan hah! Not this generation but soon I think. Scary.

  3. #2493
    Tin Can's Avatar
    Join Date
    Dec 2011
    Posts
    23,103

    Re: Images shot on X-ray film

    The phone scanner has been done some time ago, but it's crap. Look here for the DIY DSLR scanner thread, very interesting.

    Quote Originally Posted by StoneNYC View Post
    Welcome, I'm told that both Viewscan and SilverFast support a lot of old model scanners (even some with SCSI ports for cables) so if ever Epson or anyone else fails to support an OS upgrade, I think it's still a safe bet to use those other programs for many years.

    However at the quality if my iPhone camera, I've wondered if designing a simpler system where you deposit your phone into a machine and it "docks" with it and using that can scan hah! Not this generation but soon I think. Scary.

  4. #2494

    Join Date
    Jul 2013
    Location
    Pennsylvania, USA
    Posts
    23

    Re: Images shot on X-ray film

    Quote Originally Posted by StoneNYC View Post
    Anyway, once I have them all scanned, I had to Google it to figure it out, but you simply open up Photoshop, I happened to have CS6 even though I have only used it a few times, I got a great deal on it when upgrading the light room and said what the heck let me get it just in case.

    Anyway you simply open up all the files at once I mean within Photoshop you open them they show up as Tabs. Then you go to the top of the screen and I believe it's under the file, you then scroll down to select the automate option, and there is some kind of selection or stitching, but it's not called stitching it's called something else, and of course the word escaped my mind at this time, but it's obvious, like "combine" or something, anyway I select auto and it just figures it out for me, I don't have to collage it or anything. It uses pattern recognition.
    The option is called "Photomerge" in Photoshop. Another way to get that to work is if you launch Adobe Bridge CS (comes with Photoshop CS) and select the scanned portions of the image (file_001.tif, file_002.tif, etc) by holding down the control key and clicking on each one then in the tools menu select Photoshop, then PhotoMerge, it will launch a dialog box showing your selected scanned images. Just hit OK on that dialog box and it will bring in each scanned portion of the image and place it on it's own layer. Then from the Layers menu select "Merge Visible" then "Flatten Image" and save the fully merged image to disk. You can then go back to the window that has Adobe Bridge open and delete the individual scanned portions of the image since you no longer need those files.
    GreggObst.com
    LF 8x10/5x7/4x5, MF and 35mm shooter.

  5. #2495
    おせわに なります! Andrew O'Neill's Avatar
    Join Date
    Sep 2003
    Location
    Coquitlam, BC, Canada, eh!
    Posts
    5,262

    Re: Images shot on X-ray film

    Ektascan has the same insane density as the double-sided stuff, so how does increasing exposure cut down on the contrast?
    More exposure, less development. One could also pre-expose the film. That's a great way to cut contrast.

  6. #2496
    おせわに なります! Andrew O'Neill's Avatar
    Join Date
    Sep 2003
    Location
    Coquitlam, BC, Canada, eh!
    Posts
    5,262

    Re: Images shot on X-ray film

    I find many people who are using X-ray film, are not compensating for reciprocity effect.

  7. #2497
    ScottPhotoCo's Avatar
    Join Date
    Jul 2012
    Location
    Los Angeles, CA
    Posts
    802

    Re: Images shot on X-ray film

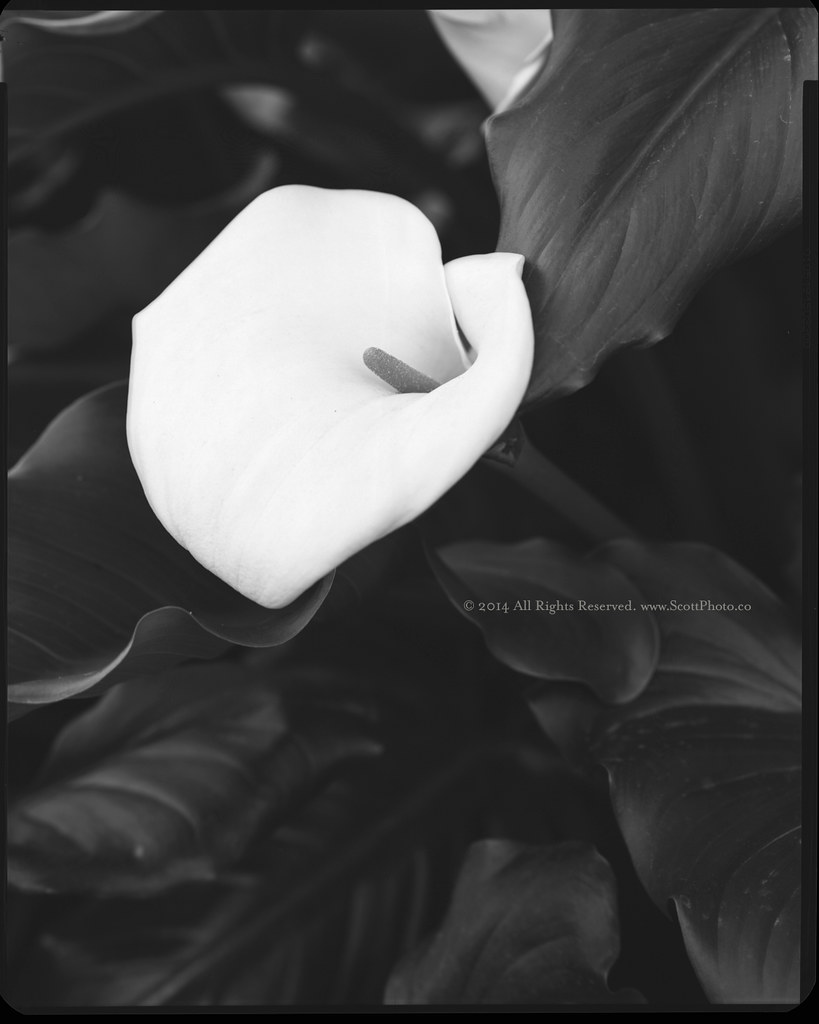
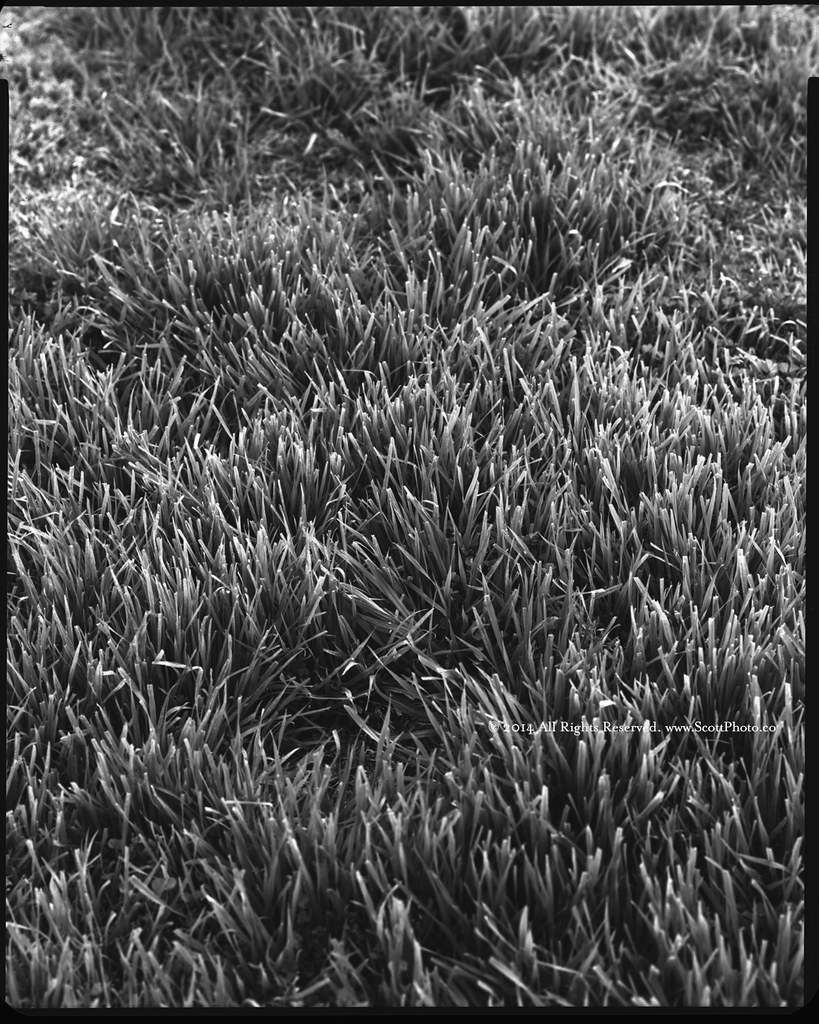
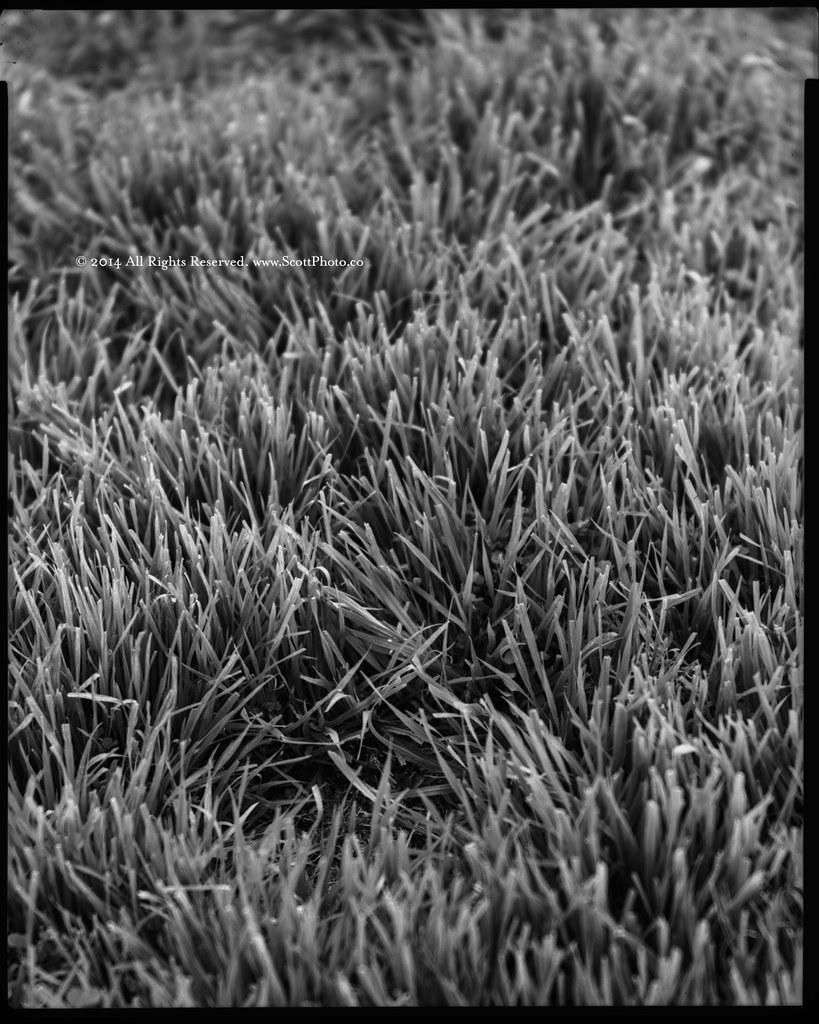
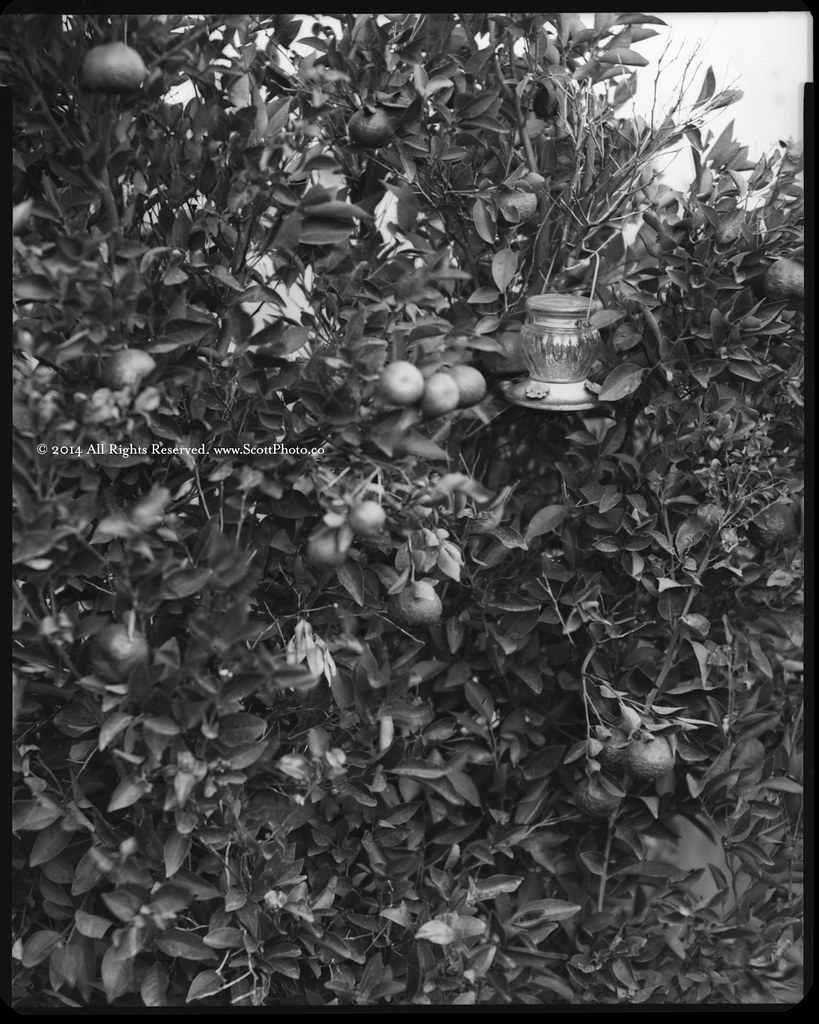
    Finally had a chance to continue my testing. Here are my four latest shots with details. All were processed in a Jobo tank with continuous agitation for 7m using Adinol (25mL:1L) at 68 degrees. No presoak.


    XRay_Test_Jobo_ScottPhotoCo_0214-4_WM by ScottPhoto.co, on Flickr
    Camera: Deardorff v8
    Lens: 16.5" Goerz Artar
    Film: Kodak Ektascan B/RA (metered at 80iso)
    Exposure: 1s at f16


    XRay_Test_Jobo_ScottPhotoCo_0214-2_WM by ScottPhoto.co, on Flickr
    Camera: Deardorff v8
    Lens: 16.5" Goerz Artar
    Film: Kodak Ektascan B/RA (metered at 80iso)
    Exposure: 1s at f22


    XRay_Test_Jobo_ScottPhotoCo_0214-3_WM by ScottPhoto.co, on Flickr
    Camera: Deardorff v8
    Lens: 15x12 Ross
    Film: Kodak Ektascan B/RA (metered at 80iso)
    Exposure: 1/20s at f8


    XRay_Test_Jobo_ScottPhotoCo_0214-1_WM by ScottPhoto.co, on Flickr
    Camera: Deardorff v8
    Lens: 15x12 Ross
    Film: Kodak Ektascan B/RA (metered at 80iso)
    Exposure: 1.2s at f8

    These were only shot for testing and not for content.

  8. #2498
    (Shrek)
    Join Date
    Mar 2011
    Location
    Montreal
    Posts
    2,111

    Re: Images shot on X-ray film

    Quote Originally Posted by Andrew O'Neill View Post
    I find many people who are using X-ray film, are not compensating for reciprocity effect.
    I found I didn't have to worry much about it with Fuji down to 20 seconds or so, but with Agfa it seems different. I haven't done any formal testing, just with exposures in the 5min or more range, I give it a lot more than the Fuji.

  9. #2499

    Join Date
    Dec 2011
    Location
    Massachusetts
    Posts
    268

    Re: Images shot on X-ray film

    Quote Originally Posted by Gregg Obst View Post
    The option is called "Photomerge" in Photoshop. Another way to get that to work is if you launch Adobe Bridge CS (comes with Photoshop CS) and select the scanned portions of the image (file_001.tif, file_002.tif, etc) by holding down the control key and clicking on each one then in the tools menu select Photoshop, then PhotoMerge, it will launch a dialog box showing your selected scanned images. Just hit OK on that dialog box and it will bring in each scanned portion of the image and place it on it's own layer. Then from the Layers menu select "Merge Visible" then "Flatten Image" and save the fully merged image to disk. You can then go back to the window that has Adobe Bridge open and delete the individual scanned portions of the image since you no longer need those files.
    Thanks all for the Photomerge info. I don't have Photoshop (have been using Pixelmator) but can probably get my hands on a copy....

  10. #2500

    Join Date
    Jun 2006
    Location
    Westfield, New Jersey
    Posts
    417

    Re: Images shot on X-ray film

    Quote Originally Posted by Andrew O'Neill View Post
    More exposure, less development. One could also pre-expose the film. That's a great way to cut contrast.
    Ah. Beware of mottling. One can under develop too much.

Similar Threads

  1. Technical Pan Film
    By Jehu in forum Darkroom: Film, Processing & Printing
    Replies: 34
    Last Post: 22-Apr-2016, 18:42
  2. Images, not technical discussions.
    By rdenney in forum Image Sharing (Everything Else) & Discussion
    Replies: 0
    Last Post: 23-Jul-2015, 14:16
  3. Replies: 91
    Last Post: 23-Jul-2015, 12:01
  4. T Max 400 Technical Discussion by Sandy King
    By Michael Kadillak in forum Darkroom: Film, Processing & Printing
    Replies: 38
    Last Post: 7-Feb-2006, 06:08
  5. Discussion: Pyro stain, silver rich film & thick emulsion
    By Pete Caluori in forum Darkroom: Film, Processing & Printing
    Replies: 10
    Last Post: 22-Nov-2003, 04:39

Tags for this Thread

Bookmarks

Posting Permissions

  • You may not post new threads
  • You may not post replies
  • You may not post attachments
  • You may not edit your posts
  •