
Look up 14" duct end cap plug , should work and save a bit of moneyOriginally Posted by Randy Moe


Look up 14" duct end cap plug , should work and save a bit of money
Questions and comments are always welcome
That is a really good idea.
Quick question: Based on my searches, I could only find metal end caps. Do you think this would be a problem with all the darkroom chemicals?
They may start to rust eventually. You could coat/paint them to prevent this, or routinely clean off any nascent rust pits, but plastic caps seems like a more elegant solution.


Tin Can

From thousands of mural print experience I will say the most difficult part of Mural processing is getting the flow of chemicals quickly on the print surface to reduce flow marks... I use a lot of chemicals
in open trays and in troughs when I work to avoid this problem. Like film processing the first 15 seconds of development is critical.
Trying to save money with low amounts of chemicals in Mural printing is a bad idea IMHO as a full sheet of paper wasted is quite expensive.. A 100ft roll of Ilford Warmtone can run over $700 at B&H .
Hey there LFLarry you might have missed that I am using 30"Arista, 48"Foma, and 56"Kodak Polycontrast rolls. Those are going to be some big tubes.
Hi, you really only have a few options which I suspect you already know.
1 - Tray development. The biggest trays you can find to buy are 30x40 now, so that only covers 1 of your three sizes.
2 - Tube development. You would need a 12" tube that I described above for 30x40, 14" tube for 40x50, and anything beyond that in a tube isn't really practical.
3 - Trough development. You will have to come with with some DIY type solution for this and your milage my vary.
4 - Misc... other options would include using rollers or brushes if you have concrete floor and other more obscure options.
If you are printing with 56" roll paper then you have a pretty heft investment to even be in that ballpark and anything above 40x50 isn't very practical for 99% of photographers is my guess, but I may be wrong. I print big because I have collectors and clients that are willing to make the investment, otherwise, I couldn't justify the massive expenses associated with printing this big. The paper and chemical fees alone are a car payment for most people.
I have personally done all of the above and my preference is tray development. I designed and built custom darkroom trays for my largest size print that I make which is a 24x72 pano.
What are you doing for your big prints right now and what is the largest size you have printed?
+1 for tray development.
5 litres of developer in 2 buckets, splash and move with hands (gloves) or large brushes/wipes/sponges. works better with a helper.
bob carnie is right, flow marks are the enemy. prewetting the paper helps a bit (might decrease contrast though). diluting developer and cooling helps even more (increased developing time). practice by moving up in size before doing really big ones.
put on some groovy music.
enjoy.
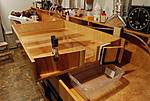
My approach to printing 30x40's is to use a single, elevated (on 2x4 "stretchers") tray (34x48") which I built from 3/4" birch plywood and coated with marine epoxy. This tray features a tapered right end, with a gasketed flap in the middle of this...which when closed ensures that the tray holds liquid, and when opened allows chemistry to be dumped.
Procedure is to have chemicals in tubs to left of this tray, dump into tray, move empty tub under dump-flap on right side, agitate by tray-rocking, open flap and place 2x4 under left edge of tray to elevate to facilitate dumping, at the end of dump cycle gently squeegee print to save maximum chemistry and minimize carryover of chemistry to next step, remove 2x4, reseal flap, pour in next chemical. Took awhile to get up to speed with this...but it works great.
What I found in "dialing in" the above process is that a pre-soak did not work for me...as it interfered with later absorption of developer which caused some visible unevenness. I'm using Ilford Classic FB (available as 30x40 sheets) and mileage may vary on this pre-soak issue with other papers. At any rate...I find that two gallons of chemistry works fine...and at the start of a run I dump a little less than half of the developer into the tray prior to adding the print, then quickly pour the remaining developer over the print before starting to rock the tray. As for developer dilution...I did find that if I used an "extreme" dilution I had trouble with getting maximum blacks, so I dialed this back a bit and now find that my Moersch 4812, when diluted to 1:24, works great with a four minute developing time (3.25 active rocking plus .75 dumping/squeegeeing).
I also use my single tray for the entire process...including washing/squeegeeing (glass smooth epoxied surface facilitates squeegeeing). This means that the print does not get moved about until it is ready to hang - which minimizes having the print become creased.
Right now I'm printing some 30x40's for an upcoming show using this tray...and down the road I'll likely build a larger tray of the same design to do 40x60's. Will still fit over my sink... although I might need to up the amounts of chemistry for this. Here are photos:
John this is great advice and the pictures really help. I was trying to visualize something like this with buckets.
Your system design makes sense.
Thank you!
Tin Can
 Posting Permissions

 Reply With Quote
Bookmarks