Page 1 of 2 12 LastLast
Results 1 to 10 of 13

Thread: Dis-assembly of DURST Laborator 138 for storage.

  1. #1

    Join Date
    Jan 2012
    Location
    Montréal, QC, Canada
    Posts
    72

    Dis-assembly of DURST Laborator 138 for storage.

    Several years ago, I was given a Durst 5x7 Laborator 138 and all the necessary accessories, for enlarging from 35mm to 5x7 and everything in between. When I picked it up, I took it apart into three pieces, base, bottom column, and top column with head and fitted it into my Toyota Echo. I put it back together and now I want to put it away for a year while I expand my darkroom. Problem is, I can't seem to remove the top column and head. I consulted the manual, the section on assembling the enlarger, so I worked backwards and started to remove the top section

    Click image for larger version. 

Name:	P1060041.JPG 
Views:	69 
Size:	155.9 KB 
ID:	148888Click image for larger version. 

Name:	P1060043.JPG 
Views:	61 
Size:	168.9 KB 
ID:	148889

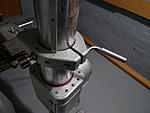
    I loosened the black knob on the left at the top of the base column and the clamp on the right. I tried to pull the top column section out of the bottom cylinder but nothing happens. What do I do Now????

    Thanks!
    Last edited by Bogdan Karasek; 26-Mar-2016 at 15:34. Reason: missing word

  2. #2
    Ginette's Avatar
    Join Date
    Jul 2008
    Location
    Montréal suburb, Québec, Canada
    Posts
    463

    Re: Dis-assembly of DURST Laborator 138 for storage.

    You do the right thing Bogdan but it is harder to pull out than to put onto!
    First you can remove the grey head part, 4 Philips long screws under the head.
    Then you can put the enlarger horizontally, it can be easier to pull out the upper column section. And it can help to have a second person to help you!
    My Lumen project http://ginetteclement.com

  3. #3

    Join Date
    Jan 2012
    Location
    Montréal, QC, Canada
    Posts
    72

    Re: Dis-assembly of DURST Laborator 138 for storage.

    Are these the long Philips screws you are referring to to? Do I have to take out the 4 screws completely or just loosen them so that the head can slide out.

    Click image for larger version. 

Name:	P1060049.JPG 
Views:	61 
Size:	168.0 KB 
ID:	148895Click image for larger version. 

Name:	P1060050.JPG 
Views:	51 
Size:	155.9 KB 
ID:	148896

    Am I on the right path, Ginette?

  4. #4

    Re: Dis-assembly of DURST Laborator 138 for storage.

    Those are the right screws. Loosening them should allow the head to slide out, you don't need to remove them.

  5. #5

    Join Date
    Jan 2012
    Location
    Montréal, QC, Canada
    Posts
    72

    Re: Dis-assembly of DURST Laborator 138 for storage.

    Thanks Jason. Will get that done tomorrow morning.

  6. #6

    Join Date
    Mar 2011
    Location
    Germany
    Posts
    475

    Re: Dis-assembly of DURST Laborator 138 for storage.

    I can see that your head is on half flag only.
    It's very important to bring him to the top before unscrewing anything.
    The mechanics inside the rod has so much power that the rod may become something like a rocket.
    Some years ago I stupidly knocked my wife with this rocket rod.
    The other thing is that not bringing the head to the top after usage will result in a weakened spring inside.

    For disassembling I would move the head first, like Ginette has said before; the 4 screws are directly under the head and they connect him with the negative unit.

    For disassembling the two rods, you have to ensure that after removing all screws, the top rod is possible to move easily 360 degrees left/right .
    If not, there must be another fixing screw.

    Ritchie

  7. #7

    Join Date
    Jan 2012
    Location
    Montréal, QC, Canada
    Posts
    72

    Re: Dis-assembly of DURST Laborator 138 for storage.

    Thanks for the input, Richie,but how do I bring the head to the top of the column? You mention "The mechanics of the rod......." which rod are you referring too???? the top column thaT holds the head? Bit confusing???? Could you please clarify your 1st paragraph! You seem to imply that there is a danger in removing the head.

    Thanks!

  8. #8

    Re: Dis-assembly of DURST Laborator 138 for storage.

    The head assembly is not at the top of the column. You should raise it to the top of the column (as if you were making a bigger print) before you pull the head off. The springs are really powerful, and without the weight of the head and condensers can be dangerous. My wife also got attacked by it.

  9. #9
    Ginette's Avatar
    Join Date
    Jul 2008
    Location
    Montréal suburb, Québec, Canada
    Posts
    463

    Re: Dis-assembly of DURST Laborator 138 for storage.

    Quote Originally Posted by Bogdan Karasek View Post
    Are these the long Philips screws you are referring to to? Do I have to take out the 4 screws completely or just loosen them so that the head can slide out.

    Click image for larger version. 

Name:	P1060049.JPG 
Views:	61 
Size:	168.0 KB 
ID:	148895Click image for larger version. 

Name:	P1060050.JPG 
Views:	51 
Size:	155.9 KB 
ID:	148896

    Am I on the right path, Ginette?
    No, don't unscrew any screws on the colomn, only the black button and the L shape handle should be enough to slide the column out.
    The 4 screws I told you is for removing the gray head part (where the mirror and lamp are) if you put the head fully UP and look with a flashlight, you will see the 4 screws under the head. Not an obligation to remove the head, just to remove fragile parts before putting the enlarger on ground.

    Here some pictures I made in the past for my Durst 138 buyers. Click image for larger version. 

Name:	colomn split handle.jpg 
Views:	72 
Size:	29.8 KB 
ID:	148907 Click image for larger version. 

Name:	head 4 screws.jpg 
Views:	71 
Size:	45.1 KB 
ID:	148908 Click image for larger version. 

Name:	leg split handle.jpg 
Views:	68 
Size:	50.3 KB 
ID:	148909 Click image for larger version. 

Name:	tabletop removed.jpg 
Views:	64 
Size:	83.1 KB 
ID:	148910
    My Lumen project http://ginetteclement.com

  10. #10
    Ginette's Avatar
    Join Date
    Jul 2008
    Location
    Montréal suburb, Québec, Canada
    Posts
    463

    Re: Dis-assembly of DURST Laborator 138 for storage.

    It will be easier to remount if you keep the top column that way.
    Attached Thumbnails Attached Thumbnails top.jpg  
    My Lumen project http://ginetteclement.com

Similar Threads

  1. Durst CLS 301 on Laborator 138
    By Aldo in forum Darkroom: Equipment
    Replies: 20
    Last Post: 8-Apr-2013, 13:04
  2. Durst Laborator 54???
    By Fourtoes in forum Darkroom: Equipment
    Replies: 11
    Last Post: 1-Sep-2010, 01:11
  3. Durst Laborator G 139
    By Thomas Douglass in forum Darkroom: Equipment
    Replies: 3
    Last Post: 5-Feb-2002, 04:49

Bookmarks

Posting Permissions

  • You may not post new threads
  • You may not post replies
  • You may not post attachments
  • You may not edit your posts
  •