


How long a cable release is required for mounting though the channel in the grip? It appears (based on Kickstarter photos) that an 18" will work.


How long a cable release is required for mounting though the channel in the grip? It appears (based on Kickstarter photos) that an 18" will work.


If you look at my first setup I immediately modified the grip handle with a slot, to allow a shorter cable to be used.Originally Posted by HMG

Now we are into using and modding the camera/ This should be a new thread.
Perhaps the Mods can move this thead starter to a better location?
Hello Oren!
Tin Can
So cool! That's a great idea.
Without modification, you should be able to thread a 12" cable release through the utility grips, but it can be unwieldy if you throw the whole rig in a bag (the cable can get crimped/bent). I wish we had the ability to add a hole to the grips!
Done - carry on!
Just checking in.
Let's rock!
Tin Can
Maybe some cannot find this. Here is my first Travelwide mod.
I probably would not have thought of it, if I hadn't seen a similar solution on A FOTOMAN camera and since I have 3 dozen of these short German NOS shutter cables I try to dedicate one to a camera as needed. (none are for sale, I bought a large Lot of them on eBay}.
Some have asked, what length cable fits? I don't know because I did this. I made center punch dents in a row and drilled them out with a cordless drill. I hand filed it all until my cable could pass through. The cable chrome part was loose at top and I applied 2 layers of gaff tape to make it stay in place, when pushed into the top hole. Then I gaff taped cable and slot. Gaff tape also improved my grip. I drop everything. Pita!
Tin Can
1.To Ben, Oren Grad, Randy Moe, Kellog & et al.
Fist of all let me say congratulations to Ben and Justin for very successfully completing this long journey testing your patience, tenacity, and perseverance . I hope it's your spring board to life.
When I first heard of the complication with the ground glass screen I wasn't surprised. I once worked for a tech company and plastic bezels were in my domain. Getting short runs to match was difficult and even longer runs could go crazy if the hoppers had to be refilled or the heat got out of control. We had our best luck with the Duralith company out of Millville, NJ. They showed us the most and best samples but always seemed to have trouble reproducing them. It's like playing horse shoes. You can get close.
If you are going to be a true P&S person and shoot from the hip don't bother with the below discussion.
At first I thought, no problem I'll just buy a GG and drop it in. That was before two things happened: 1, I received the TW calibration screen and saw its multi-sided/shaped & dimensions. 2, In January of this year I lost an eye due to melanoma cancer and my good eye isn't that good. I don't see well into the dark and my depth perception is poor.
So, no drop in GG, and I was really liking the one from Deardorf. Instead I'm going to cut an opening in the TW calibration screen an fit in an acrylic GG to regain brightness and ease of focus. There are three obvious questions: Where do I cut the opening in the TW Screen and how do I cut it and what size do I cut it to. Of course each question begs a clutch of follow up questions such as, are the TW plastic and the Acrylic GG the same thickness? Can they be bonded with glue or require a mechanical attachment?
This is the point where I beg Ben, the forum members and the brotherhood of TW owners for ideas and help with this modification. I have made a list of questions for Ben that might help the process.
1. What type of plastic is the TW focusing screen made from? Is it a high temp melt like polycarbonate or a low temp melt like Styrene? What is the mold temp? This will help in my tools choices.
2. Is there a datum point that measurements can be taken from? If not are the knock out pin marks symmetrical and equally spaced? What is that on center spacing?
3. Is there a film position offset left or right? Where is the exact placement on the TW screen the film should line up to? I know it should mimic a film holder's location.
4. What is the plastic thickness of the screen frame walls? I measured them from 6 locations on 3 sides, (the curved wall could not be used), and averaged those measurements out to 2.48 mm. The curved end wall varied between 2.86 & 3.05mm. All measurements were taken with calipers I purchased at Harbor Freight (possibly not accurate).
5. Is the screen panel portion the same thickness as the walls or different? If different, what is the thickness of the screen portion? I measured the depth at the same locations, first from the viewing side and then to the film side, from the top of the walls to the viewing panel surface. They were, TL 6.12mm & TR 6.35, and BL 6.19mm &BR6.21, and averaged 6.21mm. The film side, the most important side were, BL(TL) 4.82 & BR(TR) 4.76mm, BR(TR) 5.21mm & 5.31which averaged 5.02mm. Subtracting the average depth numbers from the total wall height of 13.15 leaves 1.92mm thick for the focusing panel? Is it? It would seem it is also about 1mm out of plane. Probably my eye.
6. I noticed the screen placement panel is not equally set, up or down, in the walls around its perimeter. Wall height around the outside perimeter dim. is 13.15mm on 3 sides.. I measured 4.76-5.31mm from the film emulsion side to the top of wall film side. Average, about 5.05mm. What is the correct offset?
7 .All these dimensions should be on the pre-mold drawings. I realize some of the questions seem like duplicates asking for the same answer, and they are. I want to make sure we're on the same page and that other TW owners might understand what I'm asking for.
8.Please correct me on any mis-measurements!
9.Also, will any TW focusing screens be available in case I screw this one up.
I mentioned above that I liked the Deardorf GG, it's great quality for $60,00, but as soon as I received my TW I re-thought it. The camera is so lite it almost floats out of your hands, so I found a very durable acrylic GG maker from Bohemastudio in Lodz, Poland thru ebay.com. He custom cuts to size and makes grid lines and non-grid GGs. I think cutting the GG 5mm over film size on all sides might be a good size. He does business thru ebay so look for him there. I'll be messaging him soon.
Happy trails, & thanksgiving
I modified this DOF chart for a more pocketable version. Haven't done it yet but need to calculate a f6.8 column for my Angulon.
I like! I get closer. I'm shooting people at 3 ft. I sighted in for 3' and try to guess 3'. I should probably use a string to raise the weirdo old man factor. That's my next mod!
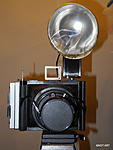
I keep getting people saying they blinked from the flashbulb. They blink late and I get 'eyes wide open' not shut... They ask for a second shot. I am training them not to expect a second chance.
Then I tell them pics will be ready tomorrow.............
Next I stop scanning and only show them prints.
ps for nervous nellies. I AM USING FLASH BULB COVERS OR SHIELDS!
I am finding flashbulbs give a different 'texture' perhaps from movement? No 1/10,000 sec freeze.
Tin Can
Unfortunately, Schneider doesn't say with the charts what CoC criterion they used - it's worth checking against a DOF calculator to see what it is.
 Posting Permissions

 Reply With Quote
Bookmarks