
Don't worry about the reverse function. It's over-rated.


Don't worry about the reverse function. It's over-rated.
Okay. Here's my step-by-step ... Your mileage may vary. Please be really careful inside this thing. There is some serious voltage kicking around quite close to the places you need to mess with things...
TURN OFF THE MACHINE AND PULL OUT THE CORD!
1. Get the lift off (if you have it). There's a white knurled knob at the back down from the outlet hose under the lip. Unscrew and remove it. Now lift the back slightly and slide the whole lift mechanism towards the drum end. It has two screws in slots that it should slide off. You may need to exert some pressure but be careful - the case is easily cracked.
2. Undo the four screws holding the plate that the lift attaches to to the controller area. Remove the plate. Now you can access all the screws (6) holding on the cover. Remove all 6 screws and pull the 3 control knobs off. Now you can carefully lift off the cover. The thermostat light will remain attached, just set the cover over to the right where the drum would go.
3. Undo the screw inside the drive gear and remove the gear. Be careful not to lose the brass collet inside the gear that holds it on the shaft. You'll need it later!
4. Get the old motor out. Disconnect the orange and purple leads from the circuit board. Undo any screws and pull the old motor out. You need to pull the motor apart to retrieve the drive shaft. I just kind of prised it open. It's full of really hideous white grease. I used side cutters to remove the last plastic gear from the shaft. It took some effort to get it off.
5. The new motor fits the existing drive hole perfectly. But you need to drill 2 holes about 6mm from the shaft to attach the motor to the case. I used 6mm computer hard disk screws to hold the motor on. They fit perfectly.
6. I cut down the old 1-0-2 motor speed pot on the circuit board so the new variable speed pot from the new speed controller would fit. You could just find a new spot for it if you want. I just used a hacksaw blade to cut of the shaft and top of the pot leaving it on the circuit board and fixed into the 2 position. This supplies about 20v to the new speed controller. If you do it my way you'll also need to adjust the case cover so the old knob will fit on and be useable. It was a bit of a pain. If I was doing it again - I'd just put the new one next to the old ... much easier.
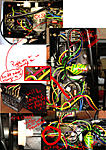
7. Attach the speed control unit some where ok on the outside and make a small hole in the case edge for the cables to go. Cable it up. If you look at the pictures - I ran the negative from the existing circuit terminal straight out to the speed controller negative terminal. Then the positive to the motor and to the controller. And the controller terminal to the motor.
8. Cut the old shaft down. This is a bit tricky because it's basically impossible to measure the correct length. I got it on the second try. If you cut around 40mm from the shaft you'll be about right. You just need to be within about 5mm anyway. I use a hack saw and a pair clamping pliers to hold the shaft. It's not easy but it's not too bad either. I used a 6mm shaft joiner to join the piece of old shaft to the new motor drive. Attach the joiner first and then the attach the drive gear to the shaft using the collect you saved earlier. Now put the other end of the joiner on the motor drive and tighten up the grub screw. The new motor has a hemispherical end on the shaft. I put the screw on the curved part. If you can get a 4.5mm to 6.35mm joiner that would be better! I couldn't so mine is a bit off centre as it rotates. It still works fine though.
10. Put it all back together again. Make a plastic cover to stop liquid getting into the speed control unit. You just need a "roof" to deflect any liquid away.
11. Give it a test. You should have continuously variable speed all the way from nothing up to near 70rpm!
Parts list (I got everything from Jaycar Electronics here in Australia):
1. 9 - 28VDC 10A PWM Motor Speed Controller You could look for something able to reverse as well if that was important to you... :-)
2. 12V DC Reversible Gearhead Motors - 36RPM This motor is 36rpm @ 12v and 72 rpm @ 24v. It has about 2.5 times the torque of the existing CPE2 motor.
3. 6mm Female Shaft Joiner If you can find one the does 4.2mm to 6.35mm you'd be spot on.
4. Some cable and some terminators
Total cost was about $70 ...
Thanks. I'm not!Originally Posted by michael slade


Not a belief but a fact, you haven't seen the problem yet, good luck with that.
It is not a fact until someone actually provides some detail and evidence of the physics along with their own results of both a reversing and non-reversing drum. Calling it a fact doesn't make it one. It also doesn't actually advance this conversation. I am yet to have a poster actually describe the terrible fate that awaits me.
There's a Jobo Drum Reversing religion! Who knew?
Couldn't be more true

well done, heres to hacking the system!
through a glass darkly...
I am not in competition with you so relax.. keep going the way you are and good luck with that.
Hi Bob. Yeah I know it's not a competition. And I'm pretty relaxed. What I guess I meant though is that I am genuinely interested if there is evidence or detail to the claim around reversing the drum. It would be interesting to explore the reasoning and have a discussion around it. I just found it a bit frustrating to get told it is an absolute with out the supporting detail because it's not enough to come to an informed conclusion. It also means none of us learn anything. My current evidence shows it to be unnecessary. That could change with further processing runs. But if you have clear evidence I'd be very interested to have the benefit of your experiences. As I'm sure would many others.
As I said, I am more than willing to get my drum to reverse if it can be shown to be required. And its certainly achievable. But without evidence I don't know whether to even try.
I have experienced a shop closing for film process situation with Rotary Process.
I have used Jobo since 1993 and for 10 years no problem, about four five years ago we started to get Road Ruts, vertical minus density marks in the film that mimicked the rotation of the processor. these showed up as dark lines in the print so it was minus density, along the whole length of 120 film in Pyro and in D76.
For the life of me we could not figure it out , we tried everything, stopped processing client film and concentrated on fixing the solution.
It turns out that Toronto has a funny water system , and its different at times of years, I have noticed this with Hypo Clear and just recently iron Blue toner.
the solution was to hand rotate the film during these periods. BEFORE STARTING THE MACHINE ROTATION, THIS MEANT INVERSION JUST LIKE YOU WOULD WITH A STAINLESS STEEL HAND SYSTEM, **I am not yelling here but very , very important action to solve our problems.
Now we watch for water issues. I can only say with single direction rotation, a change of water condition in your darkroom and your single rotation method will give you nightmares... I may have not show its ugly head yet but it could.
Also you are stating you are doing E6 which like C41 is a much hotter solution which would make me think the emulsion would accept the chemicals much faster. I have only noticed this problem with 20c processing. Pyro was the worst.
I have talked about Laminar Flow before, , I am not sure that I am describing it correctly but film requires the emulsion to open up fast , accept the chemicals fast , and start doing its mojo fast.
If you have something stopping the chems from getting to a certain area you will get minus density and in our part of the world its road Ruts.
Now I do under stand that in Austraila every thing is backwards/upside down to us, so your road ruts may run the opposite direction.
 Posting Permissions

 Reply With Quote
Bookmarks