
I'm struggling to find any suppliers of CB in the UK. Any suggestions?Originally Posted by Steven Tribe


I'm struggling to find any suppliers of CB in the UK. Any suggestions?

I completed the polishing today and found the rear element of my 360mm apo-ronar also had a fungus smudge. So I took out that element and polished it out as well, which took about 30 min for one face. The first lens took several days, but it was mostly due to the learning curve, molding the pitch, learning all the tricks, etc. Here are some pics of before and after.
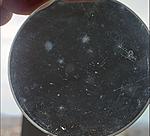
- First pic is the original lens, both sides with fungus etching.
- Second is with front side polished out, the remaining fungus spot is on the opposite side, for which I had to remold the pitch due to different radius of curvature.
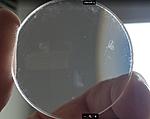
- Third is both sides polished out with a bit of the fungus etch still remaining as it goes a little deep into the glass. But the lens was more than satisfactory for me at that point.
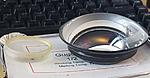
- Fourth is the assembled lens. You can see a white reflection from the front lens (coating is gone) and a purple reflection from the second element behind the first.

Overall, the process may not be worth it for just one lens, as the time and effort spent is more than what the lens is worth. But my personal satisfaction level and morale are elevated significantly. Also I have a bunch of enlarger lenses damaged by fungus and balsam separation that I will work on and provide some updates later.
Last edited by kfed1984; 14-Apr-2024 at 12:12.
Any suggestions for separating the lenses other than heat? The only effective method I've seen is gradual/uniform heating. Also solvent was mentioned.
Plain old plaster of paris to use as a jig for lens alignment is such a bad idea, all gypsum products expand as they set ( from exotherm ) your jig will be loose fitting
and if your plaster mix isn't proper you'll have plaster bits falling onto your glue surfaces. There are some foundry plasters that have very low expansion rates like
US Gypsums Ultra Cal 30. But you're back at endlessly blowing bits off your glue surfaces.
I've never re cemented any lenses, I do have a few brass oldies that could use re cementing, but off the top of my head would be to machine a jig to hold
the lens elements since I have a machine shop. An alternative is to look for a thick wall HDPE or nylon tube that might have the same inner diameter
as your lens elements that you could build a jig to hold the lens elements in alignment for cementing.
I've considered the plaster expansion as a good thing actually. The expansions should not be too great and should facilitate easy removal from the plaster jig.
I thought about making a metal jig, but the whole point of plaster is that it will remember the radial positions of the lenses, since they are not perfectly aligned mechanically but optically. Watching videos of lens cementing and optical alignment, you can see the lens being pushed by hand until optical axii align together, which means that mechanically/radially they will be offset somewhat. And the idea is that plaster will locate the two lenses back to their original optical axii. That will work only if both lenses are aligned angularly back the same way with respect to the jig. So that's my justification for plaster.
In the video below at 3:20 you can see the lenses wobbling a bit relative to each other after optical alignment. Meaning that mechanically they are not aligned in the radial position. But maybe that's just my perception. Share some thoughts.
https://www.youtube.com/watch?v=kIa42sOWG0I
Last edited by kfed1984; 13-Apr-2024 at 18:54.
Yes I hold a membership at Photrio.
Most of them will be purchased online anyways, so does it really matter if in UK or not? I've seen 100ml bottles online for 60 euro. I wonder if all it is, is tree sap dissolved in some solvent.
Also, what is so difficult about UV resins? Difficult to separate afterwards?
There is a slight eccentricity of the lens elements, but I don't think that doublet is final, it may be destined for
more grinding if it were to be a final lens or not it was a demo more of the machine than lens making.
I think you have the right idea but bad choice of material for the jig, the lens you're taking apart is already optically
aligned and all you want is to hold it in the same position, I would suggest a hard durometer moldmaking rubber
like a shore 50 either polyurethane rubber or silicone, either rubber would need some mold release for the lens
and possibly for the UV glue. You would have to test the glue against whichever rubber you choose.
The rubber would be a lot more forgiving than plaster when time to remove the lens comes.
The video was interesting in particular how the alignment machine works. You could make a crude approximation
of that machine with PVC pipe, a few pieces of wood for a base ( even lower tech, a old drawer ) and a vacuum cleaner.
You're not going to get micron accuracy.
For couple of reasons PVC pipe would work, it's cheap and readily available, it's easily worked, and it's soft so the risk of scratching is less.
The alignment machine in the video uses a light vacuum to hold the element in place so that it can tapped into optical alignment, then adjusted to hold,
a house hold vacuum cleaner should work, even a hand vacuum. You would have to port the the pipe jig so that it's not a full vacuum to adjust
then more vacuum to hold, you probably wouldn't need the full vacuum suction a vacuum cleaner would supply.
Ok that makes sense now. I took out some of my separated lenses and they look like they've been edge-ground after cementing. So optical alignment is purely angular in a concentric jig. I could technically use the lens body as a jig, after coating with mold release, or the lenses could be held with aluminum tape and aligned with a straight edge. The optical alignment in the video did not look like it required a precision of more that 0.001".
I'm not sure if a vacuum jig can be a helpful air for balsam repair, unless I have the complete optical setup in the promo video.
Last edited by kfed1984; 14-Apr-2024 at 13:25.
I'm now thinking if both lenses are same diameter (like the one on above-left) I could rest them on a surface plate against a v-block. That should be more accurate than any other method. For the other lens above-right, I could set two v-blocks on top one another for two lens diameters. Maybe not actual v-blocks but something rigged up to function like v-blocks, clamped with thumb screws. Then it can be used for all kinds of lenses like an adjustable jig.
Last edited by kfed1984; 14-Apr-2024 at 12:31.
 Posting Permissions

 Reply With Quote
Bookmarks