
Yes. Scanners are designed to scan normally developed film.Originally Posted by Ken Lee

Ken's scanning instruction is excellent.


Yes. Scanners are designed to scan normally developed film.
Ken's scanning instruction is excellent.
I did another test while waiting for the step wedge and BTZS book. Just 30 seconds longer development and a little bit more agitation totally blew out my highlights. I'm not so sure I like Delta in Rodinal but won't give up quite yet.
Pere,
I'm a little confused. The T2115 has .15 steps (1/2 stop) so am not following your math. But there is another issue I'm having using SilverFast and Epson V850, and that is when I scan the step wedge I see distinct steps up to about step # 14 then they are all the same white, without any further steps being distinguished. I'm using a profiled NEC monitor and have turned off all image enhancements in SilverFast. Any help there appreciated. I think I've successfully nailed down my ISO but with a washed out step wedge don't know how to proceed. My negatives look a bit over developed as my Zone VIII have little to no detail or texture. Rodinal 1:50 with Delta 100.
An step is not exactly half stop (but close), see this table: http://www.stouffer.net/T2115spec.htm
#14 is just 2.0D, your scanner may see way, way beyond that density. You have to dig a bit about the scanning:
First you should not scan auto, go to Histogram and set scanning limits to take all the range.
Second you have to scan 16 bits per channel, and then save it in TIFF format, because if not you only will have only 8 bits per channel, this is 0-255 values that will deliver the effect you say. Scan 16 bits, configure Photoshop sampler to 16 bits and see 0 to 65535 values that will show you the differences in all density range.
Note that te image may look dull, because the scene/negative may have a larger range than the monitor, so you may see compressed tonality, anyway it would be good to check densities.
To know if you are making a Normal development see if the Z-VIII has the standard density from the Normal contrast.
Feel free to ask anything, here or in a PM. I'll be happy if I can help.
Thank you Pere. I didn't see that table on the Stouffer website. I'll double check everything i'm doing, I appreciate it!

I use a mac to drive both my scanners and in (library - I think) you can find a colour meter which can read LAB numbers or Greyscale for that matter.. Since L is luminosity and reads the image from 0 Black - 99 white you can use the meter to read the physical numbers. I think in ranges of 10 whereas the shadows start in the 0-10 L range, quarter tones 25-35 L range , Midtones 40-65 L range, 3/4 tones 70-80 L range and highlights from 80-99 L range.
Keeping i mind that there is fall off points for prints at both ends for different papers and process, for example when I am printing B W Silver on my Lambda I can get away with L - 4 for the shadow with perceivable detail in print( any lower number will print jet black even if you can see it through the transmission of your monitor), and 96 - L for the highlight with perceivable detail in print( any higher number will print total white even though you can see it through the transmission of your monitor). For inkjet BW these numbers change to L -6 and L-94 so there is a slight variance.
By understanding these numbers you can channel your knowledge of the historical 10 zone thinking and hold your two end points and then between those two points you can with Curves and other slick PS , Lightroom, Capture One methods create any kind of image you prefer from your original thoughts in exposing the film and development.
The camera stores usually talk about screen balance and nothing is farther from the truth, either the pixels will record on a certain process or they will not , any amount of screen balancing still has you shooting in the dark so to speak, but of course you will own a colour monkey or some kind of spectrometer which will give you the false sense of security that is so common out there.
By understanding this concept you can work at your scanning station with confidence.
This hybrid thing is tough for me, since I came from the traditional wet print. I just did what Pere recommended, and sampling my wedge in PS, I see there are differences in those steps but they are very small. I had not changed PS over to 16 bit in the mode option (but the color sampler still says "8 bit" for some reason). I seem to get the entire range scanned. My ISO is right at 100 for Delta, which by everything I read I'm an outlier since everyone seems to need to shoot with a lower ISO than box, but after three different tests, my development and agitation seem to peg me right there.
Let me repeat:
>> Scan 16bits, all histo range, don't use the "auto" button...
>> Save tiff format
>> In Ps click o the dropper and select 16 bits:
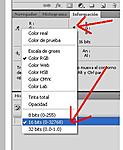
Pere, I'm not scanning in Auto mode. But in PS I do NOT have that option on the eyedropper to select 16 bit for some reason? I have the latest version of CC.
Forget it, found it. Thank you.
Laminarman,
Everything is all right...
You see step 14 as the upper limit of density that your scanner can distinguish. That is the density above which your highlights blow out.
In terms of density, 14 steps is 7 stops. But in tone reproduction terms, with normal development you can cover a subject luminance range of double that (about 14 stops) which can be picked up by your scanner.
That's because you would usually develop your film to a contrast of about 0.5 to 0.6 where (in the straight line portion) film produces about a half stop of density gain per whole stop of greater exposure.
The "curve" would look kind of like a 30-60-90 triangle (Not a 45-degree triangle which would be a curve of unity which some ancient processes enjoy).
The normal scene is about 7 stops (5 in the sun from black to white plus 2 in the shade) plus there might be highlights that might blow out from being chrome, mirror or glass reflections.
So your overall system has 7 stops of latitude towards greater exposure as-is with a normal scene. You have the flexibility to develop to unity and still fit a normal scene. (You shouldn't unless you want to prove or demonstrate what is possible). You have the flexibility to expose an ISO 400 speed film at EI 6 and still fit a normal scene (You shouldn't unless you want to prove or demonstrate what is possible here too).
 Posting Permissions

 Reply With Quote
Bookmarks