
Ken, after you scanned the image as a RAW file in VueScan and brought it into Photoshop, what option did you choose on the profile Mismatch dialog box ?


Ken, after you scanned the image as a RAW file in VueScan and brought it into Photoshop, what option did you choose on the profile Mismatch dialog box ?
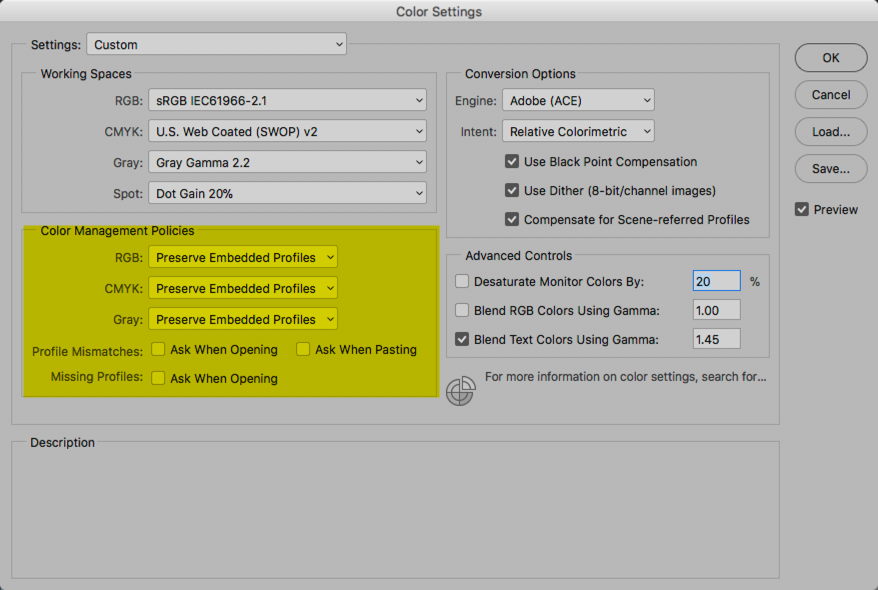
I don't get a profile mismatch prompt because I have them all turned off.Originally Posted by IanBarber

I'm no expert but my workflow is rather simple, 99% monochrome except for snapshots.
For printing I work in Gray Gamma 2.2 because that's what Piezography uses with Quadtone RIP. For making JPG files for the web I use sRGB.

Good work guys.
My guess is that when you bring the RAW scan into Photoshop, it will be an untagged negative. To get it to a positive, are you just inverting the image and then applying the Gamma 2.2
In these tests I have made low-res scans of a positive (a recent print) because it's easy to spot a faithful rendition when we can see the original. It's easy to tell that the 3 scans made with no adjustments (Epson with adjustments disabled, Apple Image Capture and Windows Scan) all resemble the original print and closely match one another. Similarly, it's easy to see that the VueScan raw file is dramatically different, as no Gamma adjustment has been applied.
Normally after scanning a b&w negative I explicitly convert it to Gray Gamma 2.2 and save it in Photoshop PSD format. (When acquiring a raw file from my digital camera, I do the same thing.) I perform all corrections and printing in Gray Gamma 2.2.
If I make a JPG to put on a web page, I convert to sRGB.

Ken, this is tremendous, thanks for updating your tutorial and sharing it. For black and white, I had migrated to the 0-255 slider settings, influenced by my C-41 work.
For gamma, with C-41, do you have suggestions? With color negative, correcting for the orange mask means either adding or subtracting data (or multiplying or dividing, depending on your workflow). In this situation, clipping, particularly of highlights, needs to be avoided. It is challenging.
Have you done tests with Epson Scan gamma set at values other than 1.0 or 2.2?
I have scanned color negatives at gamma 3.0 and 4.0, all other settings per your tutorial, save as .tiff. Higher gamma in Epson Scan shifts the negative histogram to the right. For box-speed-exposed Portra 400, the histogram falls almost in the middle, which is helpful for subsequent color correction work. I find that box speed exposure of Portra 400 with gamma 1.0 or 2.2 easily results in clipped highlights after color correction (orange mask and color balance).
Does Epson Scan gamma setting change data acquisition from the sensor, or is it a software manipulation?
Thanks again, this is valuable and helpful.
Yes of those options the Vuescan raw, is the only one unchanged in anyway. (There are a few ways to save raw in vuescan, that will allow minor corrections BTW).
I don't know anything about Apple Image Capture and Windows Scan, as they are 8 Bit?, I won't comment on them as they are probably a distraction.
Back to epsonscan, it is my understanding that if you scan a positive per you instructions, it will be same as the viewscan raw with the following adjustments:
1. the sRGB gamma applied
2. the colors are adjusted to match the sRGB color coordinates.
The later is point is very minor, I asked Ed Hamrick (vuescan author) about it, but he is not keen on divulging those kind of details. To be fair I can't imagine epson would help either...
But it is important to note, that if you are dealing with a negative, all the scanning programs will apply their respective algorithms to invert the negative.
Most people want an image in sRGB, or something very similar in anycase, so it's important to understand the context.
You're welcome and I very much appreciate the helpful information shared by others here and elsewhere. Ted has provided several valuable missing links.
I've done very little scanning of color materials: hopefully there are tutorials on the web which cover the issues. Positives are hard enough, but negatives are more challenging because we never know what they "really" look like unless we scan a calibration target (hint hint).
Being merely a consumer of these consumer-grade Epson scanners, it's not clear to me whether any adjustments we make via scanner drivers affect the process before image acquisition (aperture, exposure time, lamp brightness in physical terms or gain or other attributes in electronic terms) or whether all the adjustments we request are performed in software, after image acquisition. To be certain, you'd have to know the API (application program interface), namely the protocol by which the driver software talks to the scanner. Making matters worse, not all APIs are published by the manufacturer: sometimes vendors publish only the basics and keep the good ones for their own use, or make them available only by license, to protect their intellectual property.
From my experience with VueScan when scanning black and white negatives.
When setting the Output to Raw even if you make any additional changes to exposure, curve adjustments etc, those adjustments are not carried over when you press scan.
The scanned image (negative) should have a gamma encoding of 1.0. When importing to Photoshop, it should be assigned the same gamma value of your grey working space (gray gamma 2.2)
Now, the image needs to be inverted from a negative to a positive and this is where things in my opinion can get tricky. A simple invert does not seem to do a very good job but the ColorPerfect plugin on the other hand does a very good job with the inversion.

Jeez all the years I've been scanning, I've been scanning RAW... but no clue what gray gamma PS is set at. I'll have to check when I get home.
YouTube Channel: https://www.youtube.com/user/andy8x10
Flickr Site: https://www.flickr.com/photos/62974341@N02/
Instagram: https://www.instagram.com/andrew.oneill.artist/
 Posting Permissions

 Reply With Quote
")
Bookmarks