
Please explain how you cut the rolls and keep the paper flat.. Also, if you like you can post pics and diagrams of darkroom setup to illustrate your methods..
Thanks Steve


Please explain how you cut the rolls and keep the paper flat.. Also, if you like you can post pics and diagrams of darkroom setup to illustrate your methods..
Thanks Steve

Hi Steve,Originally Posted by Steve M Hostetter

I've focused my work on making large prints, the largest of which has an image size of 53"x68-70" archivally processed and toned with sepia, gold and selenium.
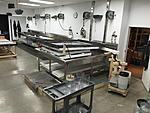
I have a large table with a dowel at one end where the paper can be rolled out and cut (illustrated in the back left of the photo I've attached). I found that this was the best way to get consistent cuts.
Keeping roll paper flat is next to impossible because it always wants to curve back into shape. But if you plan to scroll process like Clyde Butcher or drag your prints from tray to tray, the curve in the paper isn't so much an issue.
I personally stayed away from the scroll method because I felt that I was overhandling the print and was limited in processing techniques. Dragging prints from tray to tray definitely works but I found that I wasted a ton of chemistry, it took up a ton of space, set-up and take down was really time consuming, and that it was extremely difficult to do - even with two people - at 50" and 56" paper width sizes.
I developed a one-tray method made up of a large tray with holes at one end that a gutter system will sit under. The tray is able to be positioned at a slight incline such that the gutter will return chemistry to me. The gutter is literally a gutter and the piping is ABS. I have a dedicated developer, fix/hypoclear, selenium, etc gutters/pipes. This allows me to pour my developer (8L), stop (8L), fix (8L) all of which are used in a one shot. I'm also able to plug the holes and fill up the tray for washing or for hypoclear (20-40L), selenium (20L), thiocarbamide (20L) and GP-1 (20L) which is either rocked or poured. My washing is extremely efficient as I can get more than 6 exchanges of water in 30 mins, filling up, rocking, drain, repeat.
To keep my paper flat for pouring I presoak for a good 5-10mins before heading into the developer.
Attached are two pictures, the first illustrating a 56"x80" print being washed, the second showing the tilt-up and gutter application. I hope some of this helps and gives you some ideas.
Best,
Michael

I have printed 30x40 prints, paper from a roll dispenser (invaluable), homemade easel using sheet metal strips (painted with matte paint) taped down, tray processed.
Uneven development should not be an issue since most are developed to completion. I never experienced a problem with that.
The paper has to/should be rolled going from the easel to tray, unrolled into the tray. Using a foam swimming pool "floaty" to help roll the paper going from developer tray to subsequent trays helps prevent crimping too. Clyde does that I believe. At about $32 per sheet (32x40) it pays to be careful with the wet paper.

I found that using RC paper is a lot easier to handle when making very large prints than FB.
The paper is much stiffer when wet and does not crimp so easily.
A second person and access to both ends of the tank are absolutely essential, as are regular kitchen rubber gloves - as you need to get your hands in the chemicals to lift/move the paper.
The only other way I have heard of (but never seen) is to have a single very large tray with a drain hole in the bottom at one end - and you keep the paper in the tray and you pour the chemicals in and then drain them out - one at a time - but be prepared for lots of chemical wastage.
Martin

There's a rental darkroom (huge darkroom) in downtown San Francisco that is equipped to process mural-sized prints. They supply everything except the toners and paper.
Thomas
Keep in mind the old (usually true): If you can't make it good -- make it big.
Wilhelm (Sarasota)
This thread has motivated me to print a certain negative at 20x24 tonight!. I printed it at 8x10 in the past very successfully but it screams to be printed BIG. Because my largest easel is 20x24 and my enlarger is mounted on an enlarger table, 20x24 is the largest size that I can print at home. Rather than messing with multiple trays, I bought a flat bottomed Cescolite tray and will process the paper in this one tray - just like I do salted paper. Can pour the developer back into the beaker and then wash the tray with the water stop, drain, fix, etc.
Thomas
On using RC paper. I don't believe you will find any fine printer using it for finished prints.
Ask Clyde Butcher about using RC paper. He's not the only one who got bit by the stuff.
I'm on my third large roll (42"x98ft.) of Ilford Classic, generally souping in Moersch 4812...and have not (yet) had any of the mottling problems mentioned earlier. Would love to hear more users of this paper chime in to get a broader sense of this "problem."

I have used a few rolls of this and have not seen any mottling as well. I see no problem . Mottling usually is a issue with mechanics of getting paper into the developer , and or, not stopping the development fast enough.
Grey background are significantly difficult and if one does not have the emulsion covered within the first 15 seconds then trouble will occur.. Very complicated images will show less issues than flat grey scenes due to camouflage.
 Posting Permissions

 Reply With Quote
Bookmarks