
I use hangers and Pyrocat HD. I think, but can’t prove, that the developer hardens the emulsion and reduces scratches.


I use hangers and Pyrocat HD. I think, but can’t prove, that the developer hardens the emulsion and reduces scratches.
I used X-ray film before using paper negatives but I rarely avoided scratches. I got scratches in the trays but mostly when I loaded them on the film holder.Originally Posted by Jim Noel

Paper might be more expensive when new but I get expired ones for a lot cheaper than X-ray film and I never had problems with paper up to 40 years old.
X-ray film also gets fogged easier under a safe light and I like to see and control the development process in the tray.
I use Paterson trays to which I glued a glass (from Home Depot) which I cut to make fit close to the inner edges and before gluing it, I sanded the edges. Not a scratch ever again!
I also use kodafix which is hardening but of course that only protects after the fixing stage.
Always handle it with gloves and keep in an archival envelope.

I understand all of what you wrote here. I have a dimmer on my RED safe light so this will help with the fogging. I make my fixer from Sodium Thiosulfate and alum with some Boric Acid and some Acidic Acid. I will get some "Kodafix" and use that with the experiments as well.
I will continue to use the stainless 4X5 carriers and develop by inspection in the very dim safe light.
I do have over 3,000 sheets of 8X10 and some precut 5X7 paper in stock. I am 74 YO - so I think that I have enough to carry on for a few more years I shall be working with photography. ;-))
Thank you.
Toplecca di Sopra - Tuscany - Italy
Aulacodiscus Margaritaceus var. Debyi. 50 enlargements.
- Microscope: Zeiss Photomicroscope II
- Lighting: 60 watt tunghsten lamp
- Objective: Wild 10/0,45 Fluotar with 8 mm spacer
- Condenser: Zeiss INKO DIC III Generation - Prism I - Slide 40/0,65 Plan
- Eyepiece; Projection Eyepiece Olympus FK 2,5x
- Others: Beam Splitter Zeiss Tessovar 0,5x
- Lightmeter: N/A
- Exposure: 30 seconds
- Film: ILFORD MULTIGRADE IV RC Paper - 6 ASA - size 4x5"
- Developer: ILFORD PQ UNIVERSAL 1+9 - 2 minutes at 20° C
- Stop: ILFORD ILFO STOP
- Fixer: ILFORD HYPAM FIXER
- Scanner: EPSON V700 and EPSON Scan 3.81
- Software: Adobe Photoshop CS4

Wow! Very, very nice set-ups! I'd been thinking about buying a nice microscope with binocular/camera head, but it hadn't thought of large format films. Very inspiring!
That looks like a set of antique prepared slides, true? That's another thing I've been looking for in antique stores in recent times. I have a 1950's era undergraduate lab teaching microscope, which would enough to see some things.
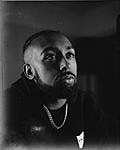
Ive been shooting Paper Negatives on a Sinar Norma 4x5 for the last 8 weeks and it has changed my life. Im obsessed with the whole process. Reading through all the information on this forum has proved invaluable.
Im currently working my way through as many photo papers as I can, each having their own charm and capturing skin in different ways. Even second hand paper off eBay with edges blown out can have satisfying results.

Welcome!
Keep them coming!
We have over 20 years to read...
Tin Can
Take a look at this link for paper reversal process:
https://joevancleave.blogspot.com/20...-progress.html
That is on the list but not until I build a 16x20 sliding box camera!
I feel pretty confident with my developing skills now, so look forward to trying out that reversal process.
For the time being Im happy to continue learning with each shoot and content with working in 4x5.
Ive read with interest that some people have enlarged their paper negatives using a 4x5 enlarger, so next time I see a bargain large format enlarger I will try that. Ive done some simple contact prints using two sheets of glass and a lamp which turned out okay. But theres a lot to learn with regards to printing, that will come.
Anyone have success with enlarging 4x5 paper negatives without digital intervention?
 Posting Permissions

 Reply With Quote
Bookmarks