
I'll watch out for your wife!
I once had my hands covered in Brown Recluse, never again!
Originally Posted by Roger Cole


I'll watch out for your wife!
I once had my hands covered in Brown Recluse, never again!

raid!
Michael Cienfuegos
So, I shoot some studio 8x10, get it developed, hang it to dry,check my messages and this.
"ALL UNITS please refrain from using water for the rest of the evening. Major backup and flooding problems in west end of the building. Please if you don't ablsoutly need to use water, please wait until tomorrow. Thanks"
I have no flooding and no problem, but 30 feet north 2 units do...
This in no way my fault, I am at the very end of the building sewer, and mine nearly dumps into the street.
But, Chicago is in the process of installing a new sewer right outside and they just sewed it up and now this, so, I can't print tonight.

I can't show you a finished darkroom yet, but it's getting closer and closer to being finally done. After spending 16 months renovating our (new to us) house I was given the go-ahead to start the darkroom - in the back part of a separate garage structure in the back yard.
Bear in mind this is a retirement project and is likely the last darkroom I'll have the pleasure of building - and the first on I've been able to build "my way" rather than making do with given constraints, space and otherwise. So progress is moving along a a pace that has to include a variety of commitments, though none of them actually paid work anymore. (a way of justifying said less than satisfying pace...)
I spent a while debating whether I wanted the "big sink" or "trays on counter" approach. I finally settled on a big sink as well as a good bit of counter space. I've spent most of my darkroom time (school(s), home, commercially, etc.) working on counters, but did enjoy the few times I had access to big sinks.
When finished it will be about 8 x 11 feet. First step was having water and a drain run out there (I wasn't going to build "my darkroom" without water if I could help it. Been there, done that, don't care to repeat it.)
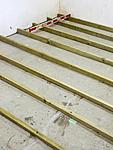
With water and drain in place next step was to make a level floor over the humpedn now patched, concrete. With a floor down I built the sink support bench and an 8 foot sink (MDO with epoxy coating) before building the enclosing wall as it had to be in place first or it wouldn't fit.
An awful lot of little jobs done to get to today's state: floor leveled with vinyl self-lay flooring in place, enclosing wall top and bottom plates in, majority of wiring done (incl. 220V for plate burner), electric baseboard heater and thermostat installed, sink built and in place, drain installed and connected, taps in but not yet plumbed, hot water tank in and wired, but not yet plumbed (tomorrows job, hopefully).
The sink drain installation completion and sink back splash boards (MDO again, cut, drilled at stud locations and first coat of paint applied) were today's job.
I've included a couple of photos...more when it's looking more like a darkroom. (though I've been keeping a running, actually more stumbling than running, post of pics on my Flikr site for my family and friend(s) at http://www.flickr.com/photos/kdlaphotos/. Best viewed from "Sets" as the temporal order is preserved.)
Dave

(window, of course, will be covered...)

Looks great
Dave
Group on 9A/9N South Bend Lathe
http://finance.groups.yahoo.com/group/southbendlathe9

+1 for sure.
This was my first "real" darkroom, to where I didn't have to print in a bathroom. It consisted of two sinks, a Chromega F enlarger with a T1212 Aristo cold lite head and a Beseler MXII with a Zone VI head. The Beseler was mounted inside a closet which could be closed for dust control. You can see a MacBeth TD524 which still worked great the last time I used it (since then sold and replaced with an X-rite 301). A Zone VI developing timer (indispensable), two print washers, Zone VI 8x10 (still have) & Kostiner 11x14 (sold). The SS sink is a Leedal 6' I bought at Helix in the early 1990's (still have). The 4' ABS Delta sink was reinforced with wood to hold the two print washers (since given away). A film developing SS jacket with 1 Gal tanks is under the sink along with a dry mount press. A chiller was mounted behind the sinks in a laudry area. I enjoyed it while I had it, but took up an entire room in my house.
Luis

Last edited by Luis-F-S; 17-Mar-2020 at 21:24.
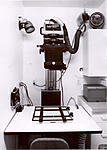
This was my second darkroom, built in a part of my garage. It was about 5' wide by 15' or so long. I sold the Chromega F (mistake #1), and got a Zone VI 5x7 enlarger (mistake #2) which went to a Zone VI II enlarger (mistake #3) and then to a Durst SM-183. On the other side is a Valloy II, a great 135 enlarger. Never cared for the Zone VI enlargers, but loved some of their other darkroom gadgets. Ditched the smaller ABS sink and kept the SS one. A 12x12 exhaust fan was mounted in the ceiling with a second one blowing in under the enlarger table. The Chiller mounted in a small bath area adjacent to the darkroom, you can see the water lines coming through the wall in the 3rd photo to the Leonard control valve (currently for sale in the For Sale forum). It was a good 1 person darkroom and I enjoyed it while I had it. The Durst SM183 consists of a 5x7 head on the L-184 frame. It has a swing arm where the head mounts that can either be swung up (for really large prints) or down as I have it. I have the condenser set and the Aristo cold lite head for it with a compensating timer. A film/print drying cabinet was outside the darkroom.
Luis
Last edited by Luis-F-S; 3-Dec-2013 at 21:11.
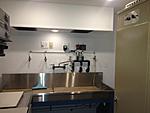
This is my third and current darkroom shown while under construction. It's in an RV garage next to the house. Thank goodness I don't own an RV! My wife wanted a new closet, so we built the closet on a loft and the darkroom on the ground at the end of the garage. I've been posting photos of it in another thread, but thought it was far enough along to show a couple.
http://www.largeformatphotography.in...1ft-room/page2
The SM-183 enlarger is partly assembled, the head is still in boxes. The sink and wet side is complete, the mixing valve gave way to an Intellifaucet K250, I have 4 chilled faucets and one cold/hot faucet. The chiller is behind the wall on the floor all the piping is insulated through the wall. There are two Doran 12x12 exhaust fans mounted above the sink which discharge to the outside. The print drying cabinet is next to the door and barely fits in the approx 8' x 11' space. The Valloy II enlarger sits alongside a Saunders LPL 4500II with both VCCE and dichroic heads. I have an X-rite 301 densitometer which replaced the Macbeth. On the second photo at right side is a Cal Stainless drying cabinet. I think it will work great as a one person space. The lighting is all LED's with dimmers, the two exhaust fans are speed controlled. All the outlets are GFI protected of course. I'll post some more photos of the other side when I put the Durst back together and hang a few cabinets. Post #517, next page. Much of my darkroom stuff is still in boxes, curious as to what I'll find when I open them.
Luis
Last edited by Luis-F-S; 17-Mar-2020 at 21:29.
Luis, the newest darkroom is looking good. I get the impression you spend more time constructing darkrooms than doing photography.Maybe this will be your last one.
Nate Potter, Austin TX., Chatham MA.
 Posting Permissions


 Reply With Quote
Bookmarks