
Yes the Symmar. I was thinking a 3D printed jig with two pockets for the two lenses with different diameters, we covered it a bit earlier. For the lenses of same diameter I could rest the lenses on the side in a v-block.


Yes the Symmar. I was thinking a 3D printed jig with two pockets for the two lenses with different diameters, we covered it a bit earlier. For the lenses of same diameter I could rest the lenses on the side in a v-block.
Well, OK, but typical 3D-printed plastic will not be accurate to 0.001" . Our expensive new machine at work for product mock-ups, might be approaching that level.
The accuracy of internal diameter I can verify with an inside micrometer. If printed with let's say 0.1mm layer thickness, and adjusting the extruder settings, I think it's possible to make a good jig.
For balsam gluing, will it cure by itself if left at room temperature? How long could it take before the lenses can be removed?
Yes it will harden at room temperature. Length of time depends on the amount of solvent (zylene) added to the raw Canada balsam. Days rather than hours or weeks. I use stretched rubber bands ( 4, at least) to maintain the position of the 2 or more single lenses - the V block set-up is hardly mobile!Originally Posted by kfed1984

Helps if you can iterate the dimensions yes.
I would take off the tops of the surface texture with fine emery cloth too.
How are you going to hold the lenses perpendicular to the jig ?
I can imagine you might put the negative element down on its concave side on a piece of glass on a bench, then bring in the jig from the side ?
Are you aiming to use the 300 for contact prints or enlargements ?
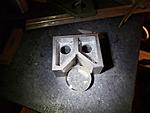
I plan to rest the lenses flat on a surface plate, the bottom of one lens is concave, so it will sit flat on its perimeter. Then I will position them against the edge of a v-block, lying on its side on the surface plate. This applies to the two lenses of same diameter on the left in the pic below. The other larger lens is from a symmar, for which I want to make a jig. I will use the symmar for contact prints mainly, but would be good if it can be used for enlargements. Again I don't think the lens will be compromised by a bit, if its off by a thou.

again I could just machine a jig, I just don't want to take it that far
Last edited by kfed1984; 23-Apr-2024 at 21:50.
Does anyone have anything against this balsam or it needs to be some optical grade Canada balsam?
https://arttreehouse.com/artstore/pr...zes=8+oz.+size
Last edited by kfed1984; 24-Apr-2024 at 05:10.
I think you have a few more sources of error than you think, but I wish you good luck.
One point is that the cap ( flat ) around the cave side of the symmar doublet is not used for mounting in the original lens, so it will not have been made particularly tight to the optical axis. It should be good to under 3' though. So your first two optical surfaces may not be fully 'true' when you bring in the positive.
However I think you've got a good chance of at least getting a lens good for contact prints.
I Think there is only grade of Canada balsam! A Quick check shows that fancy labeling and special use (microscope slides) pushes the price up quite a lot!.
It is fairly important that the screw top ( with or without built-in dispensing bulb) is cleaned up after use or you will have to use xylene to break the seal for subsequent use.
Single air bubbles in the deposited balsam layer can “rubbed out” to the lens edge, but these are best avoided by having super clean lens surfaces and contact transfer from a glass rod or similar.

I won't claim I'm an expert, but I have separated and reglued at least 20 lenses. They all worked after I was done and I didn't break any of them. I'll just share my thoughts and conclusions based on that experience in hopes that somebody doing this finds it useful. I have no doubt that lots of people will quibble with my suggestions and my only defense is that it has worked for me and it is cheap and when I get done the lenses worked. Others, knowing the forum, will have ideas on how to select the very best trees for obtaining balsam sap and others will suggest mixing it with Pyro. Doubtless a professional with more equipment and experience can do this for you at considerable expense. And if you DIY you will understand why they charge so much for this.
You are responsible for looking into health aspects of any chemicals involved.
This will be -- sort of -- chronological.
1. First, let's be more precise. Many people are talking about "balsam" when they should be talking about more modern UV cure cement. I can't nail it down precisely, but as a general rule of thumb lenses manufactured after the late 1930s weren't cemented with balsam. The classic uncoated 159mm Wollensak I have, which dates to 1939, isn't cemented with balsam. My B&L protars, some of which date to much earlier, are all cemented with balsam. I have seen aluminum housed very late B&L protars that were not. Ebay listings are often wrong on this, with sellers boasting about there being "no balsam separation" on lenses that don't have any balsam in them and never did. (Reminds me of all the snack foods made of corn that boast "Gluten free!" Corn? Of course.)
2. Separation can happen with balsam and UV-cure cements. First question to ask yourself is whether it matters. This may be the most important question to ask yourself. If it is just on the edge (let's say a few mm's of a large surface) it is probably stable and it isn't going to affect your negatives at all given the apertures most commonly used in LF. So leave it alone. I've seen several 1950s Symmars that had very small silvery snowflake/star looking separations which are usually not on the edge. The lenses all worked great and you should leave ones like that alone. Actually separation of much more than a few mm will likely cause no issue at typical working apertures. I'll take it a step further and suggest you not start down this DIY path unless you've actually used the lens and find the results unacceptable.
3. If you need to fully separate a lens, the manner depends on what it was glued with. For balsam, some on here have said boiling water works great. You position the lens at an angle, slowly heat the water, and the different pieces of glass will slide apart. I haven't tried this, but it has some appeal for how slowly and evenly the glass will heat, minimizing the chances of breakage. What I have done is crumple up some aluminum foil so that I can position the lens at an angle so that gravity will let the elements slowly slide apart. I put that in an oven. With the glass already in the oven on a pan, held by the foil, I start out at 100F. NO PREHEATING. Slowly the glass gets warm, then I bump up the temperature 25F at a time, slowly, to avoid shocking the glass and breaking it. Eventually -- and this whole process is not for the impatient -- the balsam will melt and the lens will slide apart. This usually happens around 290 - 325F, and the smell in your kitchen is a dead give away that you're there. Depending on how they slide apart, you can open the door briefly and push them further apart with a tooth pick. Don't touch the glass with anything metal other than the foil it sits on. Once the stack has mostly come apart, turn the oven off, keep the door closed and leave the glass in there until it is barely warm. With the oven technique they don't come apart at 212F or close to it, which is why I question whether boiling will work. I'm still going to try it.
Modern cements are much more of a problem. Many times starting out in photo things I heard warnings about how careful I should be cleaning a lens to keep the cleaner out of the edge where it will damage the lens cement. If only it worked that way. Don't try heating them apart. There are chemicals for this. Summers Optical sells some very flammable stuff you use on a chemist's hotplate. (Flash point 167F) I bought a can years ago but after reading all the warnings never used it. What worked for me was "MEK" solvent. I put a folded paper towel in the bottom of a jelly jar, put the lens in there, and added the MEK, put the lid on and let it sit submerged. It will SLOWLY do the job. It will wick into the edge that is separated and SLOWLY work its way across, turning the cement white in the process. It can take weeks and weeks but it always worked for me. If your lens group has surfaces that are not separated, and some that are partially separated, it is going to take a long time. It is a lesson in just how effective modern cements are.
4. Before recementing, you must get the lens surfaces cleaner than you've ever gotten anything in your life. Acetone will help take off the remaining cement, but be careful and don't let anything contaminate your can of acetone. I used two cans, one only for the final cleaning. Lint-free "cheese cloth" with clean acetone makes a good final wipe. This step is critical, and remember how much time a mistake will cost you if you're gluing together something like a single Protar cell. That's 4 pieces of glass. If you cement the first two joints and screw up the final one, you have to start all over again. Don't even think about trying to recement more than one joint at a time.
5. I never tried using balsam for a repair. I used only modern UV-cure cements. I first used Summers' UV-69 ($64 for a big jar) because I had an old sunlamp. It worked. Then I called Summers and told them what I was doing and they suggested Type J-91 ($52.90) which can cure with an ordinary UV lamp. The "use by" dates on the cements are unfortunately not all that far in the future. For a time people on Ebay were selling smaller quantities for less. If you're really on a budget, a windshield damage repair kit might work, but you're back to the sunlamp.
6. The hardest part of this (for me) to get the hang of was how much cement to put on the concave surface before putting the two pieces together. As you clean off the goo resulting from a misjudgment, you'll develop a feel for it. Too little cement can't be undone; you have to pull them apart and hit the acetone again and get them CLEAN. Too much is less of a problem, the extra will run out the edges, which is fine up to a point. Look carefully at the puddle of cement before you push the two lenses together. Are there bubbles? If so, touch them with the plastic tip of the cement bottle and they'll pop. This should be done in an area as dust free as possible. Any dust in the puddle of cement? Start over. I used a little 12V computer fan with a filter on it to blow across the bottom lens. Gently press the top cell into the bottom one. If you're just short of cement on a edge you can gently rotate them a little. Press them firmly together, then keep your lens sandwich level so they don't slide apart.
How to center them during this process? If the lens elements are the same diameter, machinists' V blocks work fine -- so long as you keep the bottom glass level. These are the easy ones. But what if the elements have different diameters? You can very patiently eyeball it and get a perfectly usable lens. F:16 and f:22 are your friends.
Or you can use a precise custom-manufactured jig to get them precisely centered. Q: So where do you get one of those and how much does it cost? A: You already have one and it costs you nothing. Your lens mount probably holds the glass darned tight and precisely centered. Put the uncured glass into the mount and gently screw it together if necessary. You are screwing it together to get it centered, not to smash it down. It will center the glass. Check to make sure the cement is still uniform across the surface. Keep the concave surface down.
7. One everything is perfect or as close you you can get, you pre-cure the lens. Use the UV source (I use a Feit compact florescent UV bulb. NEVER use a UV "C" bulb!!!!) at close range for 5 to 10 seconds. (Summers suggests 3 to 5 seconds) It varies with your UV source and distance. You can get some idea by just putting a drop of cement on a piece of scrap glass and hitting it with the light. You want it tacky, but not rock hard. This will get you in the ballpark, though in actual practice with the UV shining through the glass it will be a little different. You can inspect your work, remove the glass from the mount, and make sure everything is exactly how you want it before you take the big final step and really cure it. (If just pre-cured, the soaking to separate doesn't take that long.)
8. You can use a damp (but not soaked) rag with acetone to clean off your mount, but it may take off the black paint so you'll need a Sharpie. You can use a just damp rag to clean off excess glue on the edges or on surfaces where you don't want it.
9. For full curing after you've done everything right, I give it a good hour, flipping the part over half way through. Too much won't hurt anything, but the bulb does put off some heat so don't get it too close. (If you have an radioactive-browned lenses, that same bulb with a week of exposure will largely clear them up.)
OR...you can do this the way you think best. I'm OK with that.
 Posting Permissions

 Reply With Quote
Bookmarks