I’m writing this while awaiting delivery of a 2002 copy of this lens, and of Schneider’s IVa centre filter, from Europe. Between Christmas and coronavirus, DHL is being slow as molasses on delivery.
I intend to use the lens with an Arca-Swiss F-Line camera configured for 8x10, although I also want to see how it fares with the camera configured for 4x5. In the next week or so, I’ll post some photographs of the camera, lens and centre filter, and talk about the lens’s image circle in relation to rise and shift. This post is about the lens’s basic characteristics and initial setup. I needed to sort out the issue of filters in particular. The post may be useful to people who are interested in buying a copy of the lens.
Focal Length Equivalent in Full Frame 35mm
The forum’s 8x10 lens comparison chart says that this is a 21mm lens in 35mm terms. Toyo has a chart that suggests 24mm. Mat Marrash, who owns a copy of the lens, says in his YouTube videos that he regards it as a 24mm equivalent.
Minimum Lens to Subject Distance
Schneider Kreuznach recommends a maximum scale of 1:3. For a 150mm lens, that’s achieved at a lens to subject distance of 0.6m (2’). I don’t anticipate using the lens that close to a subject. For close-up 8x10 at a scale of 1:5 and larger, I have a 210mm Nikkor AM ED Macro lens.
Working Apertures
Specifications:
Largest Aperture: f/5.6
Largest Aperture with Centre Filter: f/11
Smallest Aperture: f/64
As far as I know, Schneider has not recommended a range of working apertures. Rodenstock does for its 155mm Grandagon-N. For 8x10, it recommends f/22 to f/32. That sounds good to me. I also want to see how the lens performs at f/11 and f/16. I’m not in a hurry to use f/45.
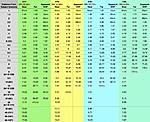
Apparent Depth of Field
For me, one of the attractions of this lens is generous apparent depth of field compared to longer lenses. I made the chart attached to this post to get a general sense of the lens’s behaviour and for planning purposes. I wouldn't use the chart in the field to focus the camera. To make the chart, I used Cambridge in Colour’s depth of field calculator.
The chart is for an 8x10 camera and a 150mm lens. It covers f/11 through f/32. It assumes that someone is viewing an 8x10 print at a distance of 25cm (10"). It also assumes that the viewer of the photograph has 20/20 vision, natural or corrected. This strikes me as a sensible assumption, but it results in notably more conservative values than is typical for depth of field charts.
Using Filters
This is a bit complicated. These are the relevant specifications:
Front element filter thread: 95mm
Front element filter thread with centre filter: 112mm
Rear element filter thread: 62mm
I was not set up to cover a diameter of 112mm. I use screw-in filters standardised at 82mm and a Lee100 filter holder with Lee square/rectangular filters that are 100mm wide. The paragraphs below discuss options for dealing with this problem.
Using the Centre Filter
I purchased Schneider Kreuznach’s IVa Center Filter to address light falloff. I’m happy to use the lens, as the centre filter requires, at an aperture of f/11 or smaller. The trade-off is a loss of 1.5 stops of light. I see the loss as equivalent to 1.5 stops of neutral density, manageable and in some circumstances beneficial.
Using a Polariser or Neutral Density Filter
What about stacking a filter on top of the centre filter? As noted, the centre filter takes screw-in filters that are 112mm (4.4”) in diameter. Few companies currently make filters in that size, those that do offer a limited range and prices are high. I’ve been able to acquire the following at reasonable prices, which will meet my current needs:
- NiSi Natural Polarizer. When rotated to neutral, it should also be possible to use this filter as roughly a 1-stop ND filter. This filter has a male thread on one side, female on the other.
- Tokina Cinema PRO IRND. Typical of ND filters for digital filmmaking, these filters also cut infrared light. Tokina makes 1-stop through 8-stop. I have 4-stop and 7-stop. Tokina's IRND filters only have a male thread.
I should note that I'm interested in a polariser to control reflections and glare, not to darken skies, which tends to be problematic with a wide angle lens.
I can also use these filters with my Nikon Nikkor W 360mm, which takes 95mm screw-in filters. I expect that a 95mm to 112mm step-up ring and these filters will often be more convenient than using my Lee100 Holder and 100mm square/rectangular filters. I've purchased a step-up ring made by a relatively new company called Lüzid. Made of brass, it's competitively priced and seems to be a decent product.
As far as I can tell, none of the top filter makers currently make 112mm skylight, black and white or colour correction filters. No doubt these filters are available used, but it may take some patience.
Using a Neutral Density, Black and White, Etc. Filter on the Rear Element
It’s possible to add a screw-in filter without stacking it on the centre filter. As noted above, the lens’s rear element takes 62mm screw-in filters. One could also use a Kodak gel filter on the rear element, or indeed in front of the lens.
There’s a fairly detailed discussion about the mechanics and pros and cons of this approach in the recent thread Using a Neutral Density Filter on a Rear Lens Element.
Because I'm standardised at 82mm, I'd use a 62mm to 82mm step-up ring if I wanted to use a screw-in filter rather than a Kodak gel. I would consider this option for a neutral density, skylight, black and white or colour correction filter. When it comes to a polariser mounted on a rear element, I think that getting the rotation right would take patience.
Obviously, there’s a point where adding filters to the front element will result in vignetting. If this happens, mounting a filter on the rear element is a way to solve the problem.
Using a Graduated Neutral Density Filter
I don’t make rural landscape photographs and I use a graduated neutral density filter for urban photography infrequently. If I want to use one with this lens, the cost-effective option is to forego the centre filter and compose with light falloff in mind, or try to reduce falloff during processing. My Lee100 filter holder for 100mm filters, and Lee100 graduated NDs, will fit the lens’s native 95mm filter thread. This option, while not ideal, may work adequately for me because I use negative film. I would not consider this an option if I used reversal film.
My second option for graduated NDs is to purchase Lee’s SW150 filter holder, or similar, and 150mm (6”) graduated ND filters. However, Lee and other makers of 150mm filter systems don’t make adapters for filter threads larger than 105mm in diameter. Consequently, I’d have to pay someone to make a 112mm adapter, perhaps S.K. Grimes, perhaps someone who does 3D printing. I’ll try the first option before deciding whether to go to the expense of the second.
MORE TO COME WHEN THE LENS IS DELIVERED
Depth of Field Chart, 8x10, 150mm, 20/20 Vision
This chart is in metric. The distance column on the left includes feet at 5m and 10m and then at 10m intervals. “HD” in the column headings stands for hyperfocal distance.


 Reply With Quote
Bookmarks