Page 4 of 7 FirstFirst ... 23456 ... LastLast
Results 31 to 40 of 65

Thread: Found an Automega E-5 Autofocus enlarger body

  1. #31

    Re: Found an Automega E-5 Autofocus enlarger body

    5x7 E3 LED test 1 Norma TMX100 PMK+ by Nokton48, on Flickr

    Here I am blowing up a 4x5 Negative using the 5x7 Negative plain glass carrier. This is 4x5 TMX in Pyro+ negative

    This one I burned with the LED head. Luckily printing times are quick! Sucker gets HOT
    Last edited by Daniel Unkefer; 8-Jan-2022 at 10:44.
    Flikr Photos Here: https://www.flickr.com/photos/18134483@N04/

    “The secret of getting ahead is getting started.”
    ― Mark Twain

  2. #32

    Re: Found an Automega E-5 Autofocus enlarger body

    Completed E3 5x7 Glass Carrier by Nokton48, on Flickr

    Glenn Evans rebuilt the bottom of the 5x7 carrier (see right) and did a nice job, bevel cut the glass. But he couldn't do anything with the top (see left). I used 3M teflon tape, and built up the thickness on the top carrier, until the glass sheets fit perfectly. I have been unable to find anywhere original Durst 5x7 glass unbroken, but reg glass works ok with the Omegalite No newton rings so far
    Flikr Photos Here: https://www.flickr.com/photos/18134483@N04/

    “The secret of getting ahead is getting started.”
    ― Mark Twain

  3. #33

    Re: Found an Automega E-5 Autofocus enlarger body

    Quote Originally Posted by tomwilliams View Post
    Daniel, those carriers look a lot like the E-5 carriers (photo attached). The E-5 carriers measure 7 15/32" x 11 23/32" .... same as the E-3 carriers?
    Those are the exact dimensions of the carriers that I have.

    How not to ship AN Glass overseas by Nokton48, on Flickr

    How NOT to ship original Durst Anti-Newton Glass all the way from Austria, in a flimsy envelope. They gave me my money back at least! But had no more glass
    Flikr Photos Here: https://www.flickr.com/photos/18134483@N04/

    “The secret of getting ahead is getting started.”
    ― Mark Twain

  4. #34

    Re: Found an Automega E-5 Autofocus enlarger body

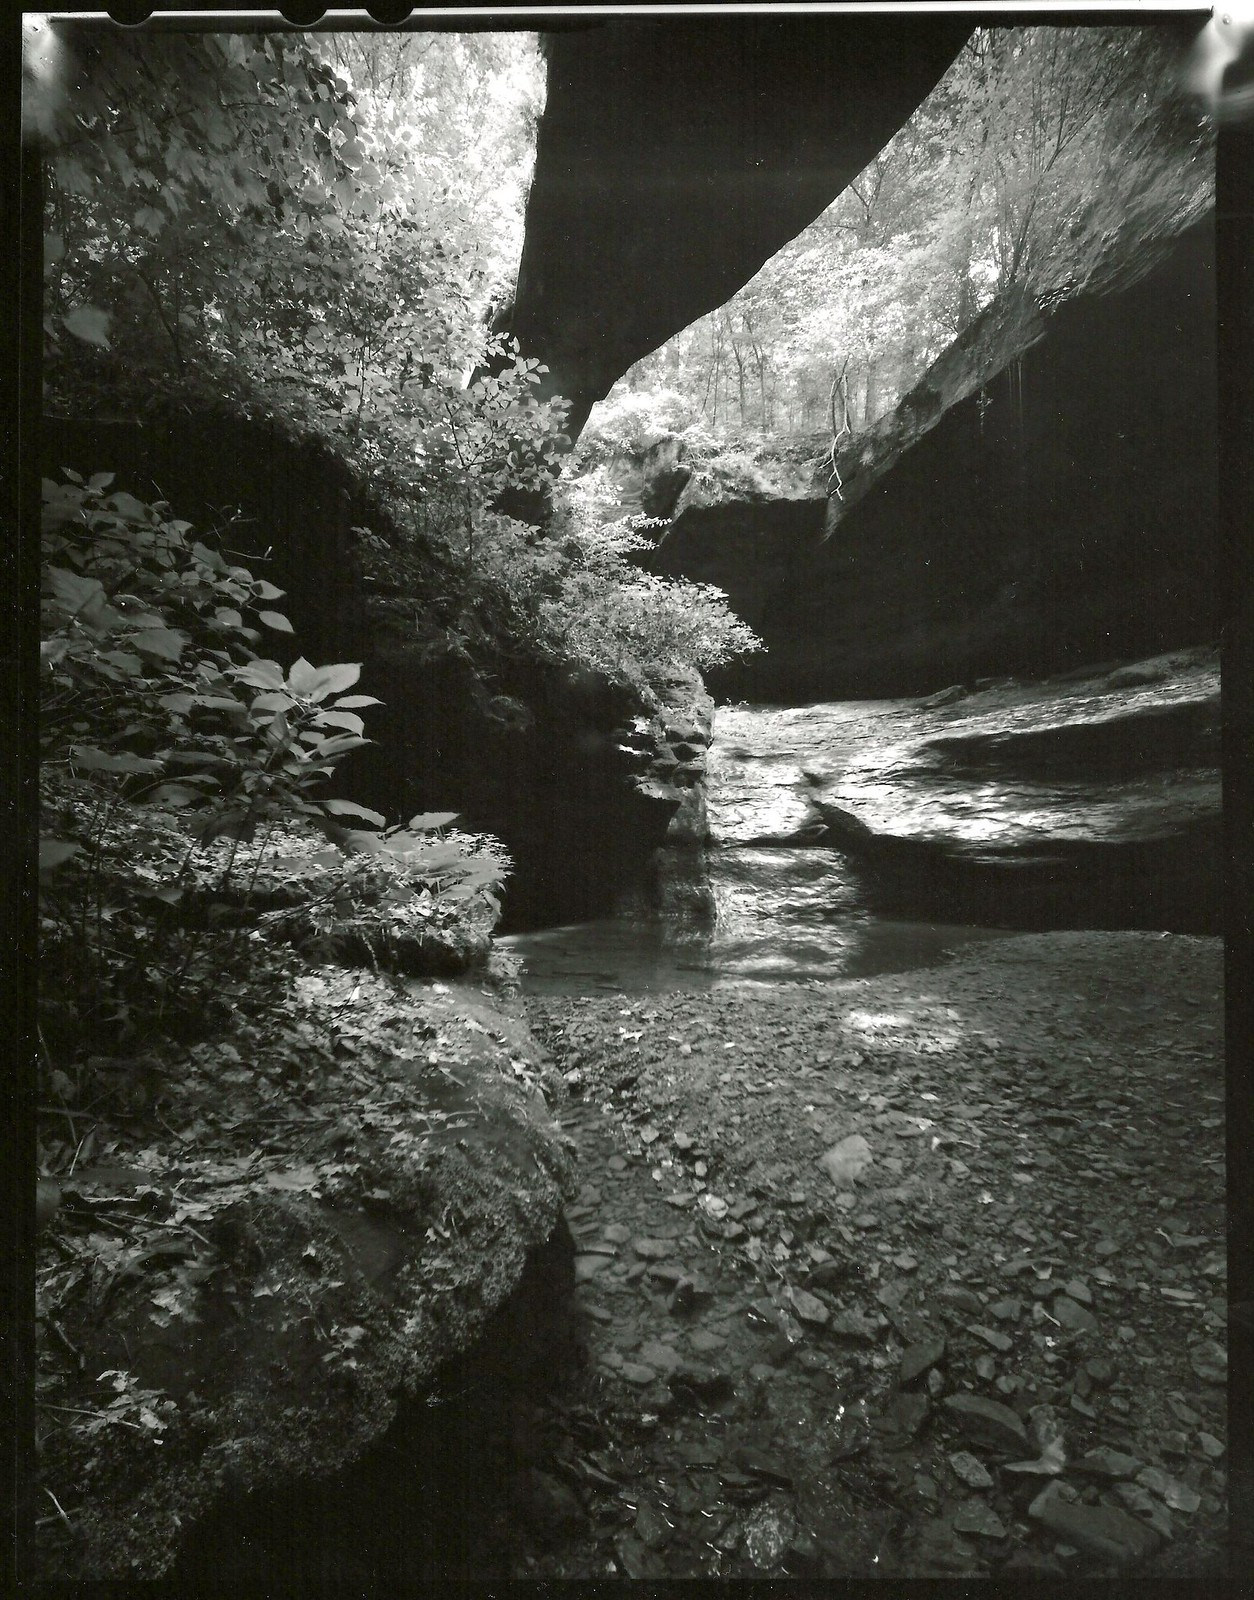
    Rock Bridge E3 180mm Arista #2 58 Grandagon Norma by Nokton48, on Flickr

    This one I burned with the LED head. Luckily printing times are quick!

    Rock Bridge #2 E3 Arista #2 RC 58mm Grandagon Norma by Nokton48, on Flickr

    Norma light leak! But negative good for testing enlarger.

    Also burned with the LED head. Printing time for 8x10 was quick which was good gets hot! Using 4x5 Linhof Plate Holders
    Flikr Photos Here: https://www.flickr.com/photos/18134483@N04/

    “The secret of getting ahead is getting started.”
    ― Mark Twain

  5. #35

    Re: Found an Automega E-5 Autofocus enlarger body

    When I got my E-5, besides the condenser head there was a homemade cold light head with a circline lamp. I use a medium format cold light head as my light source for the condenser head so never used the circline. I found an E-5 for a friend and it had a 5x7 condenser head but it was sitting on a 4x5 condenser. My friend used the cold light head but it was a bit slow for his taste so I relamped it with a brighter lamp that was a better color/actinic match and had an electronic ballast which brought it to full brightness very fast. It used that quite a while and made some beautiful prints with it (actually most of his prints are beautiful!). Then he heard about the guy back east that was making LED heads for Omegas. He got what may have been the last 5x7 one the guy made and now uses it. So in the horrible pics (sorry it is dark down there and I just grabbed some shots with a small digi) We have the cold lamp head, the 5x7 lamp house on the 4x5 condensers, and my lens battery (clockwise from the upper left - a 180mm APO-Rodagon on a 4 inch extension; a 150mm EL-Nikkor (the older one that covers 5x7) on the adjustable bellows extension; a 150mm Componon-S on a 2 inch tube; and a 135 Componon-S on a 1 1/4 inch tube (for 4x5).
    Click image for larger version. 

Name:	E5-Lamp.jpg 
Views:	10 
Size:	98.0 KB 
ID:	223247Click image for larger version. 

Name:	E5-CL.jpg 
Views:	13 
Size:	168.1 KB 
ID:	223248Click image for larger version. 

Name:	E5-lens.jpg 
Views:	12 
Size:	134.3 KB 
ID:	223249

  6. #36

    Join Date
    Jan 2022
    Posts
    12

    Re: Found an Automega E-5 Autofocus enlarger body

    Quote Originally Posted by tomwilliams View Post
    I just got the Omegalite head casing back from the sandblaster ... he got almost all the old interior finish off. Something I hadn't noticed before: if you picture the bottom half of the head, there is a 5"x7" (in the E-5) square cut out of its bottom for the light to escape and illuminate the negative. I'm sure this area should be flat (as it looks to be in your photo "E3 CLA5", Daniel), in order to rest tightly against the negative carrier. But now, from one corner to an adjacent corner of the opening, the bottom plate material arches downward (toward the negative carrier), peaking in the middle of the side. I tried to capture this in the attached photo.


    Attachment 223208

    This deformation is evident on all 4 sides of the opening. Stress relief from the sandblasting? The arch is significant, maybe 3/16" up from the corners of the opening to the middle of each side. And almost all of the deformation occurs close to the edges of the opening, rather than gradually rising from the edges of the bottom panel.

    Daniel, Kevin, I'm looking for a reality check: the bottom casing of the omegalite has deformed?
    Sandblasting causes heat and that combined with the pressure from the process caused the deformation of the thin aluminum. There are several ways to fix this. It most likely won't simply be able to be hammered or pressed back into place however because the metal has actually been stretched. The simplest fix I can think of would be to cut the base out (kind of like opening a soup can) after installing a new bottom. If I was to do this I would get a replacement piece of aluminum slightly thicker than the original. Thicker because you won't have the shape of the bowl to give it the same structural strength that the original had. Then I would cut a disc out of the new aluminum and epoxy it into the inside of the light head fitting the new disc as tightly to the original flat bottom as possible (before cutting out the bottom of the light head). Then I would mark the location of the original light cutout on the new aluminum, after marking cut out the old bottom and the light cutout. Paint the new bottom black and the inside white. The new lip created by the patch won't be any issue once you install the new padding on the bottom of the light head. The other option would be to attach the new aluminum to the bottom of the housing in a similar fashion to previously described but this way it will ultimately raise the light source up from the original position and it may mess with the negative carrier clearance. If you go this way I would still cut out the original bottom to limit "shadowing" inside the head. About the only real tool you will need to complete this would be a Dremel tool with cutout discs and maybe a compass.

  7. #37

    Re: Found an Automega E-5 Autofocus enlarger body

    E3 Board DII Cone Focusing Attachment 150 F9 G Claron Gel Holder by Nokton48, on Flickr

    I cobbled this together for the E3 and it works well for 4x5 and 5x7. From the bottom, an original E3 board, then a 4x5 DII lens cone, then an Omega Focusing Attachment. I used my machinists bandsaw to cut down the focusing rail. Then some computer mousepad behind a DII lensboard. I tapped threads and use bolts to align the easel to the lens. I use the Laser-Align and an allen wrench to nail the focus in all three planes. If the grain is sharp then I am good with it. Finally custom aligned swing out filter holder to lightly place #47 and #58 gel wrattens under the lens. So the Olde E3 becomes a variable contrast enlarger
    Flikr Photos Here: https://www.flickr.com/photos/18134483@N04/

    “The secret of getting ahead is getting started.”
    ― Mark Twain

  8. #38

    Join Date
    Jan 2020
    Location
    near Prescott, Arizona
    Posts
    121

    Re: Found an Automega E-5 Autofocus enlarger body

    Kevin, I see that I'm in the company of a dauntless craftsman. You and Daniel seem not to hesitate to take anything on. In my trepidation, I've been looking at a pourable foam rubber replacement for the existing rubber mat on the bottom of the distorted lower shell of the head. Maybe I can place a form around the current mat, a bit thicker than the existing mat, and once the existing mat is removed, pour in a rubber foam molding compound. If such a product exists, I could leave the distorted 5"x7" window alone, letting the pourable rubber compound adhere to the irregular surface. The new mat would be flush with the top of the form, hence flat, to make a light-tight connection to the negative carrier. I may be whistling in the dark though, for such a compound.....

  9. #39

    Join Date
    Jan 2022
    Posts
    12

    Re: Found an Automega E-5 Autofocus enlarger body

    Quote Originally Posted by tomwilliams View Post
    Kevin, I see that I'm in the company of a dauntless craftsman. You and Daniel seem not to hesitate to take anything on. In my trepidation, I've been looking at a pourable foam rubber replacement for the existing rubber mat on the bottom of the distorted lower shell of the head. Maybe I can place a form around the current mat, a bit thicker than the existing mat, and once the existing mat is removed, pour in a rubber foam molding compound. If such a product exists, I could leave the distorted 5"x7" window alone, letting the pourable rubber compound adhere to the irregular surface. The new mat would be flush with the top of the form, hence flat, to make a light-tight connection to the negative carrier. I may be whistling in the dark though, for such a compound.....
    Well I'm not sure I would do this but the good thing about it is that if it doesn't work you will be able to scrape it off and try another way. Keep in mind that you still need to have a flat surface to place the diffuser against so light doesn't leak between the diffuser and the housing or you may end up with hot spots on your negative.

  10. #40

    Join Date
    Jan 2020
    Location
    near Prescott, Arizona
    Posts
    121

    Re: Found an Automega E-5 Autofocus enlarger body

    Quote Originally Posted by Seadiver5 View Post
    Well I'm not sure I would do this but the good thing about it is that if it doesn't work you will be able to scrape it off and try another way. Keep in mind that you still need to have a flat surface to place the diffuser against so light doesn't leak between the diffuser and the housing or you may end up with hot spots on your negative.
    Yah - thanks for mentioning that, I hadn't got that far in my thinking.

    Like you said, following the new mat path is reversible, which I like.

Similar Threads

  1. New issue with Kodak 5x7 E autofocus enlarger
    By false_Aesthetic in forum Darkroom: Equipment
    Replies: 14
    Last Post: 14-Dec-2011, 09:59
  2. Eastman Kodak Autofocus E 5x7 enlarger info?
    By Ari in forum Darkroom: Equipment
    Replies: 7
    Last Post: 17-Feb-2010, 13:43
  3. Automega E-5???
    By BOB MURPHY in forum Darkroom: Equipment
    Replies: 1
    Last Post: 21-May-2008, 15:38

Bookmarks

Posting Permissions

  • You may not post new threads
  • You may not post replies
  • You may not post attachments
  • You may not edit your posts
  •