
I grab the negative rebate with a hemostat to pull it from the tube and use the same hemostat to hang the negative in the drying cabinet.
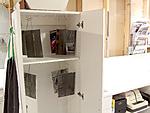


I grab the negative rebate with a hemostat to pull it from the tube and use the same hemostat to hang the negative in the drying cabinet.
Thanks to all who replied
I read the results and got a few ideas
The tubes are opened at each end.
Each end has a cap, one is a filler cap and the other is a drain cap.
While the tube is horizontal the small amount of liquid (150ml) it uses does not drain out.
If I took off the fill cap and filled with water to float the sheet out, the water would drain out the bottom.
But what I did today was to remove both ends and push the sheet from one side until it stuck out of the tube.
This allowed me to get a good grasp on the sheet and gently pry it away from the wall of the tube.
I am happy to say that out of 4 sheets processed, there was no harm done to any of the emulsion
Thanks all
Dan
HelloOriginally Posted by jim_jm

Can you tell me a little more about your home made 5x7 tubes.
How many sheets does it hold at a time, how much liquid is needed fir processing and how you go about processing the film.
Thank you
Dan


Sure Dan.
I'd been really happy with the BTZS tubes for 4x5, so I figured I could make my own slightly larger tubes for 5x7. I didn't want to pay for the 8x10 BTZS tubes, which process both 5x7 and 8x10. I process one sheet per tube.
I used 2" ABS tubes and caps from the hardware store. A permanent cap glued to the bottom of the tube, a male-threaded screw adapter glued to the top end, then a female-threaded cap atop that. The tube was cut just long enough so that the curled sheet can be fully inserted about a quarter-inch below the top edge of the adapter. The threaded cap is deep enough to hold enough developer for one sheet.
The inside of the tubes are very slick and I make sure to smooth off any rough edges that could possibly scratch the non-emulsion side of the film. For each 5x7 sheet I use about 125ml of developer. I can usually process 3 or 4 sheets at a time, staggering each one by a minute to give me time to dump the developer and get it in the stop bath tray.
This process is essentially the same as the one used for the BTZS tubes and covered by the View Camera Store here.
1. Fill each cap with 125 ml developer. This comes to just below the start of the threads and eliminates the chance of any developer touching the film before starting the timer.
2. Lights off, unload the holder and curl the sheet lengthwise, emulsion side in. Insert into the tube until it's about a quarter-inch below the top.
3. Screw onto the cap upside-down so that the developer doesn't touch the film yet. Load the rest of the tubes then turn the light on.
4. The tubes float in a deep tray of water during the continuous agitation in room light. Vigorously shake each tube for 30 sec first, then place in the tray. Spin the tubes every few seconds for the entire development time.
5. I turn off the room lights but have a dim safelight on at the opposite end of the darkroom. Open the tube and dump the developer when it's time. Don't point the open end of the tube towards the safelight when placing it in a tray of stop bath. Not deep enough to float, maybe about 1-2" deep is sufficient. Roll the tube back and forth in the stop bath while dumping the developer from any remaining tubes.
6. I have 2 trays of fixer. I place the tubes in the first tray for the first few minutes before removing the film from the tube and placing it in the second tray for the remainder of the fixing time. At this point there's no chance of any fogging from the safelight. After a few more minutes I turn on the room light.
7. After fixing, transfer to first wash tray, hypo-clear, etc before final wash. If there's any stain or anti-halation dye still on the film, additional fixing and/or hypo-clear will remove it.
There may be additional shortcuts I could take, but I've always had even development and never a scratched negative.
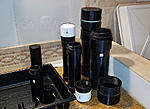
For 8x10, I follow the same process and the tubes are made from 3" ABS. Cost is probably about $10 per tube for materials. 250ml developer is required per sheet of 8x10.
Here's a size comparison between the 4x5 BTZS, 5x7 and 8x10 tubes:
 Posting Permissions

 Reply With Quote
Bookmarks