


As you may have seen elsewhere, I've just received one of Steve Lloyd's new Chroma 4x5 and a comment was made that a review would be appreciated: so here it is.
First things first - I like it. For the price, I like it a lot - This is one of Steve's first production, as opposed to the fundraiser, cameras. There are differences between this version and the earlier version, and from the photos I've seen they're improvements. There are a couple of modifications I have made, none of them expensive, which I'll show as I get to it. Steve has been helpful and communicative throughout, answering my dumb questions.
Pictures are taken in my being-decorated kitchen, so you can be amused by the smallness of a UK house! The number of photos means that this will run to a number of posts.
The camera arrived well packed in a sturdy box with bubble wrap. Sadly, I didn't photograph that... It was delivered with a second lens plate (for which I paid a little extra) and a pinhole on a lens board. The tripod mount is a standard 1/4 inch - I might have preferred the 5/16 inch but it's sturdy and stable enough, and of course fits any modern tripod without an adaptor.
The three smaller thumbscrews control the tilts of the front and rear standards, and the rear rise/fall. The large concentric screws manage the front rise and tilt independently. For my taste, these thumbscrews are a touch small; it's difficult for my slightly arthritic thumb to tighten them sufficiently, or having tightened, release them. I have replaced two of them on each side with 5mm x 18mm ratchet bolts and penny washers, which provide a much better leverage. The remaining thumbscrews on the rear risers will be replaced when I get a moment to shorten the threads on the ratchet bolts.
You will also see on this image the ground glass protector. As delivered it fits a lot better than shown there; I have inserted the world's simplest fresnel lens - an A5 reading aid from the bay, cut down with ordinary scissors, at the grand price of under two quid. Sadly, it doesn't sit quite flat, but it does have the expected effect of significantly brightening the image off-axis. But the slight bulge stops the protector fitting quite as snugly as it did.
It also has a benefit of acting as a shim for the ground glass, which forces it to the reference plane; there were a few tenths of a mm of play when I received it, down to a thickness tolerance in one of the plastic sheets according to Steve.
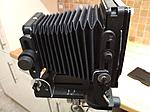
To open the camera, release all the locks on each side. The back is opened first, past the vertical. There's a magnetic grab at the vertical point which is handy.
The front standard is then raised, which turns over the lens board holder. There is a slight click as the standards reach vertical; it's easy to stop a little early. More magnets hold the centres for both the front and rear standards - I'm pleased with these - and there are also centre marks on all the necessary bits.

 Reply With Quote
Bookmarks