Page 1 of 3 123 LastLast
Results 1 to 10 of 22

Thread: Print big - Few questions for first trial

  1. #1

    Join Date
    Jun 2015
    Location
    Tokyo
    Posts
    10

    Print big - Few questions for first trial

    Dear all,

    I hope you won't mind me asking here, I am not a Large Format photographer but nevertheless a hobby film photographer shooting small and medium formats. Large format may come one fine day down the road...

    I have just started printing in the darkroom this January but got so addicted to it - or perhaps the smell of fixer - that i am constantly challenging myself with new things. First it was a small format tiny enlarger on top of my bath and now I have a 6x9 enlarger in my self built darkroom (albeit non-wet) equipped to go up to 20x24 including trays / easels etc.

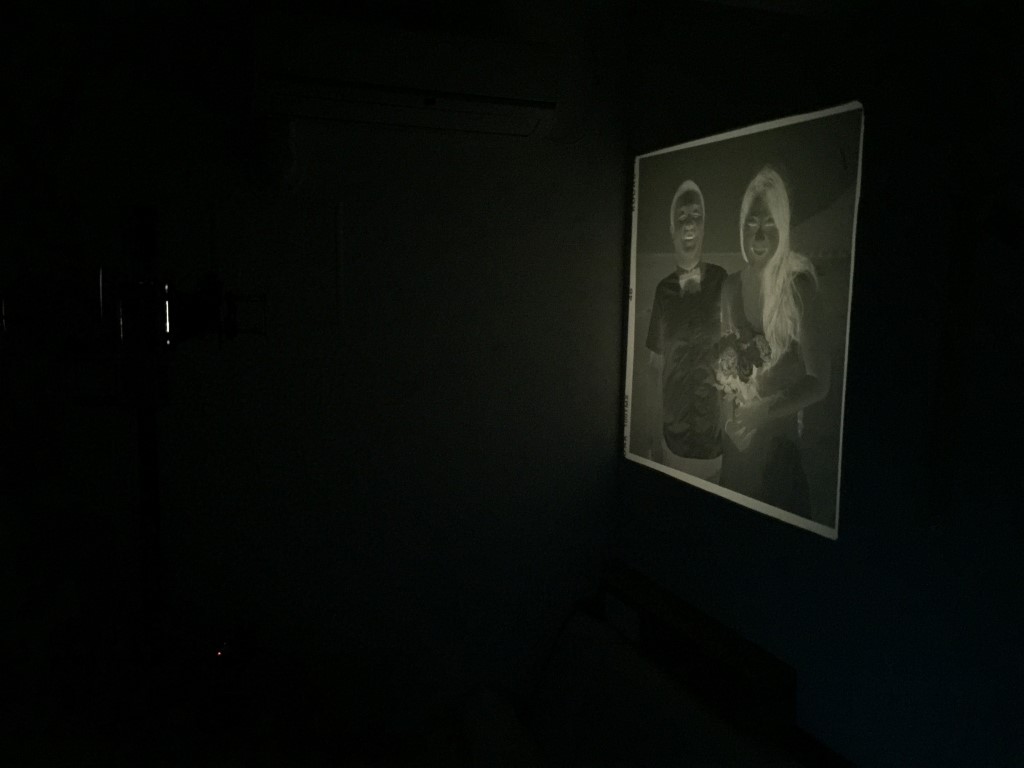
    What I need to figure out now is how to go bigger as a couple who is getting married asked me to put up a few pictures on the wall for their party. I went to the place a few days ago and those walls are huge and empty. I am thinking I need to print 1x1 meter prints from some decent Rolleiflex shots. I will be shooting the couple later in August and will use Tmax100 on a sunny day so grain will be kept to a minimum. I do know at 1x1meters I'll see a lot of grain still but as it will be a party and as people will not walk up to the prints, I think it'll be fine. For tests I printed a small format photo on 14x22 inch size and tested it at the venue, it looks just fine.

    My problem is how to handle these big prints.

    1. I have no trays of this size and don't really want to buy either as I don't think I'll print this big often. So far i thought of two things, either use some gardening plastic tray which is just over 1 meter in length and then just dip the print in a see-saw sort of fashion, or to lay the print out flat on top of my bathtub on a piece of plastic and apply the diluted slow working chemicals with a sponge.

    2. I bought a roll of Fuji RC paper that is 110.5cm in height and 20meters in length. I have never cut paper like this before but I am confident I'll manage. My problem is how to store the cut prints before I expose them. I'd like to cut around 5-10 at the same time so I wouldn't need to handle the roll too often. I don't have large boxes or black vinyl bags. Do you have any ideas? I will print a few 1x1 meter shots for the wedding but the rest I'd like to use at around 20x20 inch size so I can easily develop it in my trays. I got the advice earlier to just buy a box of 20x24 paper, use it up and then keep the box but with the prices in Japan currently, this would be a rather hefty investment. To put it in perspective, a box of 25 sheets of 20x24inch costs the same amount as the roll paper cost me which will give me a lot more than 25 sheets.

    Thanks a lot and sorry to start out with so many questions as my first post. I was actually referred to your forum from RFF where the guys said if it's about printing big - there's no better place than this forum.

    Thanks again,
    Ben

  2. #2

    Join Date
    May 2015
    Location
    SooooCal/LA USA
    Posts
    2,803

    Re: Print big - Few questions for first trial

    Quite an ambitious project!!! Very difficult, but possible with a LOT of practice...

    For the paper storage, try going to a printer or photolab... They use materials in large boxes, and might give you some if you ask... Also, large, thick mailing tubes will work if you make lightproof caps for the ends...

    A tough part will be to get the roll paper flat under an easel... (If you cut by hand, it is difficult to get the edges straight enough to be properly set in the easel...) If your enlarger head can tilt 90deg, you might be able to project the image onto something flat, large and steel, like a fridge or washing machine, and use strong magnets or tape to hold the paper down... Or if your enlarger can rotate on it's column, you can place it on a counter and have it project down to the floor... (Make sure baseboard is WELL counterweighted or clamped to the counter to prevent disaster!!!!!!!!!)

    For processing, large paper is often rolled up in a fairly tight roll, and placed in a very weak developer, and allowed to unroll more and more while submerged to allow paper to wet through the roll, in a tray, garden box, or wallpaper trough... (This is called trough processing... You might find something on the web about it...) Warning; this takes a lot of practice to get even prints as the surface will stick to the backing on the roll, and edges will often develop more, as they get more agitation than the inner part of the roll... The result is often blotchy and uneven, but with MUCH practice, good results can be obtained...

    Washing is the last problem, but RC only needs a few minutes of a good flow wash... By clipping it to a wall inside a bathtub, or on a flat waterproof board, a small hose or hose showerhead can be used to rinse both sides of the print for a few minutes each... (Flip them over once in a while, while you are washing...) Wipe with a sponge wetted with Photoflo solution, then wipe with a very slightly damp photo sponge to remove droplets, then dry on a clothesline with clips, or placed face up on a clean bedsheet pref. suspended off the floor...

    This is just one way, but it will not be easy... (A Third-world process in the First-world!!!!)

    Good Luck!!!

    Steve K

  3. #3

    Join Date
    Jun 2015
    Location
    Tokyo
    Posts
    10

    Re: Print big - Few questions for first trial

    Hello Steve,

    Thank you for the quick reply, really appreciate it.
    Luck - that I need! Each shot is going to be $30USD so I better get it right. Each 1x1m shot that is. The smaller ones should be about 5-10USD each. I'll test a lot.

    For the large 1x1 print for sure I'll need to turn the head - which my enlarger thankfully supports. It'll be a hassle to get everything lined up for good sharpness from corner to corner. I'll just tape the paper to my wallpaper and go for it that way!
    Before the actual enlargement, I'll print a few small pieces of paper in different areas of the large picture to check for exposure etc.
    The things I shoot don't require a lot of difficult dodging and burning, most often people in street-like settings etc.

    You didn't mention about my idea to lay the paper flat in the bathroom and apply developer with a sponge - which I think should theoretically work. Should it not? I will test that also with a smaller paper of course.

    Washing should be easy since it is RC. Thanks for the tip on flipping the paper, I wasn't thinking about it. If it was fibre I could use the bathtub to soak it but RC is more rigid and I am afraid where it bends I'll end up with a crack line. I'll just shower and massage it with a sponge like you say.

    As for the smaller prints where I need the easel. The straight cut will indeed be an issue. Any suggestions keeping in mind that I definitely won't have a large proper cutter just hand tools?
    I have a 60x50 rubber mat, a rotary hand cutter both mate by Olfa and I have a 60cm stainless non-slip ruler. The straight line should not be a problem, the issue will be the angle.

    Didn't think so much about the curl to be honest which is now annoying me a bit. Of course - paper coming off a roll has gut to have a curl! The good thing is that roll paper are usually rolled with emulsion facing in and therefore my paper in the easel will curl up on two sides which will be held down by the easel. I can put some extra weight i guess if it pushes the easel up?

    I am also fighting dust I tested a 14x21 inch enlargement using 2 11x14 papers side by side and I had a lot of dust etc on my print. I never realised the significance of this while doing only small prints. I use a glass carrier which introduces 4 unnecessary surfaces. I now got myself carriers both 135 and 6x6 without glass and I'll be filing them out to still get the nice black borders I am used to with the glass carrier.

    Any other suggestion you might think of?

    As for the paper storage I found a huge amazon box which will hold them nice but I need to seal it and also find some large black bags for the actual paper trap. Hmm... so much to think of and so little time and energy.

    Thanks a lot!
    Ben

  4. #4

    Join Date
    May 2015
    Location
    SooooCal/LA USA
    Posts
    2,803

    Re: Print big - Few questions for first trial

    Kool!!!

    There is several ways to process large prints, that I'm not going into because of the degrees of difficulty...(The unevenness is the hard part...) You will wish you had a processor or VERY large drums once you do this!!!! But try to leave big borders on the print that can be trimmed down later...

    Sponging the dev. on can work, but unless it is done on a perfectly level surface, the runs down the print might look like "The Adams Family" (I've see that!!!) as the best plan is something that wets the print evenly right at the start...

    Cutting the paper square would be helped by a large T square on the edge of a table or counter with your cutting mat underneath... Making tape marks on the counter to measure paper helps...

    The hot tip with roll paper is to always allow it to be in a roll... That is, unroll the paper starting at a tape mark, then let the the cut-off piece roll up easy, and cut between the rolls... This is so the paper will be resistant to dents... To apply to a wall, leave it in the roll as you pin down one of the sides, then roll it out a little and pin again, and so on until you reach the other end... Having some kind of strip underneath for the roll to ride on helps a lot... Reverse the order for unpinning...

    Lots of heavy straight edges, or other stuff around will be helpful depending on the paper curl... (To other's reading this, we are going primitive here, with whatever might work for this gig... No whining!!!!)

    Again, lots of luck!!! You will need it!!!!!!!!!!!!!!

    Steve K

  5. #5

    Join Date
    Jun 2015
    Location
    Tokyo
    Posts
    10

    Re: Print big - Few questions for first trial

    Hello Steve,

    Thanks for yet another valuable post, really helps!

    I understand what you mean above and I think I'll have something now to start out with. I will make mistakes without a doubt but that's just part of the game I assume. I will be sure to post back with my progress.
    And since you mentioned twice now that we are doing this in a primitive / 3rd world way, I got curious. How do you guys - the large format pros do it? Is there like a standard and accepted / successful method of going about this?
    Very unlikely I'd pursue it due to time / financial and space constraints but would still be very interested to know!

    Thanks,
    Ben

  6. #6

    Join Date
    Apr 2013
    Location
    Kelowna, British Columbia, Canada
    Posts
    515

    Re: Print big - Few questions for first trial

    I've had uneven development with large prints, and although I haven't had a chance to try it read that a Pre-Soak might help.

    I imagine that someone else here may be able to give you more info about it.

  7. #7

    Join Date
    Apr 2014
    Location
    oakland, ca
    Posts
    14

    Re: Print big - Few questions for first trial

    What about a hand pump garden sprayer? I use them for staining decks and fences and they put down a nice fine mist.

  8. #8

    Join Date
    Sep 2001
    Location
    Dunedin,Otago,New Zealand
    Posts
    191

    Re: Print big - Few questions for first trial

    In my experience - if you are using resin-coated paper, the sponge method works well. With fiber-not.Same for the fixing step.

  9. #9

    Join Date
    Jun 2015
    Location
    Tokyo
    Posts
    10

    Re: Print big - Few questions for first trial

    Hello all,

    Thanks once again for all the valuable tips.

    I gave the roll a go - taking things small for now in order not to introduce too many unknowns at the same time. Made the room dark and took the roll out. My god was it big!! A lot bigger than I imagined even though I had the box for a week now. Taking the roll out of the box it was quite hard to handle. As you'll see in the below image, my darkroom is very small - it isn't really a darkroom just a room I make dark!
    I ended up needing to lift that sofa and stand on its side to allow the roll to stretch out.
    My main problem was the cutting. The paper is 110cms in width and my cutting board is only 60. I also had a hard time keeping the cutter straight even though guided by the ruler.
    But overall I believe all the problems originate from the fact that I don't have a proper table I could do this on and doing it on the floor means I am down on all 4's and need to reach over the paper when cutting while using one palm to support my weight and this palm is on the paper... Quite bad actually - I think I'll need to come up with something better. Was thinking on dragging in the dining table to the darkroom and then put a blanket over it and cut the paper there. I could then stand and not need to put my palm on the paper while cutting.

    Anyways, long story short, I managed to cut two sheets of paper and put the roll away without getting any "visible" fog. I had the whole thing out for 15-20 minutes but my safelight is pretty far from the floor.

    Below you'll see my darkroom setup and the big trays I processed these 60x40cm prints. I used only 500ml liquid and when developing, I held the tray and wobbled it so the liquid moved around. RC paper is rather easy and forgiving. I did this so to see whether my sponge idea could theoretically work out. The developer you see in the tray wasn't enough to stretch out flat so this means I never had the paper completely under it at all times and yet I managed to get a good enough photo.
    By the way, this project I work on is for a friend who is getting married and asked me to present some photos at the venue.

    Here you see the darkroom with one print in the fixer. The three large trays don't fit on my workbench so I only put the developer and stop on the top as they are crucial and when the paper is already stopped, I take the fixer tray from the shelf and move the paper into it. There's no hurry once it is stopped so that is why I decided to have the Dev and Stop most accessible.

    Click image for larger version. 

Name:	BigPrint_DaiChan_Wedding_19_SM.JPG 
Views:	57 
Size:	83.9 KB 
ID:	135813

    Here you see the final print after I cut the borders.

    Click image for larger version. 

Name:	BigPrint_DaiChan_Wedding_25_SM.JPG 
Views:	61 
Size:	75.9 KB 
ID:	135814

    Thanks again, will continue updating this thread on my progress if you guys don't mind.
    Any suggestions are always welcome as I am new to this!

    Thanks,
    Ben

  10. #10

    Join Date
    Jun 2015
    Location
    Tokyo
    Posts
    10

    Re: Print big - Few questions for first trial

    Hello all,

    Just wanted to post back to conclude this thread. The wedding went well and the print(s) looked great!
    I managed to print one large one - a 1mx1m pring and I ended up processing it on the floor of our bathroom with sponges and a mere 500ml worth of developer.
    Time will tell if the fixing I did was okay, it was also only 500ml but i kept going at it for 10 minutes with the sponges collecting the excess fixer from places and redistributing it to the rest of the print continuously.

    I also did a test print a month earlier of my son which had lots of developing errors mainly I think because I used a rubber glove and I had to put my weight on the paper at times and perhaps the rubber left some residue that prevented developing? The print if I look at it closely has marks that could resemble my fist.

    Long story short it all worked out great and I ended up spending hours looking at it over the course of two weeks while the print was still with me hanging in my darkroom.

    Here are a few pics from the session - hope you enjoy looking at them as much as I enjoyed making them.

    Thanks,
    Ben

    This is my darkroom set up for the printing. The head is turned and I have some small trays with developer / stop / fixer for the test prints. I did about 10 sheets of 5x7's at various different places of the print as well as a full print of 20x20cms to have a sample to see what tones I need.


    Then the light goes off.....


    As I can't process the print in the darkroom I ended up rolling it up after the exposure and putting it into 5 black vinyl 90liter garbage bags. I came up with the number 5 after I started wearing these bags one at a time and looking straight into a bright light to see if anything comes through. After I put the 4th bag over my head I saw absolutely nothing so I added one extra for the sake of being on the safe side and it worked. I transported the image to the bathroom in the bags and moved the developing essentials / safe light etc. Once it was all dark, I removed the bag - just to find I had absolutely no idea what to do with it 
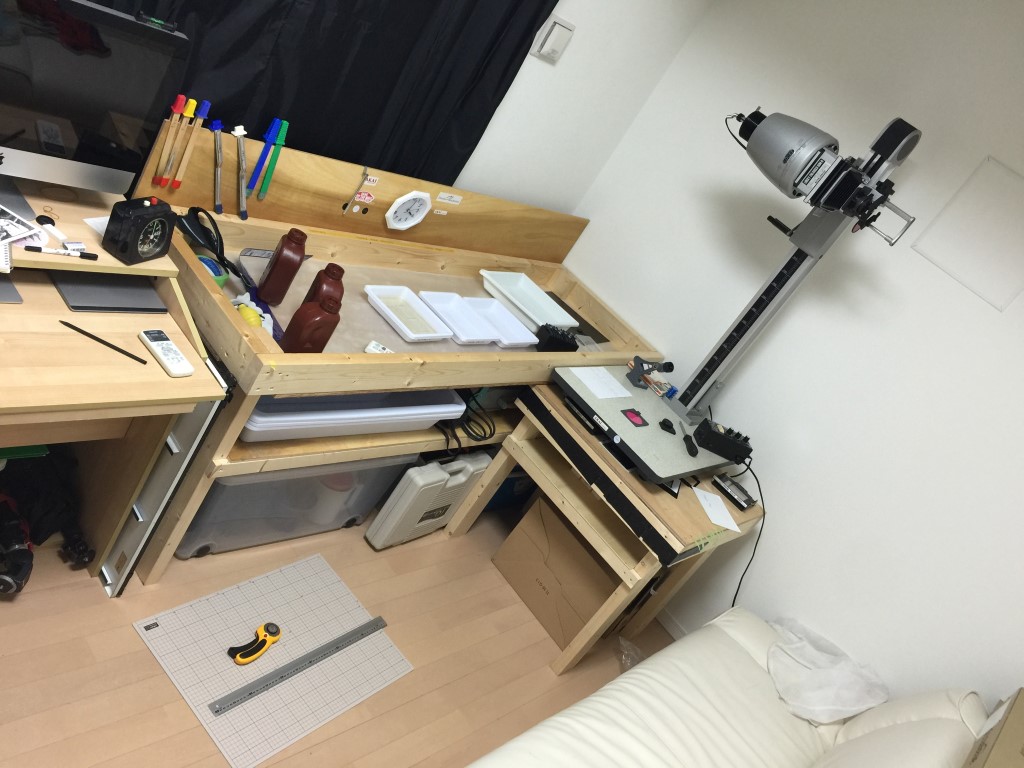
The little things....
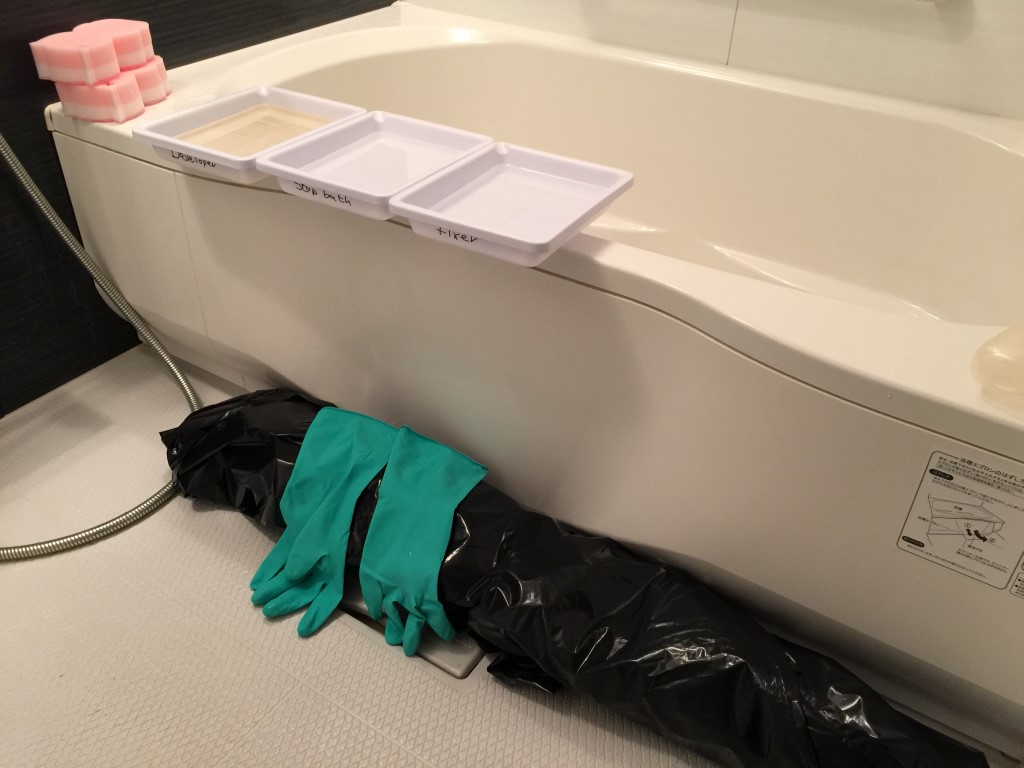
    Japanese bathrooms are made of plastic completely so it's perfect for a job like this and they are totally sealed and have a permanent vent taking air out. But its tiny and the paper takes up all the space on the floor so I really had a hard time with those 90liter bags - they ended up going over a rack above the bathtub.


Similar Threads

  1. Trial TT
    By Bokey Shutter in forum Image Sharing (LF) & Discussion
    Replies: 0
    Last Post: 10-Feb-2015, 08:50
  2. Dumb questions of an idiot - landscape trial
    By megapickle1 in forum Image Sharing (LF) & Discussion
    Replies: 35
    Last Post: 18-Jun-2012, 15:09
  3. First print-questions please
    By coops in forum Darkroom: Film, Processing & Printing
    Replies: 2
    Last Post: 10-Jul-2009, 17:40
  4. print exchange questions
    By John Brady in forum Announcements
    Replies: 23
    Last Post: 17-Oct-2006, 21:00
  5. trial and error w/8x10
    By Percy in forum Cameras & Camera Accessories
    Replies: 12
    Last Post: 17-Oct-2005, 12:21

Bookmarks

Posting Permissions

  • You may not post new threads
  • You may not post replies
  • You may not post attachments
  • You may not edit your posts
  •