This sink is very easy to make, cheap relative to using epoxy paint or fibroglass, and is odor free.
Mike Rosenberg © 2002, for LFPhoto.info
This sink is very easy to make, cheap relative to using epoxy paint or fibroglass, and is odor free.
1/8 inch Type I PVC (can be cut to specification by supplier). Comes in 4X8 ft sheets in white or dark gray, approx. $43.00/sheet. The PVC can be cut with an electric saw like plywood.
X-15 adhesive for gluing the PVC to the plywood.
PVC pipe cement (any brand will do). There are three grades of cement differing in viscosity and setting time. The high viscosity, which I recommend for gluing the larger pieces to the underlayment will allow time to position pieces. The gray medium viscosity will fill in gaps better and is best for at the right-angle seams. The low viscosity clear can be used on the edges of the bottom pan where you want it flat. Most glue manufacturers have web sites that give specifications and recommendations on glues.
PVC pipe primer. This is put on the PVC before using the glue, and softens the PVC allowing greater bonding
PVC cleaner. This is used to clean the grease and dirt that may be on the PVC and should be used prior to cementing.
Note: PVC adhesive is different from PVC cement.
Wood for pan sides and back splash — ABX plywood. It is sanded on one side and is made with waterproof glue. Pressure treated lumber is probably overkill in more ways than one, it does out-gas the wood preservatives! Particle board is cheaper, but is not the best material to use in wet areas.
2X4 for legs and pan support.
Table saw.
Router.
Circular saw.
Block plane.
Belt sander or hand orbital sander.
Roller and paint pans.
Straight edge.
Have the PVC cut for the dimensions of the sink, taking into account the thickness of the material. You can cut the PVC with a table or circular saw. Edges can be shaped with a router.
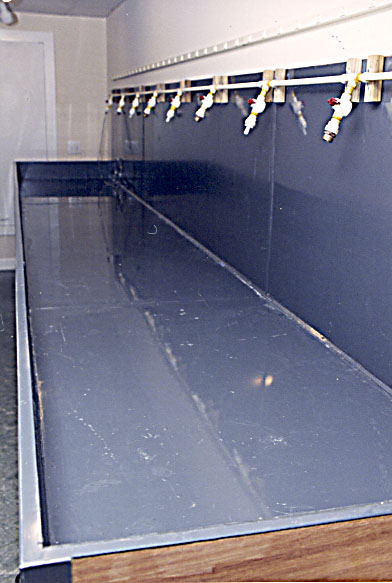
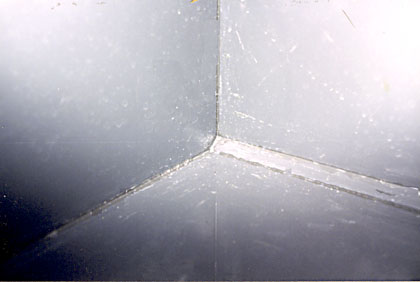
The pan for the sink should be designed to have suffucient strength to hold the plastic and what-ever else you put in the sink. I used full plywood sheets down the backsplash and attached to the legs to give enough rigidity. A two by four frame was built for supporting the sink pan (bottom) and attaching to legs, and an identical frame for a shelf under the sink for storing pans. This gives great lateral strength. Cut all the plywood and lay out. Measure and mark where a seam of two pieces of PVC will occur. At these points you will use a thin strip of PVC under the large pieces to overlap and reinforce the seams. Use a router and cut a 1 inch or 1/2 inch wide x 1/8 inch deep groove to counter sink this piece. At the vertical edges only one piece is necessary, but one on each abutting piece can be used. Don't forget to route out the seam for the backsplash. It may take several passes with the router for the full width. Go over the routed surfaces with a belt sander or other alternative to ensure it is smooth. Avoid putting seam in bottom of pan in the edge of the plywood that is the pan.
The drain is a standard kitchen plastic drain, and needs to be recessed for the water to drain. Use the appropriate size hole bit/drill for cutting the drain where you want it to be — as close to the lowest side of the sink. Again use the router to cut a 1/8 deep X 6 in. X 6 in. square - the drain will attach to this piece of PVC. Another hole needs to be cut in the PVC of the under piece and top piece of the PVC. The hole in the PVC of the pan should be large enough as to NOT overlap the flange of the drain so that a proper leak proof seal is obtained when cemented.
Assemble the wood of the sink. I recommend using glavanized decking screws that will not rust. Adjust the pitch of the sink for 1/2 fall toward the drain - no more than that to avoid having your chemicals at one side of the trays. It is amazing how well the water drains with this little amount of slope. Brush the X-15 adhesive into the routed out areas of the wood and then put in the PVC strip (note - shiny side up!). Once this is completed brush or roll the X-15 to the rest of the wood. Be careful not to get any on the PVC strips where it will contact PVC. This is important because the PVC will be cemented to this strip. All pieces of PVC to be cemented together must be free of dirt and grease for the cement to work. Clean the surfaces to be cemented with the PVC cleaner. Brush on the PVC primer to the strips of PVC one section at a time just prior to putting on the cement. This will soften and roughen the PVC for cementing. Then brush on an excess of the PVC cement and position the PVC sheet - include edges where material will abut the edge of another. You must work fast because it sets up quickly. The cement is really a solvent, and will bond and fuse the material together. This is what makes the sink permanent and water-proof. As you put vertical to horizontal pieces together be sure edges are well glued. After all the PVC is together and the glue has set to insure bonding at vertical and horizontal edges, I recommend carefully applying a small amount of gray medium viscosity cement with a syringe or similar applicator at the edges for extra security — and to fill in gaps.
You can also put the PVC on the top of the plywood pan front and side edges, and even down the outside to produce a better water proof product. Bevel sharp edges of PVC at the tops of the sides with the block plane.
Use poly-urethane to waterproof any surface of wood not covered with PVC, like the legs and bottom shelf.
If you feel the need to use a caulk you must use an appropriate caulk — most will not adhere.
A PVC two part putty, similar to an epoxy, could be used as a filler; but this material is not considered permanent.
Use wire shelving for over the sink. It is relatively cheap and strong. It now comes in gray. It also has the additional advantage of that wet items will drain into the sink.
Purchase an additional piece of white PVC sheeting for an easel to use in the sink for bleaching and viewing prints.
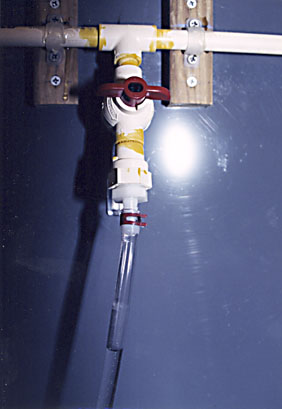
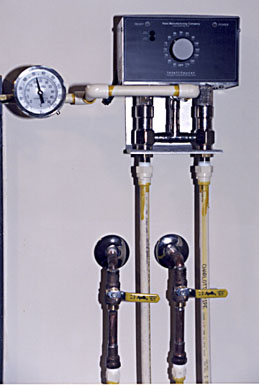
Use all plastic CPVC spigots and plastic piping; this can easily be mounted on the surface of the backsplash or the front inside edge of the sink. This plastic requires the appropriate cement. The plastic will not corrode and can easily be modified. Spigots can be plastic ball valves or other valves — these are available at Lowes or Home Depot, and the appropriate adaptor for threaded or barbed fittings can be used. I also purchased a Hasse water tempering unit (the low volume unit costs approx. $450 and is suitable for the home darkroom), which I find to be well worth the cost for insuring even temperature while washing film or prints.