
That looks excellent, Jim.Originally Posted by Jim Fitzgerald


That looks excellent, Jim.

Thanks.
Just a reminder for everyone. Most of us are describing what we post with all of the development info etc. Most are saying if it is a print or a scan. Just a reminder please let everyone know if they are showing a print or a scan. I think it helps the group understand how x-ray film can be presented in many ways. Very helpful information I feel.
Jim, great image, I bet it looks great dried and matted! You're right about it being necessary to tell if an image is a negative scan or a print scan (and if so, what kind of print) to interpret the results.
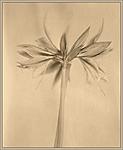
This is a scan from an 8x10" negative with some slight curve adjustments to boost highlight contrast. Green-sensitive generic, double-sided x-ray film, exposed at EI 50 with one stop reciprocity correction (exposure was something like 6 minutes), although this correction was probably unnecessary. Symmar-S 300/5.6 @ f/5.6 in quickly fading light. Developed in the tray I mentioned earlier in Pyrocat HD 1.5+1.5+100 for about 9 minutes, continuous agitation by rocking the tray from side to side and flipping the sheet every four rocking cycles. The scuff marks on the corners are caused by the curved sides of the tray, where the non-stick coating is slightly irregular. I may devise something to hold the sheet in the center of the tray to prevent this, but haven't given it much thought yet.

Apologies to you both, will keep my ideas to myself in future.
I don't follow Andrew; was that aimed at Jim and myself? I don't see the need for the apparent despondency and I don't think Jim's remark was specifically aimed at you. It looks like your experiment was quite successful indeed and I have pondered about a similar approach, but I don't have any hangers like those. Did you notice any nu sagging of the film? It looks like 4x5", which would be less prone to sagging. Have you tried this with 8x10?

Please keep your ideas coming. Silence is not a solution.
Is that a pun?
Koraks,
nice to see your bright work :-)
Not the final version, but I want to show it unperfectly:
12x16" green sensitive negative
again my 500mm Helvetia Extra Rapid
contact printed on Fomabrom
slightly digital coloured, because I wanted to get a first idea about sepia toning this print
Koraks, beautiful image, it looks great. My purpose for the comment was this. Remember we merged two threads about x-ray film. In my original post I was asking to show prints and also discuss your processing. So if you scan that is fine. I just think it is important to show what prints can be made with x-ray film. It gives the viewers an idea of what can be done. I've gotten many ideas from the people who have posted here and have learned quite a bit. I was using Pyrocat-HD but I found that I liked the results from Rodinal as well. The prints that I saw made me try this combination. So by all means tell us all that you do but be sure to let us know your end result. For me it is all about the print. Others a scan, no problem. I just feel that the more we know the more we learn.
Thanks Jim and Plaubel! Plaubel, your previous version of your image inspired me to do mine high key

Andrew, I have tried the same thing recently with an 8X10 film hanger - I cut the "hanger" part off so it would fit my trays, though I guess I could have left it alone and used larger trays. Anyway, the ridge pattern on the bottom of my tray affected the even-ness of the development, even though the film was held above the tray bottom. I am going to try it again with a sheet of glass laying in the bottom of the tray, which should eliminate any pattern. Once (if) I am successful I'll post my procedure.
 Posting Permissions

 Reply With Quote
Bookmarks