
I am about to acquire a Saunders/LPL 4550 XL enlarger.
Any experiences with this enlarger are most welcome.
Anything in particular I need to be aware of or know about?


I am about to acquire a Saunders/LPL 4550 XL enlarger.
Any experiences with this enlarger are most welcome.
Anything in particular I need to be aware of or know about?

They are great pieces of equipment, lots of notables own them as well as schools. I did repairs on LPL at Omega and answered questions for them for about 5 years. From the factory they should be permanently aligned. Barnbaum and Uselman are people that sent us enlargers to fix and owned more than just one. So good luck
"Great things are accomplished by talented people who believe they will
accomplish them."
Warren G. Bennis
www.gbphotoworks.com
I had one. Certainly a solid enough enlarger and easy to use. Only thing I didn't like was the amount of light that leaked out of it. I covered the head with a towel when I printed.
It is my favourite enlarger for 4x5". In my opinion, a very good design, not as good as the best ones but even more practical in the real life.
The "permanently aligned" issue is just a joke. As every enlarger I have used in my life, it needs to be aligned. No worries, it can be aligned.
Greg is right; it is like a funfair... lots of leaks. You can solve this with a bit of tape taking care that it needs to be cooled; it has a high output so it gets hot quite easy. Not a problem at all.
Used or new? It uses a cooling fan, synthetic diffusion chamber, plastic bellows, control wheels... they should be checked for perfect functioning.
Personally, I`d mount it on a wall. Buy the proper attachments, or just install a solid shelf to hold it. It`ll make adjustments -way- easier.
What types of repairs did you need to do? HowardOriginally Posted by Greg Blank


I used this enlarger for years before I switched to an 8x10 enlarger. The 4550XL is a real workhorse, and it gets the job done. The factory alignment only means that for the maximum print size of 20x30 (if I remember correctly) it is aligned. In reality, mine was not perfectly aligned, but it was sufficient for a 20x30 print. If there is an alignment problem it will show up when you do larger prints with the edges being out of focus or soft. So if you can test it before you buy it, do so with with the largest print you can make with it. You do not have to make a large print. You can test the alignment using a series of 8x10 prints with the enlarger at it highest setting. Focus in the center an then see what happens at the edges. If it is out of alignment then you are kind of out of luck because there is no adjustments on the enlarger to realign the enlarger.
The light source is bright enough for reasonable exposure times. If you have the color module, then you will need to devise a test for checking out the dichroic filters and dialing mechanics of the enlarger. If you print color, then small changes to magenta and cyn should make very noticeable changes to the print. Yellow will require larger CC changes before a noticeable change in the print occurs.
Hope this helps....
As with any new enlarger, you should IMHO perform a serious light leak test and when the inevitable leaks are revealed, fix them. The method I learned was to put the cap on the enlarger lens, turn out the enlarger and darkroom lights, and sit in the darkroom for ten minutes. Then turn the enlarger on (with the lens still capped) and in the dark look up, down, and all around to see where the leaks are coming from. And they will be there (John Sexton's LPL enlarger had tape at numerous places where he had used it to fix leaks). In particular, put your head on the easel and look up into the area around the lens board. This is what your paper is seeing.
When I did this with a new Beseler MXT enlarger I had major leaks from around the negative stage, from the area where the electrical cord from cold light electronics went into the head, and from the area around the lens board, plus a couple from smaller areas. Since some of these areas need to be moved every time you change negatives or lenses, you can't necessarily just tape them up, you have to devise other ways of fixing them.
I don't mean to suggest that you can't get good prints without doing this. I'm sure many people don't do it and still get prints acceptable to them. Not all light leaks will by themselves be strong enough to fog the paper. But it is, IMHO, good darkroom practice to have no light leaks from your enlarger, without trying to figure out whether they'll have any real effect alone or in combination.
As an aside, the kind of fogging I'm talking about here isn't the gross fogging you get from other sources (e.g. from outdated paper). The kind I'm talking about is a subtle degradation of the highlights that's hard to spot until you see a print made from unfogged paper. IOWs, we're not talking about fogging so bad that the paper turns gray in the developer. It's the difference between highlights that sparkle and highlights that don't.
Brian Ellis
Before you criticize someone, walk a mile in their shoes. That way when you do criticize them you'll be
a mile away and you'll have their shoes.

I have the 4550XLG that does have an alignment mechanism at the lens stage, but I don't know if the XL has a similar adjustment option, if it does then I would consider it a plus.
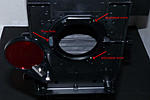
I have a 4550XL and it doesn't have the arrangement of Chuck's XLG.
I think the best way to describe the 4550 is it is designed to stay in alignment once it is in alignment. When I acquired mine a few years ago, used, it was a little out. Not by much, but required a piece of tape between the lens board and the mount and slight shimming to the column to get it vertical. I haven't had to touch it since but I do check it from time to time with a Versalab.
I think it is a great enlarger. One aspect that I like about it, since I shoot a lot of 35mm, is the 35mm mixing box which has a condenser in it. It makes the times short (perhaps too short) and delivers very sharp prints with it's hybrid arrangement.
In every enlarger, baseboard (easel), lens and film holder should be parallel (aligned).
In the LPL4550 XL (at least in my own unit), the lens holder have an alignment device, mine is the one Chuck shows. No problem here.
The film plane/easel can be aligned with the head mounting bolts, a bit difficult, but possible. I have did it this way a couple times. Thanks God the enlarger is quite good, so there aren`t big misalignments here.
The best way is to wall mount the center column, and to move the whole enlarger. It makes this task quite easy.
Another way is to level the baseboard or the easel; if the easel is made in wood (usually chipboard), simply attach some thick, big headed screws in the bottom, they will act as adjustable legs. I use this method with my small easels.
 Posting Permissions

 Reply With Quote
Bookmarks