Page 3 of 15 FirstFirst 1234513 ... LastLast
Results 21 to 30 of 143

Thread: My Century 10A Restoration

  1. #21

    Join Date
    Jul 2010
    Posts
    424

    Re: My Century 10A Restoration

    I have done may facets of wood working. When I build my lens boards I will copy the Original. My joints may be a little different. I will use a mortise and tenon, because I have the bits to do this easily. Also when I glue up hardwood panels. I know the proper way to do so. I know how to set the crowns of each board so they will not warp after they have been clamped, glued, then cut and sanded to the proper thickness. (center panels)

    Then I will use a stile and rail system for the outer framework. I have a friend here with a cabinet shop. I can use his overhead sander, it will make everything nice and flat. Also ee is already set up and making hardwood raised panel doors. I only need to run a few pieces so he wont mind.

    Lastly I will use a rabbiting bit to cut the inner panel to fit in the stile and rail frame, glue it all up, clamp it, let it dry. Send it back thru the overhead sander just to get my finished thickness 1/2" +. Then do the edge work with the rabbiting bit to make the lip. Next angle the router table and cut the bevel on the top horizontal edge, then finish. Flat black on the inside a matching finish on the front.

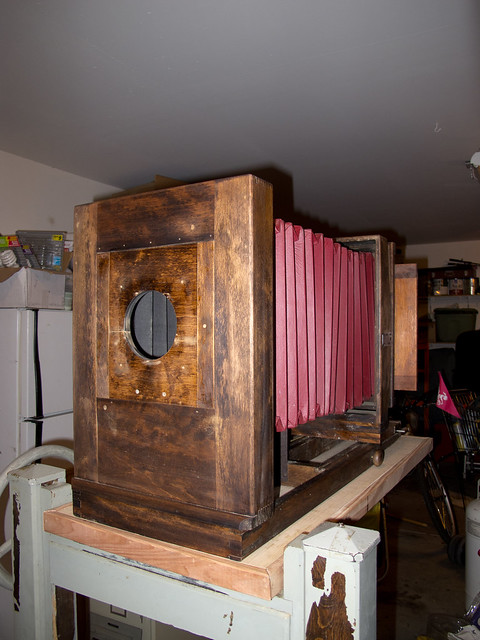
    The lens boards look like Cherry (closed grain wood) on the vertical stiles. The center section looks like mahogany (open grain). I plan to make my board more sturdy than the original, I plan to have a top and bottom rail. I will build mine like a raised panel cabinet doors but no detail on the center panel.

    I could also make the center panel thinker than the stiles and rails (the frame), and still maintain the factory thickness around the edge. This thicker center section would aid in support of longer glass. The panel could still be flush in the front so it would not be that noticeable.

    When I start to make lens boards for this camera I will most likely make 20 or so, when you have everything set up making 20-or 30 is just as easy as one or two. Material cot go up but it will be worth it

  2. #22

    Join Date
    Mar 2004
    Posts
    650

    Re: My Century 10A Restoration

    Your lens boards will end up much nicer than my camera

    If I were going to that much trouble, the only thing I might do differently is to make a long section of center panel with top and bottom rails, cross cut, and then do the side joints. But these are pretty hefty assemblies, so it might not be worth the trouble.

  3. #23

    Join Date
    Jul 2010
    Posts
    424

    Re: My Century 10A Restoration

    What I am going to be doing will be simple and fast. The sharper table is already set up to cut 3/4" stock. So the stiles and rails will be done in a matter of seconds. I will show you when I am done with a few of them what I end up with.

  4. #24

    Join Date
    Jul 2010
    Posts
    424

    Re: My Century Master Studio Restoration

    Well here is an Update. Things are moving along slowly. I dont have as much time to devote to this as I want. Also I am not one to 1/2 A$$ anything, so this may take a while. If I am going to go through the effort I may as well be proud of my work in the end.

    Here she is Stripped of all that nasty paint, still needed to fill the holes and get it ready to fill and sand.


    A side view


    And the back with the Fancy new Fresnel


    The back with all the paint gone, man it was a pain to get in all the little groves, corners, ect..

  5. #25

    Join Date
    Jul 2010
    Posts
    424

    Re: My Century 10A Restoration

    Now in this image I have started to actually start to condition the wood. I am blending the old topcoat (varnish,shellac) into a gel, and working it in the fibers of the wood. I am not trying to sand down to bare wood.

    I stripped away the paint, I tried to leave as much old stain and finish as possible so I can blend it in as somewhat of a stain. Not hard to match colors if you use the original color. After this step I will be ready to fill holes and start to build a base.


    See how nice the color is, that is all original and beautiful. I can see it now. That wood is very nice. Look at the end grain at the finger joints so dark. So very nice, I cant see how anyone would think to paint a light grey was the way to go.


    Notice the shiny part above the little latch top center of the sliding back (inner surface), That is the original finish. I will condition it until it is blended into the grain, and that grain is exposed ready to be tooth for the new base.

    That little latch at the top and bottom look like some sort of holder for a plate of some sort. If anyone can tell me what that is designed to hold I would appreciate it.

    Again with the sliding carriage with spring back all conditioned and ready for base sealer. Going to be a lot of hand rubbing on this baby this is for sure.

  6. #26

    Join Date
    Jul 2010
    Posts
    424

    Re: My Century 10A Restoration

    Ok here is the update where I am on this resto. I had to build the table top (still need brass screws), I made it the same size at optional one listed in the catalog 37 x 17 if memoer serves. (this is a repost from the server crash)

    This baby is tall


    I still need to figure my table support and front faschia.


    The wood is in fanttic shape , so is the bellows. I am reasy for the final conditioning of the camera, stain touchup and base sealer.


    Now I get to tackle the stand and the tilt hardware!

  7. #27

    Join Date
    Jul 2010
    Posts
    424

    Re: My Century 10A Restoration

    Saving these beasts is fun but very hard work

  8. #28
    dave_whatever's Avatar
    Join Date
    Nov 2009
    Location
    Sheffield, UK.
    Posts
    603

    Re: My Century 10A Restoration

    Ahh the Black&Decker Workmate - good to see it there.

    P.S. camera looking good too.

  9. #29

    Join Date
    Jan 2009
    Location
    Denmark
    Posts
    6,251

    Re: My Century 10A Restoration

    Another re-post! But shortened!

    Will be casting bronze replacements for the 2 angled fitments attaching the swivel mechanism to the table. Other interested get in touch as I only fire up about once a year.

  10. #30

    Join Date
    Jul 2010
    Posts
    424

    Re: My Century 10A Restoration

    Ok here is a Round two of blending and opening the grain to accept the new finish. I am very close. One more round of blending/conditioning I will be ready for Airbrush Spot staining. I want all of the repaired areas to match, before I start to rub in the base sealer, I will be using 6 to 7 coats of danish oil. then a wet sand and a few more coats until I will the grain.

    I also plan to do some edge vignetting on the corners/ edges of the main body. I will just match the origianl colors based on the wood type. It appears to be Cherry and Brown (not red) Mahogany parts.

    It is slow going and my house smells like chemicals. My wife would not be happy (but she is still on vacation). I will have to air this place out over the weekend.

    So to those who are interested if I will be able to blend the color/finish from a stripped painted camera, Only time will tell, I think I can pull it off. I am darn near there now and after only the second blending session.

    I have some edge grain that took in some grey paint. I may have to more aggressive and re stain to match but noting an airbrush and back taping to insure no hard lines are created ( an old car painting trick).

    here is where I am at as I type this message. ( I put in 3 hours tonight)

    The front is 99% color matched


    The back is real close too


    I shot a greycard to show you the actual color. My digital workflow is color managed so this is 100% exactly as it is in real life. Digital WB is kind of nice!


    And without the card the colors are perfect!
    Look at that rich grain, Shame I have to cover it all up with a sliding carriage.


    Looks like I didnt forget how to color match and condition a wood project. It has been a decade and a half since my last project. It was a $50,000 set (pair) of walnut radius stair cases that had grape vine with leaves and grapes bunches throughout the patterned details on the outside bands. That was long ago.

Similar Threads

  1. Century 10A and Semi-Centennial Stand 1A
    By dlin in forum Cameras & Camera Accessories
    Replies: 7
    Last Post: 27-May-2010, 03:33
  2. 4x5 reducing back for a Century 10A or make my own....?
    By Mattk in forum Cameras & Camera Accessories
    Replies: 0
    Last Post: 30-Apr-2010, 05:07

Bookmarks

Posting Permissions

  • You may not post new threads
  • You may not post replies
  • You may not post attachments
  • You may not edit your posts
  •