
Yup, and we thought a Saltzman was big!


Yup, and we thought a Saltzman was big!
Good luck with that. I think the vac easel I cannibalized was even heavier. I can stand on the damn thing without deflecting the accuracy of focus. But Xenon heads
are going to be hard to decide what to do with. The bulbs alone cost as small fortune and will cause a huge utility bill. You might be able to rebuild something more
realistic inside the head. I can't provide a shot of my own digs yet, maybe one of these days. But my homemade 8x10 enlarger dwarfs the 8x10 Durst I just installed next to it, but is a lot more temperamental due to the complexity of the electronics inherent to simultaneous additive color printing. I think those big
xenon heads were engineered for sequential color separation work, not simultaneous.
I will never post images of my darkroom. Some members have sensitive constitutions.
Quentin Crisp had it right "After seven years, the dust doesn't get any worse".
Lenses, carriers , handling surfaces are hospital standard, but I don't touch walls,floor,or ceiling at all. Cobwebs collect dust,surely..
Ian, I had a similar thought. I`m amazed about the pristine and perfectly organized darkrooms you very respectable people have. I love this thread, it remind me what I must do with mine.
My darkroom (two, actually) is packed with loads of gear, stickers, papers, part and other thingies. Dust? What Quentin Crisp said; great quote. I now know why mine doesn`t get worst! The only clean things are the enlarger I am using and the sink. Oh, the sink. Someday I`ll have to check what`s under that huge sink!
Here's mine, photograph taken last May. The clutter has been added to since then, but otherwise not much has changed. It gets used a lot, and is also my office. To give some sense of scale, the sink is 8 feet long.

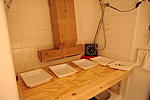
This is my bathroom/darkroom that I just completed.
I removed the ordinary bathroom ventilation fan and replaced it with a powerful squirrel cage fan in the attic. It came from an old HVAC system. The cardboard ductwork connects to where the old ventilation fan was.
The new ventilation system removes the vapors directly from the source. I can't smell the chemicals at all. Fresh air comes in from the existing house-wide HVAC system, and I leave that fan running continuously while in the darkroom. There's also a breeze of air flowing under the bathroom door (a potential dust issue).
I built the plywood table that sits over the bathtub, and below is where I wash prints. The table has several coats of polyurethane. Apparently, drops of developer are creating discoloration in the finish. Stop and fixer don't seem to harm the finish so far.

Sweet. I love the duct work!
Most economical darkroom ever.
Yes I like that ductwork too. If your seems are sealed I bet it's quite efficient.Originally Posted by Randy Moe

--- Steve from Missouri ---
Here's my darkroom. Please excuse the quality of the photographs. especially the first one. There was minimal light with which to work.
Contrary to that suggested by the super-wide lens, this darkroom occupies a pretty small space that measures 6.5'x8'. But for it's limited dimensions, a lot is packed into it, including an 8x10 enlarger! Using a Zone VI Beseler adapter, I can also fit this enlarger chassis with a 45s, color head. The 8x10 enlarger was sold without the adapter, so it was inexpensive. (I already had the adapter that was needed.)
The Sink is only 4' long. I plan to get The Sink II, longer 6' version to make larger prints.
I would have to say that I'm most pleased with my equipment board at the left above the sink in the first photo. (And, at the right in the second.) It's hard to tell, but all the electrical and plumbing equipment up to the print washer is mounted on a removable sheet of 3/4" plywood that's connected via one power cord and hot and cold water. If we should move from our house, it goes with me. It took a long time to design and build, but it was worth it.
I'll also note the custom made negative drying cabinet at the left in the second photo. I looked on EBay/Craigslist for quite a while and couldn't find one that I liked. So, I built this one using poplar.
 Posting Permissions

 Reply With Quote
Bookmarks