Page 2 of 3 FirstFirst 123 LastLast
Results 11 to 20 of 26

Thread: Dissassembly of an Antique Brass Lens

  1. #11

    Join Date
    Jan 2009
    Location
    Denmark
    Posts
    6,254

    Re: Dissassembly of an Antique Brass Lens

    When there are no lens cell present (glassJ, then you can use hammer impact without any risks at all. Attach the flange to a length of wood which has a circular cut out which will allow screw connections to the wood through, at least, 2 of the holes in the flange. Anti-clockwise blows, of course.

  2. #12
    Tin Can's Avatar
    Join Date
    Dec 2011
    Posts
    22,507

    Re: Dissassembly of an Antique Brass Lens

    Best


    Quote Originally Posted by steven tribe View Post
    when there are no lens cell present (glassj, then you can use hammer impact without any risks at all. Attach the flange to a length of wood which has a circular cut out which will allow screw connections to the wood through, at least, 2 of the holes in the flange. Anti-clockwise blows, of course.
    Tin Can

  3. #13
    Drew Bedo's Avatar
    Join Date
    Oct 2006
    Location
    Houston Texas
    Posts
    3,225

    Re: Dissassembly of an Antique Brass Lens

    Quote Originally Posted by Steven Tribe View Post
    When there are no lens cell present (glassJ, then you can use hammer impact without any risks at all. Attach the flange to a length of wood which has a circular cut out which will allow screw connections to the wood through, at least, 2 of the holes in the flange. Anti-clockwise blows, of course.
    Maybe a last resort. All of tis is 150 year old brass, so caution is important.
    Drew Bedo
    www.quietlightphoto.com
    http://www.artsyhome.com/author/drew-bedo


    There are only three types of mounting flanges; too big, too small and wrong thread!

  4. #14

    Join Date
    Jul 2008
    Posts
    3,901

    Re: Dissassembly of an Antique Brass Lens

    Do NOT apply excessive force or impact force as brass deforms easily followd by extreme difficlty of tryiing to return the deformed brass to it's orginal shape.

    ~Keep in mind, optical mechanical parts are in thousands of an inch tolrances and dimensions. So easy to deform, extreme difficult to reform.

    Two primary factors are likely at work here preventing dis-assembly,

    ~decades of corrosion within the threaded parts causing the threaded parts to effectively "weld" together. The friction lock from corrosion between internal-external threads can easily prevent dis-assembly. Given there are no glass element involved, best way to deal with this is to imersion soak the lens barrel in penetrating oil like PB blaster for a few months.. This will go a long ways to dissolving the corrosion inside the threads.

    Had a imagon rear lens element stuck on a compoud shutter that needed help. That rear element was absolutely STUCK on.. applied just enough PB blaster to lightly coat the seam of the thread interface over a period of a few months.. tried to remove the rear element months later, it easily came apart.

    *Impact force will more than likely damage some part or aspect of the lens barrel.*

    ~Renention of torque forces when the lens barrel was first assembed. If the threaded parts were put together very tight, this will add to the difficulty of disassembly. The ideal way to grip the barrel is to make a split collar/collet with a few thousands of an inch clearnace then clamped on to distribute the clamping force on the two threaded parts uniform around the entire circumfrence of the lens barrel threaded parts. These collars/collets will grip extremely good, not slip and not deform the brass allowing large amounts of twisting force to be applied. These will be a special/custom made part for this need.
    Where these collars/collets are applied will alter the dimentions of the lens barrel due to the forces involved. Clamping slighly away from the threaded area of the internal threads wil tend to enlarge that area of the threads, clamping close in to the external threaded area of the threads will tend to compress the threaded area. This can slightly increase the gap between internal to external threads aiding dis-assembly.

    This is no small or simple task due to the factors mentioned, do one wrong move will easily damage or destroy the lens barrel.


    Bernice

  5. #15

    Join Date
    Jan 2009
    Location
    Denmark
    Posts
    6,254

    Re: Dissassembly of an Antique Brass Lens

    I don’t agree with the nay sayers! Clamping and torsion around the barrel is very likely to cause “out of round” thin walled barrels with unusable threads. But the two flange threads are cut in quite substantial pieces of brass that can’t be distorted with tangential impact. Of course the barrel is not clamped rigid while this is done - but held in your left hand whilst your right hand welds the hammer. Or vice versa for a smaller percentage of the population (approximately 13% in the US).

    And yes, I have done this myself on a number of occasions on 19th century Petzvals.

  6. #16
    Drew Bedo's Avatar
    Join Date
    Oct 2006
    Location
    Houston Texas
    Posts
    3,225

    Re: Dissassembly of an Antique Brass Lens

    Lots of well meant advice here.

    I will avoid impact force and heroic clamping. The soak and/or heating approaches will come first. Then perhaps the heat with freezing technique. Thisis not a must-do thing anyway. If the flange won't come off, I will move on and either re-sell the item or sell off the parts such as lens hood and rack and pinion assy. There is no hope of re-glassing.

    ***************************************

    Many years ago, I salvaged ten 75mm Oscillo Paragon lenses from scrapped oscilloscope cameras. There was an aluminum collar threaded onto the front and rear lens cell of each one . . .that would not come off. I took them to a local gun smith, and with persuasion got him to chuck one lens cell into his lathe. Cut it off in seconds! Got him to do the others too for some barter item that I do not now remember. Sold most of them at a camera show in the mid-1990s
    Drew Bedo
    www.quietlightphoto.com
    http://www.artsyhome.com/author/drew-bedo


    There are only three types of mounting flanges; too big, too small and wrong thread!

  7. #17
    Mark Sawyer's Avatar
    Join Date
    Jul 2004
    Location
    Stuck inside of Tucson with the Neverland Blues again...
    Posts
    6,269

    Re: Dissassembly of an Antique Brass Lens

    Regarding any "clamp-it-and-force-it" methods, the only way I'd try that is with adjustable rubberr-strap oil filter wrenches that wrap around the whole body of the lens.

    With a flange, you might mount it to a solid piece of wood like a 2x4, and screw it down through the regular screw holes, then use both hands on the barrel. But always start with that penetrating oil. The previously-mentioned Blaster is good stuff.
    "I love my Verito lens, but I always have to sharpen everything in Photoshop..."

  8. #18

    Join Date
    Jul 2008
    Posts
    3,901

    Re: Dissassembly of an Antique Brass Lens

    Another aid, heat the threaded area of these brass parts to not much more than 250 degrees F, apply pentrating oil to the threaded joint seam area while heated, allow the entire part to cool.

    Heat will cause the parts to expand, applying penetraing oil to that area while hot allows the oil to enter the expaned spaces between the threaded joint. As the part is cooling, the penetrating oil will be drawn into the contracting gaps previously expanded by heating via capillary action to aid in dissolving and loosen the adhesive action of corrosion within the threaded parts.


    Bernice


    Quote Originally Posted by Drew Bedo View Post
    Lots of well meant advice here.
    I will avoid impact force and heroic clamping. The soak and/or heating approaches will come first. Then perhaps the heat with freezing technique. Thisis not a must-do thing anyway. If the flange won't come off, I will move on and either re-sell the item or sell off the parts such as lens hood and rack and pinion assy. There is no hope of re-glassing.

  9. #19

    Join Date
    Feb 2009
    Posts
    310

    Re: Dissassembly of an Antique Brass Lens

    Quote Originally Posted by Bernice Loui View Post
    The ideal way to grip the barrel is to make a split collar/collet with a few thousands of an inch clearance then clamped on to distribute the clamping force on the two threaded parts uniform around the entire circumference of the lens barrel threaded parts. These collars/collets will grip extremely good, not slip and not deform the brass allowing large amounts of twisting force to be applied. These will be a special/custom made part for this need.
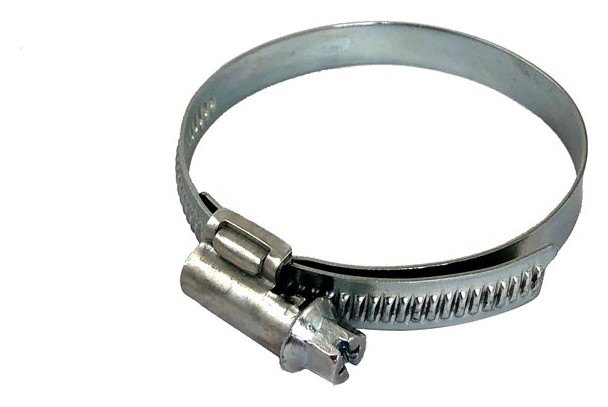
    What you describe looks like a deluxe instrument.... I don't own anything that great. I just use simple hose clamps:-


    They are very cheap and come in all the sizes ever needed. Fasten two of them to both the lens parts to be unscrewed (put a layer of insulating tape under the clamps if you don't want to scratch the lens barrel), then apply a long iron lever between the clamps' fastening bolts. Use a hammer on those bolts if the lever force is not enough....
    Last edited by ridax; 9-Sep-2022 at 13:31. Reason: typos

  10. #20
    Tin Can's Avatar
    Join Date
    Dec 2011
    Posts
    22,507

    Re: Dissassembly of an Antique Brass Lens

    I don't use that type hose clamp

    nor oil filter wrench

    They all make things worse

    Kroil, let sit, Kroil again

    and good luck
    Tin Can

Similar Threads

  1. Determining aperture of antique brass lens?
    By Drew Bedo in forum Lenses & Lens Accessories
    Replies: 14
    Last Post: 23-May-2019, 13:19

Bookmarks

Posting Permissions

  • You may not post new threads
  • You may not post replies
  • You may not post attachments
  • You may not edit your posts
  •