Page 1 of 3 123 LastLast
Results 1 to 10 of 22

Thread: DIY Gas Burst Agitation for 1 gallon vertical tanks

Hybrid View

Previous Post Previous Post   Next Post Next Post
  1. #1

    Join Date
    Sep 2020
    Location
    San Francisco
    Posts
    155

    DIY Gas Burst Agitation for 1 gallon vertical tanks

    I spent some time making gas burst agitation for my 1-gallon arkay style tanks and wanted to share what I learned.

    This older thread was extremely helpful:
    https://www.largeformatphotography.i...gen-Processing

    In particular, this part, which is based on a Kodak technical bulletin that I was unable to find: "The bubbles come out of the plenum 1/4" from bottom in 1/64" holes (Kodak recommends 1/32" or smaller) spaced alternately 1/2" apart at 30 degrees pointing down, in one second bursts every ten seconds at 35 psi, bounce off of the bottom and flow upward forming a closely and evenly spaced group of small bubbles. The rising bubbles don't agitate the developer, they displace it 5/8" inch."

    My tanks are home-made but roughly match the standard dimensions (if there is such a thing) for a 1-gallon stainless tank: 2.5"w x 10.75"d x 10.5"h. This leaves about 0.75" below the hangers to the bottom, which is enough space for a 0.25" thick plenum, 0.25" below it and 0.25" above it.

    The guidance for holes is "30 degrees pointing down," which I took to mean 15 degrees off the down-facing center line.

    For my first attempt, I used a thin-wall stainless tube. While still straight, I used my mill to drill 1/32" holes every inch along a line at 1" spacing. I then rotated the tube 30 degrees and drilled the intermediate holes. I then bent the tube into a spiral and welded 1/4" rod horizontally on the bottom to help it stay aligned and to space it 1/4" off the floor of the tank. Here's how it looked:
    Click image for larger version. 

Name:	IMG_5626.jpeg 
Views:	31 
Size:	176.5 KB 
ID:	223489

    Here is a close-up of the 1/32" holes pointing down, alternating 15 degrees off the center line:
    Click image for larger version. 

Name:	IMG_5627.jpeg 
Views:	28 
Size:	147.3 KB 
ID:	223490

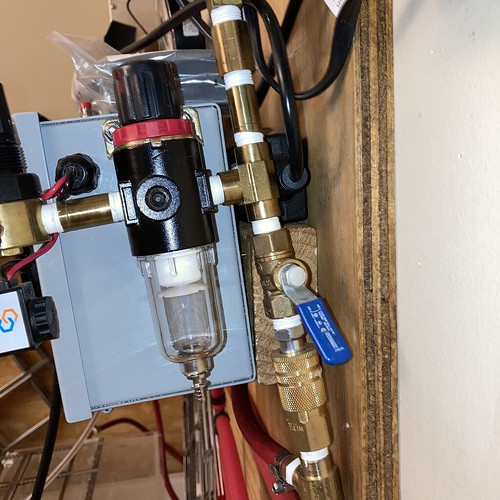
    I used a 1/4" compression to 1/4" female NPT adapter and a 1/4" NPT to 5/16" quick connect adapter to connect the plenum to 5/16" polyurethane tubing. The quick connect stuff is very convenient in use since I need to be able to put the tanks away and cheap on Amazon. Here are some of the connectors:
    Click image for larger version. 

Name:	IMG_5633.jpeg 
Views:	23 
Size:	148.9 KB 
ID:	223491

    To test it, I adjusted the gas to get an approximately 5/8" fluid rise. The issue with this plenum was that the gas burst was uneven. Here you can see the bubbles forming on the first third of the tubing length:
    Click image for larger version. 

Name:	Screen Shot 2022-01-12 at 2.36.53 PM.jpg 
Views:	43 
Size:	49.7 KB 
ID:	223492

    The pressure eventually propagates to the end but the resulting fluid movement is more of a wave from front to back, left to right. Negatives developed with this plenum were uneven with more density where the bubbles were more vigorous.

  2. #2

    Join Date
    Sep 2020
    Location
    San Francisco
    Posts
    155

    Re: DIY Gas Burst Agitation for 1 gallon vertical tanks

    From the first plenum, there were a few things I wanted to improve:

    1. 1/32" holes were too big. Too much pressure was dropping in the first few inches of tubing because it wasn't restrictive enough. Increasing pressure would make the bubbles more even but the resulting fluid rise would be so great as to overflow the tank.
    2. There was no way for the pressure to equalize between the three legs of the plenum
    3. Bending the stainless tubing was hard and I couldn't get the legs to run directly under the hangers so that the bubbles would travel along each face of the negatives

    For my second plenum, I chose copper tubing. Though it is more reactive than stainless, it is much softer and is easy to solder. I couldn't reliably drill holes smaller than 1/32" in stainless but in copper it is possible. I bought 1/64" carbide drill bits from ebay, which are inexpensive and readily available as surplus from PCB manufacture. Rather than bend a spiral out of the tube, I cut and mitered short sections and soldered them together using plumber's solder and a torch. The layout includes crossover tubes at each end to help balance the pressure across the three legs. The legs align under the hangers. Here's how it looked:

    Click image for larger version. 

Name:	IMG_5634.jpeg 
Views:	20 
Size:	169.5 KB 
ID:	223493

    And here are the 1/64" holes:

    Click image for larger version. 

Name:	IMG_5630.jpeg 
Views:	20 
Size:	139.8 KB 
ID:	223494

    The bubbles from this plenum were much more evenly distributed at lower pressures:

    Click image for larger version. 

Name:	Screen Shot 2022-01-12 at 2.36.18 PM.jpg 
Views:	29 
Size:	45.8 KB 
ID:	223495

    I have been able to achieve much more evenly developed negatives with this plenum.

  3. #3

    Join Date
    Sep 2020
    Location
    San Francisco
    Posts
    155

    Re: DIY Gas Burst Agitation for 1 gallon vertical tanks

    Finally, the gas source. Everything I read suggested an industrial gas bottle of nitrogen, which is inert and so won't oxidize the developer. I don't have a nitrogen bottle, but I do have argon for my welder (much more expensive but also more inert) so I did most of my testing with that. Connecting the quick release fitting to the flow meter was not easy. I ended up with a hack: a short length of flexible tubing and two hose clamps from home depot:

    Click image for larger version. 

Name:	IMG_5636.jpeg 
Views:	18 
Size:	108.5 KB 
ID:	223503

    This worked ok but flow meters are not regulators and so they can't maintain constant pressure for bursty loads. This doesn't matter at 10s intervals but at shorter intervals I tested it did not work. A proper nitrogen regulator that can handle low pressures is better (and the quick connect would just screw in):

    Click image for larger version. 

Name:	IMG_5637.jpeg 
Views:	12 
Size:	106.7 KB 
ID:	223504

    Industrial gasses are really a pain. The bottles are heavy and the stores that sell gas are generally hostile places for regular people. If you are going to go this way, you may want to buy an "owner bottle" (non-rental) locally and swap it for a full bottle at the store. However, it turns out none of this matters because if you have a compressor and use one-shot developer you can just use compressed air. Here's how to hook your compressor to the plenum:

    Click image for larger version. 

Name:	IMG_5624.jpeg 
Views:	13 
Size:	118.0 KB 
ID:	223505

    Everything I read suggested using inert gas was important but I tested compressed air and development times were unchanged and the negatives look good. I toss the developer after one use anyway so it doesn't matter if it is oxidized.
    Last edited by Sam L; 12-Jan-2022 at 17:44.

  4. #4

    Join Date
    Sep 2020
    Location
    San Francisco
    Posts
    155

    Re: DIY Gas Burst Agitation for 1 gallon vertical tanks

    The next challenge was to control the gas bursts. In spirit, the mechanism is very simple: a solenoid on a timer. Amazon has 12VDC normally closed solenoids for about $10. These can be controlled in various ways, but I chose to use an Arduino driving a relay. Getting into how this works is beyond the scope of a forum post. I'm happy to share the code but if you know what to do with the code you probably don't need the code!

    Here's the controller:

    Click image for larger version. 

Name:	IMG_5635.jpeg 
Views:	19 
Size:	87.6 KB 
ID:	223496

    An easier option might be to find an on/off timer that can be adjusted down to seconds and connect that to the solenoid.

    I made mine adjustable in the same ways the commercial ones were, but found that every change to timing I tested made the development less even. I suggest it is sufficient for the controller to only do 1s on 10s off.
    Last edited by Sam L; 12-Jan-2022 at 17:43.

  5. #5

    Join Date
    Apr 2021
    Posts
    1

    Re: DIY Gas Burst Agitation for 1 gallon vertical tanks

    I'm lucky enough to have a film processing sink & I've been looking at doing this for a while but got hung up on the interval timer, I've found many suitable solutions but they're all a bit messy.
    Your solution looks great though, would you mind sharing some more info on it mainly the internals as I have some Arduino coding knowledge!

  6. #6
    Tin Can's Avatar
    Join Date
    Dec 2011
    Posts
    22,500

    Re: DIY Gas Burst Agitation for 1 gallon vertical tanks

    I use 2 timers in series. The most common perhaps 511.

    Next time I get out of bed I will show my spares

    I have a BAD KNEE this weekend
    I


    Quote Originally Posted by Jbb View Post
    I'm lucky enough to have a film processing sink & I've been looking at doing this for a while but got hung up on the interval timer, I've found many suitable solutions but they're all a bit messy.
    Your solution looks great though, would you mind sharing some more info on it mainly the internals as I have some Arduino coding knowledge!

  7. #7

    Join Date
    Sep 2020
    Location
    San Francisco
    Posts
    155

    Re: DIY Gas Burst Agitation for 1 gallon vertical tanks

    JBB, happy to share the code, though I think you should do something much simpler. PM me and I'll send you a link.

    My solution ended up being clean but is way overkill. If I were to do it again, I'd probably still use an arduino, but:

    - No display, only dim red LEDs for "running" and "gas on"
    - A simple 3-way toggle switch for run - off - continuous
    - No adjustable timing, just 1s on 10s off

    That would dramatically simplify it and it would do everything you need.

    - I use the same solenoid as Tin Can and common 5V one-channel relays from Amazon driven directly by the arduino. One gotcha is that you have to add a shunting diode for the solenoid or you will fry your Arduino. Mine was rebooting after the solenoid was released until I added the diode.

    - I suggest using a toggle switch with a rubber boot for splash resistance.

    - The tiny arduino pro micro is nice, though any would work. The pro micro fits really well into small enclosures.

    - I fit everything (arduino, display, solenoid, etc) into an aluminum Hammond 1590BB enclosure like they use for guitar stomp boxes and put rubber feet on it keep it above any water sitting on the counter.

    - 12V wall wart with a 5V regulator in the box

    - 5/16 (8mm) poly tubing (https://www.amazon.com/gp/product/B08GC75P4N) and quick release fittings. Double threaded union to get into the box (https://www.amazon.com/dp/B08XWYGQ14)

  8. #8
    Tin Can's Avatar
    Join Date
    Dec 2011
    Posts
    22,500

    Re: DIY Gas Burst Agitation for 1 gallon vertical tanks

    Lowest Noise by TIN CAN COLLEGE, on Flickr

    IMG-0929 by TIN CAN COLLEGE, on Flickr

    IMG-0928 by TIN CAN COLLEGE, on Flickr

    IMG-0927 by TIN CAN COLLEGE, on Flickr

  9. #9
    Tin Can's Avatar
    Join Date
    Dec 2011
    Posts
    22,500

    Re: DIY Gas Burst Agitation for 1 gallon vertical tanks

    IMG-0932 by TIN CAN COLLEGE, on Flickr

    IMG-0926 by TIN CAN COLLEGE, on Flickr

    IMG-0930 by TIN CAN COLLEGE, on Flickr

    IMG-0933 by TIN CAN COLLEGE, on Flickr

  10. #10
    Tin Can's Avatar
    Join Date
    Dec 2011
    Posts
    22,500

    Re: DIY Gas Burst Agitation for 1 gallon vertical tanks

    I should have used all SS fittings, too much $$$

    The very quiet compressor is in the furnace room then through the wall with water into a spare bedroom, now totally blacked out

    No need for black paint

    I have a Snap-On pencil air gun that takes 25 psi down to almost nothing for dust

    There are 6 enlargers on the dry side

    Adding Alt Process fake Sun

    This DR was moved from a bigger Chicago space

Similar Threads

  1. GAS BURST Agitation System DIY
    By Tin Can in forum Darkroom: Film, Processing & Printing
    Replies: 21
    Last Post: 11-Sep-2015, 19:28
  2. Nitrogen Burst Agitation
    By cyrus in forum Darkroom: Film, Processing & Printing
    Replies: 26
    Last Post: 3-Feb-2015, 08:12

Bookmarks

Posting Permissions

  • You may not post new threads
  • You may not post replies
  • You may not post attachments
  • You may not edit your posts
  •