Page 1 of 2 12 LastLast
Results 1 to 10 of 16

Thread: Metering For Still Life

  1. #1

    Join Date
    Oct 2013
    Location
    Doncaster UK
    Posts
    627

    Metering For Still Life

    I need to get to grips better for some still life I want to do on 4x5 black and white film especially the metering side.

    For the lighting, I am using the modelling light from a studio flash head and a soft box, I also use reflector cards to fill in some of the dark areas. My choice of film will be FP4 developed in Pyrocat 1:1:100 for 16 minutes in a small tank with inversions every minute.

    Question:
    Would I be better using incident metering or spot metering and placing an area on a specific zone and then looking whether I need to change development for the high

  2. #2
    8x10, 5x7, 4x5, et al Leigh's Avatar
    Join Date
    Dec 2010
    Location
    Maryland, USA
    Posts
    5,454

    Re: Metering For Still Life

    Quote Originally Posted by IanBarber View Post
    Question:
    Would I be better using incident metering or spot metering and placing an area on a specific zone and then looking whether I need to change development for the high
    Hi Ian,

    Forgive the straight talk, but...
    You need to learn how to use an incident meter first. Meter the scene with a meter that responds to flash when using that light source (with or without a soft box). Develop normally, then print normally.

    Evaluate the prints. If they're less than satisfactory in some respect, determine what's wrong and make adjustments.

    Once you get to the point that you can reliably interpret incident readings and know what results you'll get, then you can advance to a spot meter and the Zone System for finer control of the results.

    Your choice of still life in a studio is an excellent learning environment, since the subject and lighting remain unchanged over an extended period of time (if you wish).

    - Leigh
    If you believe you can, or you believe you can't... you're right.

  3. #3

    Join Date
    Jul 2016
    Posts
    4,566

    Re: Metering For Still Life

    Quote Originally Posted by IanBarber View Post
    Question:
    Would I be better using incident metering or spot metering and placing an area on a specific zone and then looking whether I need to change development for the high
    Ian, one thing is metering light and another different one is deciding exposure/processing, sometimes we put all in the same basket.

    The metering part can be done in both ways, if you use an incident meter you can also meter fill and key separately by pointing with the meter to each light source, this is an straight way if wanting a key vs fill ratio, not being influenced by subject's reflectiveness or color.

    Also spot metering delivers an amazing degree of control, and you can anyway use a grey card oriented to the light sources to meter on it as if it was an incident meter.

    Predicting result with incident vs spot has to be the same for you, the point is that you have to be able to do nearly the same not mattering if you use spot or incident. I'd start with the spot meter, perhaps it's easier to predict the result for any spot in the scene, to know where the deep shadows are and what the intensity glares have.

    After several tests, if you review anotated spot meterings for the highlights/glares, you will find what happens for any level of overexposure and you will know if you want to use N- development to control excessive densities.

    You know, you may use the shading gradient and glares for volume construction, I've always find that something complicated...

    So I'd use both, incident to check key vs fill ratio, and spot for knowing shadows and glare levels.

  4. #4

    Join Date
    Oct 2013
    Location
    Doncaster UK
    Posts
    627

    Re: Metering For Still Life

    Thank you Leigh and Pere, some interesting points to work on

  5. #5

    Join Date
    Sep 1998
    Location
    Oregon now (formerly Austria)
    Posts
    3,408

    Re: Metering For Still Life

    Sometimes I think we make things more complicated than they need to be.

    Metering is metering, whether inside or outside, landscape, studio, portrait, still life, whatever...

    If you have good metering technique with whatever kind of meter, just apply that to your still life. The obvious exception here is when you use flash, for which you'll need a good flash meter and learn to use incident metering techniques (since most flash meters are incident meters).

    When you control the lighting, it is easier to get good results after a few tries too. Shadows too dark? Add more fill, etc., etc. With a spot meter, you just place a low and see where the highs fall and adjust lights accordingly. With an incident meter, adjust your lighting ratio. If you use an averaging reflected meter, you may have to make a test print or two and adjust lighting based on those (here we can collectively mourn the passing of Polaroid).

    Development need not be adjusted if you get your lighting right. However, maybe you like the look of flat light and increased development, or whatever. Simply tailor your lighting and development for the desired result.

    The things that complicates still life photography for me (I like to use natural light through a window/skylight and reflectors) are compensating for bellows draw (not difficult, really) and reciprocity failure. This latter sometimes needs a bit of testing, but once you get it down for a particular film, it's not difficult either.

    Best,

    Doremus

  6. #6
    Pieter's Avatar
    Join Date
    Jul 2018
    Posts
    947

    Re: Metering For Still Life

    The Minolta Spotmeter F meters flash, too.

  7. #7
    chassis's Avatar
    Join Date
    Jul 2011
    Posts
    1,974

    Re: Metering For Still Life

    Agree with Leigh and Doremus.

    I use incident for still life, primarily a Sekonic L-758DR flash meter. The principle is the same if using continuous lighting. The method below is also how I meter portraits.

    Meter the brightest highlight, with incident dome pointing toward the light source, normal to the subject surface, at the highlight location. Then meter the deepest shadow, with the dome facing normal to the subject surface at the shadow location.

    I like to meter at the subject on the lens axis, with dome facing the camera. This third measurement should generally fall between the highlight and shadow reading. For a portrait, this reading is with the meter in front of the chin of the subject, with the dome facing the camera.

    Then it is decision time from a creative point of view. Where you place the highlights and shadows on the film, and how you process the film, is up to your aesthetic goal.

  8. #8

    Join Date
    Oct 2013
    Location
    Doncaster UK
    Posts
    627

    Re: Metering For Still Life

    Quote Originally Posted by chassis View Post
    The method below is also how I meter portraits.

    Meter the brightest highlight, with incident dome pointing toward the light source, normal to the subject surface, at the highlight location. Then meter the deepest shadow, with the dome facing normal to the subject surface at the shadow location
    Chassis, do you do this to find what brightness range you have in the scene ?


    Quote Originally Posted by chassis View Post
    I like to meter at the subject on the lens axis, with dome facing the camera. This third measurement should generally fall between the highlight and shadow reading. For a portrait, this reading is with the meter in front of the chin of the subject, with the dome facing the camera.
    Would this third position give you and average of the first two and then you make a decision based on all 3 readings what you visualise for the final outcome.

  9. #9
    chassis's Avatar
    Join Date
    Jul 2011
    Posts
    1,974

    Re: Metering For Still Life

    Ian, the range is found by metering the brightest highlight and the deepest shadow. For still life and portrait, I normally use strobe. In this example, the brightest highlight might be f/11 and the deepest shadow might be f/5.6, meaning a two stop difference. This is a common lighting setup for me, a 1 or two stop difference between subject highlight and shadow. Yours may have a wider or narrower range of brightness. With continuous lighting, I would choose a shutter speed on the meter, and meter for f/stop, using the same method described in this, and my prior, post.

    The third metering position, facing the camera, very well might be the average reading. Or it might not be, depending on where the "middle of the subject" is positioned, relative to the lighting. Where to place the meter, and where to orient the incident dome, is important, and based on your creative aesthetic.

    To confuse things further, I often use a black background, which I do not meter. The black muslin is rendered nearly completely black in the positive image, with nearly zero density on the negative. This is an aesthetic choice and might not be desirable for everyone. If using a colored or grey background, or with lighting on the background, it would be useful to take a fourth reading on the background, in various locations if the background light is not uniform (e.g. spot or grid lighting on the background).


    It also helps to put the meter down, cover the ground glass, and look at the scene with your eyes, without equipment. Explore the scene with your eyes and see the highlights and shadows. This helps to increase understanding.

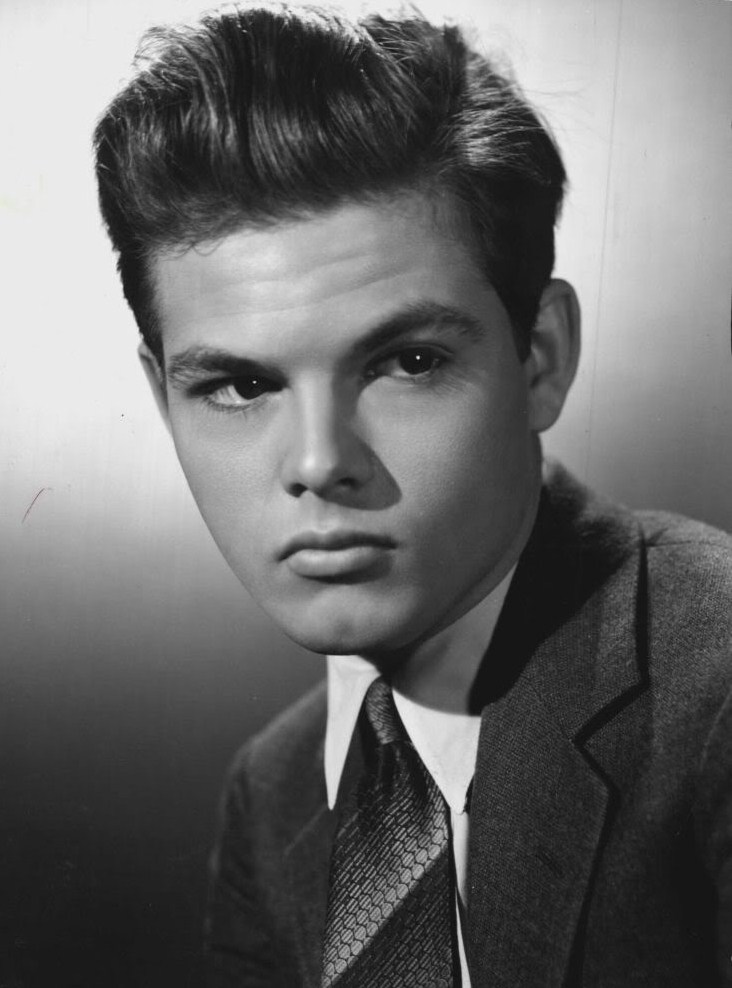
    I could keep going, but a better way to learn is to practice and to look at images that fit your aesthetic. Still life and portrait are the same, in my view, from a technical lighting point of view. The subjects and aesthetic goals are different, but the lighting basics apply equally. Here is a portrait that I recent saw, with interesting lighting. It looks to be a fairly typical Hollywood portrait of the 1940s, with key, fill, hair and background lights. Lighting this image is no different in my mind than lighting a still life set.

    Dickie Moore, American actor in 1944
    Photo credit: photographer unknown, publicity shot for the film "Youth Runs Wild"
    Source: Wikipedia

  10. #10

    Join Date
    Oct 2013
    Location
    Doncaster UK
    Posts
    627

    Re: Metering For Still Life

    Thanks Chassis.
    I still have a fair way to go to make a negative that matches my visualisation.

    This is one I did yesterday using a continuous light inside a soft box. The image on the ground glass looked very nice and low key but the negative looked much brighter.

    Click image for larger version. 

Name:	Screenshot 2019-01-05 at 14.04.54.jpg 
Views:	20 
Size:	59.7 KB 
ID:	186097

    I scanned it but had to do some heavy lifting in Photoshop to get it to look how I visioned it in my mind


Similar Threads

  1. Low ISO metering
    By guyatou in forum Style & Technique
    Replies: 9
    Last Post: 6-Feb-2015, 01:58
  2. Still Life & Flash Metering
    By oneshotbeary in forum Style & Technique
    Replies: 20
    Last Post: 30-Nov-2013, 15:28
  3. Sinar 8x10 bag bellow for metering or non-metering back
    By Linhof in forum Cameras & Camera Accessories
    Replies: 1
    Last Post: 20-Sep-2013, 18:37

Bookmarks

Posting Permissions

  • You may not post new threads
  • You may not post replies
  • You may not post attachments
  • You may not edit your posts
  •