Page 3 of 4 FirstFirst 1234 LastLast
Results 21 to 30 of 31

Thread: How to print large - 6 foot possible

  1. #21
    Michael Wesik's Avatar
    Join Date
    Dec 2014
    Location
    Vancouver, British Columbia
    Posts
    67

    Re: How to print large - 6 foot possible

    Quote Originally Posted by Ron McElroy View Post
    How do you dry prints this large?
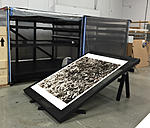
    All of the prints I make are dried in a tented drying rack that has one or two humidifiers placed inside (not the kind that produces steam). After being carried by its corners out the tray (I don't roll any of my prints at any time), a print is placed on a sheet of angled plexi emulsion up, squeegeed and picked up by the corners again and placed onto an archival screen which is then inserted into the drying rack which is zipped up for most of the drying time. The process takes two people unless the prints are small like 30x40s. I found that if you can create a fairly humid environment - between 70% - 90% humidity - it allows the emulsion and the paper base to dry slowly, at the same time, over the course of a few days depending on the time of year. I get minimal rippling and have had virtually no issues mounting the largest of my prints on dibond. It took a while to figure this out though...

    Click image for larger version. 

Name:	IMG_2115.jpg 
Views:	55 
Size:	75.5 KB 
ID:	151202

  2. #22

    Join Date
    Nov 2013
    Posts
    69

    Re: How to print large - 6 foot possible

    what do you use for mounting to dibond?

  3. #23
    Michael Wesik's Avatar
    Join Date
    Dec 2014
    Location
    Vancouver, British Columbia
    Posts
    67

    Re: How to print large - 6 foot possible

    Quote Originally Posted by Argentum View Post
    what do you use for mounting to dibond?
    I'm not sure to be honest. I have everything mounted by Hieu at the Lab in Vancouver. He's about the only person I trust with mounting my stuff. They're fantastic.

  4. #24
    Drew Wiley
    Join Date
    Sep 2008
    Location
    SF Bay area, CA
    Posts
    18,395

    Re: How to print large - 6 foot possible

    I have a several big patio door screens for drying - alum frames with fiberglass mesh. I got them free due to where I work (we sell lots of big windows etc, and
    size mistake or warranty issues arise from time to time), but you could make your own. Dibond is nonporous, so you'd have to use a cold laminating adhesive with a pressure roller system. Not a do-it-yourself procedure. It's tricky. But I don't know why Dibond would really be needed unless you require an exceptionally smooth substrate for high-gloss prints. Big fiber-based prints can be done wet mounting, with or without a vacuum press. This is far less expensive, but requires practice, a low humidity comfortable workspace, and suitable board. Working by yourself requires forethought, or in my case, a suspension system that keep the
    print taut, but allows it to be very gradually lowered while being simultaneous applied to the board. A certain number of horror stories are just part of the learning curve. So save up some of your "dud" work prints just for practice.

  5. #25

    Join Date
    Nov 2013
    Posts
    69

    Re: How to print large - 6 foot possible

    I am also curious to know how people would fix a dibond panel to a wall using hidden fixings. Is gluing a hanger to the back the only way? I'm skeptical of glue coming unglued over time.

  6. #26

    Join Date
    Feb 2010
    Posts
    1,136

    Re: How to print large - 6 foot possible

    Damn, that is a really sweet set up for large prints (Michael Wesik). You must have a huge amount of space to work with. (I am jealous. ;-)

  7. #27

    Join Date
    Mar 2005
    Location
    Newbury, Vermont
    Posts
    2,293

    Re: How to print large - 6 foot possible

    Currently printing to 20x30 in homemade epoxy over birch ply trays.

    Currently designing system to print to 40x60 - consisting of a single, large sheet of plexiglass, tilted to almost vertical above my darkroom sink, with slightly tilted trough underneath this - which will empty into an interchangeable one or two gallon container inside which is placed a small recirculating pump/rubber hose. Rubber hose will either have plain end, or I might affix a length of smallish diameter pvc into which a row of small holes have been drilled, to distribute solutions.

    Long story short: exposed paper is taped on top edge to plexiglass. Pre-soak water hosed over print directly from sink mixing valve, then developer hosed from recirc. pump, evenly over print, until development is complete. Flush pump tube back into dev. container to clear. Replace dev. container with stop and submerge pump into this, then proceed to pump stop over print. Follow same procedure for fixing baths. Finally, carefully (!) transfer print into oversized wash tray and wash/tone/etc. prior to a very careful squeegee, then hang to dry.

    Above setup will take up relatively little space, and avoids the less desirable aspects of handling logistics/fumes/etc. from chemicals sitting in large open trays. My guess is that oxidation might be somewhat greater - but then I can use relatively smaller amounts of solutions than I would with open trays, thus could re-mix when needed and still have this be cost effective.

    I cannot wait to try this...and will report back with some photos of the setup and notes on results.

  8. #28
    Drew Wiley
    Join Date
    Sep 2008
    Location
    SF Bay area, CA
    Posts
    18,395

    Re: How to print large - 6 foot possible

    Argentum - there are some really nice thin anodized aluminum cleat options out there. No wires, no glue, very reliable. I made a clever picture hanging station
    consisting of a handtruck modified to carry a stack of large framed pictures into location, with an attached little case holding wall anchors, screws, and my cordless drill, and best of all, with an attached adjustable-height story pole for my wall laser. The wall half of the cleat is just aligned to the laser beam and fastened to the wall. The picture side is screwed to the back of the picture frame or installed using appropriate frame clips. Up it goes completely and permanently level, yet easily removable too.

  9. #29
    Tin Can's Avatar
    Join Date
    Dec 2011
    Posts
    22,508

    Re: How to print large - 6 foot possible

    Quote Originally Posted by John Layton View Post
    Currently printing to 20x30 in homemade epoxy over birch ply trays.

    Currently designing system to print to 40x60 - consisting of a single, large sheet of plexiglass, tilted to almost vertical above my darkroom sink, with slightly tilted trough underneath this - which will empty into an interchangeable one or two gallon container inside which is placed a small recirculating pump/rubber hose. Rubber hose will either have plain end, or I might affix a length of smallish diameter pvc into which a row of small holes have been drilled, to distribute solutions.

    Long story short: exposed paper is taped on top edge to plexiglass. Pre-soak water hosed over print directly from sink mixing valve, then developer hosed from recirc. pump, evenly over print, until development is complete. Flush pump tube back into dev. container to clear. Replace dev. container with stop and submerge pump into this, then proceed to pump stop over print. Follow same procedure for fixing baths. Finally, carefully (!) transfer print into oversized wash tray and wash/tone/etc. prior to a very careful squeegee, then hang to dry.

    Above setup will take up relatively little space, and avoids the less desirable aspects of handling logistics/fumes/etc. from chemicals sitting in large open trays. My guess is that oxidation might be somewhat greater - but then I can use relatively smaller amounts of solutions than I would with open trays, thus could re-mix when needed and still have this be cost effective.

    I cannot wait to try this...and will report back with some photos of the setup and notes on results.
    This does sound interesting. Please advise on pumps after your testing.

    Patently waiting!

  10. #30
    bob carnie's Avatar
    Join Date
    Jan 2004
    Location
    Toronto, Ontario,
    Posts
    4,946

    Re: How to print large - 6 foot possible

    One needs Flow Bond for dry mounting fiber prints to diabond.. Heat not cold mount.

    Very finicky process to do but will work... contact Luigi at Drytac Canada for specifications.

    I have done a lot of this mounting but to be honest prefer to mount large prints to 4ply Rag or 2ply rag.

Similar Threads

  1. 8 Foot Print from 617 Film Scan
    By gregmo in forum Digital Processing
    Replies: 8
    Last Post: 30-Jul-2013, 15:39
  2. What is this huge over 5 foot large format camera ?
    By premierpicker in forum Cameras & Camera Accessories
    Replies: 5
    Last Post: 31-Dec-2012, 09:02
  3. Looking for someone to print large.
    By Greg Gibbons in forum Digital Processing
    Replies: 30
    Last Post: 24-Jun-2010, 22:47
  4. How to mount a 4 X 8 foot ink jet print???
    By Kirk Fry in forum Digital Processing
    Replies: 9
    Last Post: 27-Oct-2007, 02:34
  5. Large Format or Medium Format for use on foot and sailboat
    By McCormack, Ken in forum Style & Technique
    Replies: 11
    Last Post: 31-Jan-1999, 00:52

Bookmarks

Posting Permissions

  • You may not post new threads
  • You may not post replies
  • You may not post attachments
  • You may not edit your posts
  •