
I am envious.Originally Posted by Michael Wesik


I am envious.
One way to save space is to use PVC water pipes. They come in various lengths and widths. I got 12" pipe and cut mine to five feet (60 inches) -- the widest paper that I have. Then they are cut right down the middle. Glue each end with PVC glue and a flat PVC panel (cut to size). These act as "legs" so the tube can't rotate. Cover the inside and outside seams with silicone sealant. I have four tubes -- developer, stop, fix, wash. I use them for B&W as well as color. I put heating pads underneath for color. Each tube needs 1 gallon of each chemical -- not bad. The paper is normally curved and slides into each tube easily. You can run it through with one hand on each end of the paper or simply roll it up inside the tube and then unroll it -- and repeat. If you have a problem with uneven development just dilute the developer and increase the development time. I've made eight foot prints this way without an assistant. I can't imagine using four 5x8 foot trays -- an 8x20 foot area. That would need a warehouse! I get it all done in a 4x5 foot area. That's one-eighth the size and can fit in most darkrooms.


Can you draw your tube design, I'm not visualizing it...
Thanks!
Tin Can
Is there an interest out there in a mural print making workshop?
+1
Yes! But I could only attend if it's local to me. Or at least within a day's ride.
Is it in Connecticut?

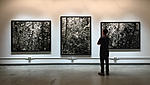
I'd love to see some pictures or diagrams of your process and some examples of your work as well. It sounds really interesting. The largest prints that I've been able to make are 53x69 inches image size (see attached picture). They are partially bleached, redeveloped in thiocarbamide, and then toned with GP-1 (and selenium for the final edition). Please excuse the iPhone pictures.
I've been using all Ilford papers, mainly warmtone and classic fibre, so I'm limited to 56" in width. I could go longer but I don't typically like to push my negs beyond 5x enlargement, so my 11x14 negs are tapping out around this size.
I'm currently printing to 21x30...cutting down from 42"x98' rolls and souping in 22x32 inch trays (homemade).
Years ago I did 40x60's with students (all student work), souping in large troughs on darkroom floor, with one person on each side pulling up and down. Very messy and not to my liking.
I'd like to go with something like the cut-in-half pvc pipes mentioned above - but cannot find anything online (here or elsewhere) which completely/accurately describes the "scrolling and/or rolling" procedure for large prints.
So....could someone please describe (completely/accurately) the scrolling (and/or rolling) procedure, which I can do by myself (without help), in troughs in my 36"x16' sink, with a good degree of smoothness/consistency/safety to prints - in sizes from 30x40 to 40x60? Thanks!!
 Posting Permissions

 Reply With Quote
Bookmarks