Page 2 of 4 FirstFirst 1234 LastLast
Results 11 to 20 of 36

Thread: Paper Negative Reversal Process (In camera positives)

  1. #11

    Join Date
    Jul 2016
    Posts
    4,566

    Re: Paper Negative Reversal Process (In camera positives)

    Quote Originally Posted by WayneStevenson View Post
    I just thought I would share my results from testing some Ilford MGIV RC paper t
    Many thanks for sharing, I'll use your information to try it.

    I'd like to ask at what ISO paper was exposed ?

    Thanks in advance

    Regards

  2. #12

    Join Date
    Aug 2012
    Posts
    5

    Re: Paper Negative Reversal Process (In camera positives)

    Quote Originally Posted by valotus View Post
    I recently found this topic while I'm looking for solution to get paper base neutral. I'm using Ilford multigrade RC paper and doing reversal process with permanganate bleach and potassium metabisulphite wash. Have been doing this for several years more or less successfully, but now I have got problems with yellow-brownish tint on white areas.

    I have tried to trace it in different steps of process, but the weirdest thing is that the stain mostly appears in last wash after fixing. Before that image seems to be neutral and if there is any slight colour, fixing will remove it. But then comes the ugly yellow-brownish stain...
    I finally discovered (at least partial) solution to my problem. Don't know what mechanism makes it, but potassium metabisulphite wash was the reason which caused paper base colouring after process.

    At first it was pretty confusing because as a wash it seems to work perfectly and totally removes all stains after permanganate bleach, leaving paper totally bright white. But as I told before, very unpleasant yellow tint will then appear after final development and fix.

    Some years ago I used weak sodium hydroxide dilution as a wash, so I swapped back to it and got rid of colouration. What I stated confusing was that sodium hydroxide wash doesn't solve permanganate stains totally and will let paper pretty dirty looking, but this will be compensated in final developing which cleans it again. After fix and wash it stays clean and neutral too.

    If someone is wondering why I am using this paper reversal process instead of traditional negative-positive method, this is the reason:

    Click image for larger version. 

Name:	5687_LR.jpg 
Views:	167 
Size:	114.6 KB 
ID:	153823 Click image for larger version. 

Name:	5711_LR.jpg 
Views:	180 
Size:	60.0 KB 
ID:	153824 Click image for larger version. 

Name:	3542_LR.jpg 
Views:	180 
Size:	77.4 KB 
ID:	153825

  3. #13
    Tin Can's Avatar
    Join Date
    Dec 2011
    Posts
    22,476

    Re: Paper Negative Reversal Process (In camera positives)

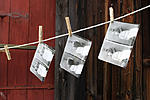
    Nice new Cabinet Cards.

    Great work!
    Tin Can

  4. #14

    Join Date
    Dec 2015
    Posts
    203

    Re: Paper Negative Reversal Process (In camera positives)

    If someone is wondering why I am using this paper reversal process instead of traditional negative-positive method, this is the reason:
    So you are doing this with a portable darkroom? Sort of a no-mess version of wet plate?

  5. #15

    Join Date
    May 2012
    Posts
    39

    Re: Paper Negative Reversal Process (In camera positives)

    Hello,

    after some test I concluded that 1.5 cand give me rather better results than 3 ISO.
    Also, after seeing some other recipes for the bleach, I decided to use 2 minutes instead of one (If you wish, I will share the test image that I made to conclude that)


    Click image for larger version. 

Name:	27322436924_9cc2cb1c6f_b.jpg 
Views:	103 
Size:	56.2 KB 
ID:	153830
    This was the first test with 3 ISO (use exactly the recipe used suggested here)

    Click image for larger version. 

Name:	45P_0029_p.jpg 
Views:	121 
Size:	74.4 KB 
ID:	153831
    The last image with 1.5ISO


    The reason for going down one stop is related with the fact that all images came a bit to dark (so the paper needed to be burned a bit more in the first exposure)

  6. #16

    Join Date
    Aug 2012
    Posts
    5

    Re: Paper Negative Reversal Process (In camera positives)

    Quote Originally Posted by Rael View Post
    So you are doing this with a portable darkroom? Sort of a no-mess version of wet plate?
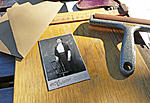
    Actually it is pretty much like no-mess version of wet plate. I have had this museum project going on for several years and this is a perfect process for it; it's fast (with RC paper it can be done dry-to-dry and even mounted on cardboard within 20 minutes under primitive outdoor museum conditions), still it's a traditional silver based process.

    Orthochromatic BW paper tonal range is pretty close to wet plate and any impurities of process just makes more old look to it. And maybe the best of all, final developing can be done on daylight, so everyone standing around my desk are able to see the magic of image appearing on paper...

    Darkroom with safelight is only needed for the first developing/bleach/clear steps and also for loading plateholder, so it can be done in quite small or even portable darkroom.

  7. #17

    Join Date
    Feb 2016
    Location
    Fredericksburg, VA
    Posts
    21

    Re: Paper Negative Reversal Process (In camera positives)

    I am just starting out with paper negatives, getting interested in positives.

    I see permanganate bleach mentioned in this thread, and I see very nice photos on Flickr by dipositif who uses potassium dichromate with sulfuric acid as bleach. I am collecting tools for Bromoil, and so already have copper sulfate, potassium bromide, and potassium dichromate on hand.

    My goal is to bleach and use sodium sulfide toner (like dipositif on Flickr). The question is, does it matter what bleach process I use??

    I have Adorama paper but plan to get some Slavich Bromportrait 80 since it seems that the Brom papers give the most substantial toning result.

  8. #18

    Join Date
    Jun 2014
    Posts
    2,084

    Re: Paper Negative Reversal Process (In camera positives)

    Try it out! I'd say it doesn't matter, but I've only experimented with dichromate bleach so far - and a bit with copper sulfate, but that wasn't aggressive enough to my taste, although in hindsight, it may work well for mordancage (but that's an entirely different can of worms).

    As for sepia toning: I always use a thiourea sepia toning (if I want sepia that is), which works on every paper as far as I can tell. The extent of toning depends on how far you bleach back the image and the hue (varying from greenish yellow to warm brown) can be varied with the ratio of NaOH:thiourea.

  9. #19
    sapata's Avatar
    Join Date
    Nov 2007
    Location
    Brazil
    Posts
    79

    Re: Paper Negative Reversal Process (In camera positives)

    Quote Originally Posted by WayneStevenson View Post
    Attachment 113505

    I just thought I would share my results from testing some Ilford MGIV RC paper that I cut down into 4x5 to load into my cut film holders. With the intention of shooting at 8x10.

    Besides Dektol and fixer, you need three other chemical solutions. Easily obtained, and inexpensive.

    Bleach (2 part, mixed 1:1, makes very short life. I get several days before it stops working. It eventually goes clear but will still be useless with it's normal colour when it goes bad so always test):
    Part A: 2g Potassium Permangnate to 1000ml water
    Part B: 28g Sodium Bisulfate to 1000ml water

    Clearing:
    30g Sodium Metabisulfite to 1000ml water

    Hypo Stock Solution:
    32g Sodium Thiosulphate pentahydrate (Hypo) to 1000ml water

    1)Developer Kodak Dektol stock with 3ml of hypo solution for 1:00 minute
    2)Rinse
    3)Bleach for about a minute
    4)Rinse
    5)Clearing solution for about a minute.
    6)Rinse
    7)Second exposure was done in daylight at sink while clearing and rinsing for only a couple minutes at most.
    8)Second developer 20 - 30 seconds approx. Should be to completion.
    9)Rinse
    10)Fix (fixer of your choice)
    11)Rinse
    12)Dry.
    That's great!
    I'm very curious about this process, specialy bacause it uses very few chemicals and as you've mentioned, easily to find.
    Is there anything I have to look while developing? I mean... because it's made by inspection, do I have to pay attention to any particular stage of the process?
    Also, at n.5 "clearing solution for about a minute" is this one minute done under the red safe light?
    From n. 7, everything is made in normal light condition, correct?
    Many thanks!
    Mauricio Sapata
    www.mauriciosapata.com

  10. #20
    Tin Can's Avatar
    Join Date
    Dec 2011
    Posts
    22,476

    Re: Paper Negative Reversal Process (In camera positives)

    Wow, very cool!

    Thanks for posting a complete process with specifics!
    Tin Can

Similar Threads

  1. Alt-Process Prints from Digital Negatives or Positives
    By ndg in forum Image Sharing (Everything Else) & Discussion
    Replies: 583
    Last Post: 3-Dec-2019, 20:10
  2. 8"x10" Paper Negative Box Camera Images
    By JoeV in forum Image Sharing (LF) & Discussion
    Replies: 21
    Last Post: 14-Oct-2010, 08:44
  3. BW reversal process
    By bluenote in forum Darkroom: Film, Processing & Printing
    Replies: 22
    Last Post: 27-Jul-2010, 01:52
  4. Paper negative process help
    By goamules in forum Darkroom: Film, Processing & Printing
    Replies: 17
    Last Post: 23-Apr-2009, 05:44
  5. Why paper manufacturers doesn't sell paper larger than size of the negative?
    By SAShruby in forum Darkroom: Film, Processing & Printing
    Replies: 12
    Last Post: 3-Feb-2008, 23:37

Bookmarks

Posting Permissions

  • You may not post new threads
  • You may not post replies
  • You may not post attachments
  • You may not edit your posts
  •