Compiled by Q.-Tuan Luong for the Large Format Page
Multiply the marked f-stop by (1 + M), where M is the magnification on the ground glass. Alternatively, mark & measure the position of the lens at infinity focus, and then measure the ground glass to lens distance at close focus. Divide the total extension at close focus by the former number (near infinity, which should be close to the focal length for most LF lenses), and the resultant f-stop factor will be the same (or close enough).
When the bellows is extended beyond infinity focus for close-up work, an exposure FACTOR must be determined and applied. Two convenient ways of finding the FACTOR are:
a) When the camera is focused at infinity, note a point on the camera and another on the lens (e.g., diaphragm) such that the distance between them is equal to the focal length (call it F). Then, when the bellows is extended for close-up focus, the extension between those two points will be greater than F (call it E). The exposure factor will be (E/F) squared. For example, extending the bellows to twice-F to focus for an object-to-image ratio of 1:1, the FACTOR will be 4.
b) Measure the object width or height (call it O) and that of it's image on the ground-glass (call it o). The exposure factor will be (o/O+1) squared. For example, focusing for an object-to-image ratio of 1:1, the FACTOR will be (1/1 + 1) squared, or 4.
Applying the FACTOR:
If 4 times the exposure is required (per the examples above), open up the lens 2 stops or increase the exposure time 4-fold.
Two complications often arise.
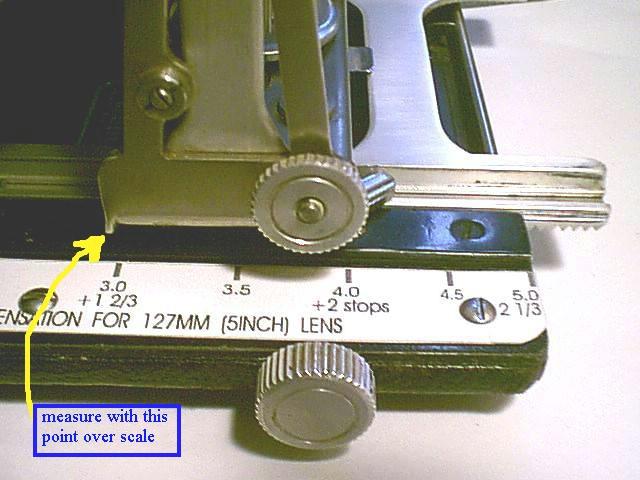
Firstly, it is hard, maybe even impossible, to measure bellows extension when using swings, tilts, rise/fall and combinations thereof; thus the object-to-image measurements are useful (indeed, Calumet offers a handy plastic template, based on that principle, calibrated directly in stops).
Secondly, FACTORs of 2, 4, 8, etc. obviously correspond to 1, 2, 3, etc. stops; what about a FACTOR of 3?? To convert FACTORs to stops, use a scientific calculator; (log FACTOR/log 2) or (ln FACTOR/ln 2) equals stops. For a FACTOR of 3, (log 3/log 2) equals (.48/.3) equals 1.6 stops.
The formula (Extension/FocalLength) **2 is basically correct. The focal length is basically the distance from the center of lens (where the aperture is) to the film plane when the lens is focused at infinity. So a 12inch lens will have 12 inches of bellows when focused at infinity. You move the lens farther away from the film in order to focus on something closer. The new distance of the lens from the film is the "extension" (not the distance to what your focused on). For instance if you move the lens to 24 inches from the film, objects another 24 inches in front of the lens will be in focus. The image will be the same size as the object i.e. 1:1 magnification and the bellows compensation will be (24/12)**2 = 4 or 2 stops more exposure needed.
Personally, I like to do the calculation directly with the aperture and thereby eliminate the square in the formula. For example the 12 inch lens at 24 inch extension just doubles the effective aperture number so f/16 is really f/32. Its very easy to use the aperture scale on the front of the lens as a visual aid in this calculation. If you had an 8inch lens f/8 just becomes f/N when you have N inches of extension. Many of the lenses have 1/3 stop marks and if you can interpolate between the full stop markings and use inchs, mm, cm etc you can fairly easily figure out what compensation to make without a calculator or any other fancy device.
Some examples if my description is not clear. 1/3 stop values approx: f/8,9,10 f/11,12.5,14 f/16,18,20 f/22,25,28 f/32,36,40 f/45
Lens:        Extension:      Compens:
8in          12.5in           1 1/3 stops  -- f/8 to f/12.5
180mm        220mm            2/3 stops    -- f/18 to f/22
125mm        200mm            1 1/3 stops  -- f/12.5 to f/20
5in          7in              1 stop   (think f/10 to f/14)
The nice thing about this is the change can be made right on the lens without even counting the 1/3 stops.
We're going to use the relationships between f/stops to determine the additional exposure needed when extending the bellows. First, consider the bellows at infinity as an f/stop type of number. That is, say your 120mm lens is "f/"120, but to bring things down to familiar f/'s, well divide everything by 10, so call it "f/"12. We're now dealing in centimeters, but it doesn't much matter. Let's say you move your bellows out to 160 mm. We'll call that "f/"16. What this says is that we've gone from "f/"12 to "f/"16 which is about one stop. So we've doubled our exposure requirements. Either open up one stop or double your time. Similarly, if we extend to 240mm it becomes "f/"24, which is two stops more exposure or four times the time.
This becomes a little confusing when working with odd numbers. A 90 mm lens extended to 130mm is the difference between f/9 and f/13 which is somewhere between familiar territory. Take a look down at the f/ scale and make an estimate, and it's probably good enough.
It's also hard to know where to measure to. It should be from the iris to film plane, but sometimes the infinity setting doesn't seem to measure what I would expect it to based on the lens' focal length. It's best just to measure at infinity, then measure at the extension and make the calculation.
While the method seems whimsical, it is based on sound engineering principles. Remember that the f/stop is the ratio of the diameter of the iris divided into the focal length. An f/8 with a 120mm lens would be 15mm in diameter. However, the amount of light is dependent on the area (pi x r^2). The area or a 15mm hole is 175.7 square mm. To double the light you would double the area to 353.4 sq.mm. This gives us a 21.2mm diameter hole which gives an f/ of 120mm/21.2mm which is f/5.6. If you do the calculations for f/4 you'll see that the hole is twice the diameter (8 divided by 4) but four times the light area. Conversely, f/16 is 1/2 the hole diameter but 1/4 the light. Notice that there's a square relationship here.
So what?!!
As it turns, as you move the lens out from the film plane, the amount of area on which light falls also increases in size and thus decreases in density by a square relationship as well. Thus, as you move a 120mm lens to 240mm, although twice the distance, the area on which light projects is 4 times as much (2 squared) resulting in 1/4 the density.
Thus, the f/ scale on the lens with which we are all familiar provides us with a handy scale showing a square relationship which we can also use as a key for our bellows extension.
By John A. Cook
There is an old saying that as photographers get older they don?t get any better, but they do get faster. During my many years as a studio product photographer, I never had the luxury of spending a lot of time agonizing over technique. There was always a budget and a deadline nipping at my heels.
Of necessity, I learned many shortcuts to get through the mountains of products I was assigned to shoot. This is one of them.
This method for calculating bellows extension is predicated on the relationship between the extension of the bellows (in inches) and common f-stop numbers. It requires no fancy gadgets to purchase nor algebraic formulae to memorize. You don?t even need batteries.
Step One:
Make a permanent, durable list of the following F-numbers. (You can also find them on your light meter.) Note that they are shown in 1/3 stops. Those with asterisks indicate "whole" stops:
3.5
4 *
4.5
5
5.6 *
6.3
7.1
8 *
9
10
11 *
13
14
16 *
18
20
22 *
25
28
32 *
Step Two:
Calculate the focal length of your lenses in inches, rather than millimeters, by dividing by 25.4. Photography is not an exact science - it?s okay to round off these numbers.
90mm = 3.5" 150mm = 6" 210mm = 8.26" 240mm = 9.4" 300mm = 11.8"
Step three:
When you are ready to make the exposure, measure the view camera?s extension from the ground glass to the lens board in inches. Measure from the center of the lens board to the center of the ground glass so as to not introduce errors from extreme swings and/or tilts.
Compare this distance to the focal length (or flange distance) of the lens and relate these two numbers to the above list of f-stops. Their difference will indicate the number of stops you must increase the exposure.
For example: a 210mm or 8" lens with 11" of bellows requires a one stop exposure increase (the difference between f8 and f11).
A 240mm or 9.4" lens with 14" of bellows requires a one and one- third stop increase (difference between f9 and f14).
A 90mm or 3.5" lens with 4.5" of bellows requires a two-thirds stop exposure increase. And so on.
This method is not accurate for telephoto lenses, whose optical center is not near the lens board. To ensure always having a bellows measuring device handy, I sewed a cloth tailor's tape measure to the edge of my focusing cloth.