My first experience developing 4X5 sheet films (Speed Graphic negatives) was in 1948, while attending Wayne University, in Detroit, Michigan.Ê The Visual-Auditory Dept. at the school had a darkroom that was equipped with three large stainless steel deep tanks immersed in a temperature-controlled water jacket. The film developer was never completely changed out, only occasionally replenished with fresh developer. It had the appearance of muddy, dark brown coffee. The film was loaded into S.S. film hangers then dipped and dunked into the chemicals in the tanks. The finished negatives seemed to have a shiny metallic appearance on the surface of their emulsion side. This may have been caused by the physical re-plating of silver onto the negatives during development, the result of using that well-ripened developer. Most of our photos were taken with harsh lighting from flashbulbs. Even so, the highlights did not burn out. The films we used in those days had a thicker emulsion layer than the films we are presently using. The negatives printed easily, using a condenser-type enlarger. Our prints were mostly 8X10s, primarily used for publication purposes. They were made on single weight graded fiber base paper, ferrotyped to give them a high gloss surface.
After graduation, I used small and medium format roll film, exclusively. Mostly color film processed by commercial photo finishers. When I would occasionally use a roll of B&W film, I would develop it, myself, in a daylight tank. In the early 1980s, I returned to using 4X5 B&W sheet film, processing it in my own darkroom. Since I was familiar with the tank development method that I had been using for roll film, I believed that I could also use daylight-type tanks for developing sheet film and obtain the same results. It didnÕt take long to realize that I was sadly mistaken. First, I tried the Nikkor S.S. sheet film tank. I found it to very difficult to load the film into the rack in the dark. Even when I managed to load it correctly, the result was streaky and uneven development.Ê Next, I tried the plastic Doran sheet film tank. That type of tank was easier to load, but development continued to be uneven. I experienced similar results with the Yankee cut film tanks. I tried several of them over the years, using alternative methods of filling and emptying the tanks, as well as various agitation patterns. It seemed that I could not obtain consistent even development using daylight sheet film tanks, no matter which type of tank or method of agitation I used. At one time, I even tried developing my sheet films in tubes. What a hassle!
Tray development seemed to be the only method that produced the smooth, even development, without streaking, that I was trying to obtain with sheet film. I have no qualms about processing my film in total darkness. However, handling those wet slippery negatives in the dark allowed for occasional scratches on the film. Invariably, a negative, or two, from each batch would be ruined and had to be discarded. It was difficult to maintain a constant temperature in the developer tray, because the warmth of my hands caused the temperature of the solution to rise. Also, allowing the chemicals to come in contact with my skin for long periods of time proved to be the wrong thing to do. I had become sensitized to the developer I was using. I needed to find a better way to process my 4X5 sheet film negatives, and I now believe that IÕm on the right track. The technique that I am presently using combines the best of all worlds, dip-and-dunk, tank, and tray development. It is convenient and simple to operate. It is readily available and relatively inexpensive. The entire set-up is compact in size, and requires relatively small amounts of processing chemicals.
For a while, I was seriously considering investing in a Jobo rotary development system, until I read the newly revised Ilford Tech. sheets. Ilford specifies the use of intermittent agitation for developing all of their B&W films. They classify rotary and tray development as continuous agitation. Ansel Adams recommended slow, deliberate agitation for tray development of sheet film. I began to realize that no matter how slow, or deliberate I tried to be with hand development in trays, it was extremely difficult to slow the agitation rate to a complete standstill. Intermittent agitation certainly was difficult to accomplish, using the tray method, and almost impossible to do, using the rotary method.
I wanted to obtain edge effects similar to those that Gordon Hutchings describes when using his PMK developer. But, I had doubts about PMK. Pyro is highly toxic, and my skin is sensitive to the Metol in the formulation. Besides, I dislike having to wear protective gloves when doing tray development. They tend to reduce my tactile ability. Steve Anchell and Bill Troop wrote that most types of film developers are capable of producing edge effects, if the dilution is correct and the agitation pattern is done carefully. The technique they described consisted of an initial thirty seconds of continuous agitation, followed by ten seconds of slow, deliberate agitation during each sixty second period of time. The film is allowed to stand motionless in the developing solution between agitation cycles. This allows the developer to exhaust itself in the dense heavily exposed areas. Then, another ten second period of slow, deliberate agitation is used to bring fresh developer into play, followed by another sixty second period of rest. This technique was supposed to encourage the formation of adjacency effects. It made sense to me. But how could I accomplish this in my darkroom?
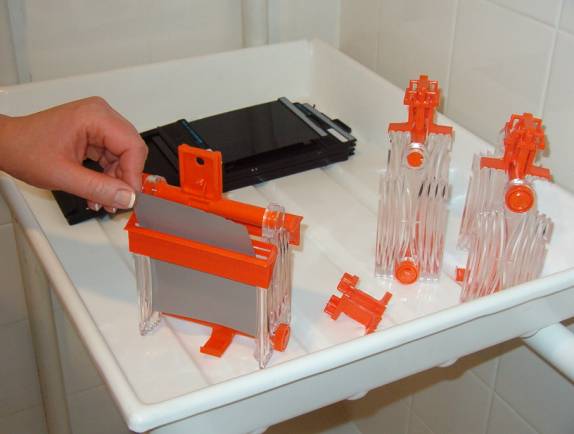
Recently, I had purchased an HP Combi-Plan 4X5 daylight processing tank to hold the clearing bath for my Polaroid Type 55 P/N negatives. After assembling the film racks that were included with the tanks, I realized that a set of three of these tanks could be used as an effective dip-and-dunk processing system. My dealer was more than happy to sell two more tanks to me. The total investment was quite a bit less than the cost of a Jobo processor or a water- jacketed S.S. deep tank set-up. It was similar in cost to a commercial tube processing system.
The three tanks (Developer, Stop bath, and Fixer) are placed in a tempered water bath. An inexpensive plastic dishwashing tub seems to work very well for this purpose. Each tank contains one liter of solution. Actually, the tanks are capable of handling a slightly larger amount of solution, but one liter is sufficient to completely cover the films. Plain water can be used in the center tank, instead of acid stop bath, if an alkaline processing regime is being used. The center tank can also serve as a water pre-soak bath, if desired. A pre-soak is not an absolute necessity, since there is no danger of the films adhering to one another with this method. Also, Ilford does not recommend the use of a pre-soak. It seems that they have incorporated a wetting agent into the emulsion, or the coating of their films. They claim that pre-soaking may remove the wetting agent, possibly causing uneven development.
The film rack for the HP Combi-Plan tank holds six sheets of film, using a cleverly designed sliding clip to prevent the film from slipping out of the rack. The racks are equipped with removable loading bars, enabling the films to be easily loaded in the dark. When used in a dip-and-dunk processing line, there is no need to struggle with the tight-fitting tank tops and no need to fill or empty the solutions from the tanks, risking un-even development. The tanks have a connector near the bottom where a water hose can be attached, allowing them to be used as film washers. The films can be allowed to remain in the film rack until they are ready to hang to drain and dry.
The system seems to operate very smoothly. The tanks are filled with the proper chemicals, placed into the tempering bath, and allowed to stabilize to the correct processing temperature. The remainder of the operation is carried out in the dark. The film racks are loaded with films that require the same developing time. Since I have three racks, I am able to use one for normal development, one for plus, and another for minus development. My normal development time using Ilfotec DD-X, at the standard 1+4 dilution, is nine minutes at 68 degrees F. The films are given an initial thirty seconds of continuous agitation in the developer, tapping the rack against the inside of the tank, occasionally, to dislodge the air bubbles. Then, at sixty second intervals, the rack is lifted out of the tank, tilted it to the right, and returned to the tank. It is immediately lifted out again, tilted to the left, and returned to the tank, where it is allowed to stand motionless for the next sixty seconds. This procedure is repeated until the nine minute developing time is completed. The film rack is then placed into the stop bath, and, finally, into the fixer tank. The stop bath and fixer require continuous agitation.
One liter of working strength Ilfotec DD-X developer can be used to develop sixteen sheets of 4X5 film, before it nears exhaustion and needs to be replaced. After the first batch of film is processed in the developer, Ilford recommends increasing the development time by ten percent for each additional batch of film that is processed in the same tank of developer. Sometimes there are only three or four films on the rack, but it is still considered to be another batch, therefore the developing time is increased by ten percent.
After the entire procedure is completed, the tanks can be emptied, and one of the tanks can then serve as a film washer. Once the films are completely fixed, they are treated in a wash aid bath, before the final wash. When the final wash is completed, the films are immersed in distilled water containing a few drops of Photo Flo. The wash aid and wetting agent procedures can also be carried out in a tank. Finally, the films are hung in a dust-free area to drain and dry.
I am enjoying using this system for developing sheet film (Ilford HP-5+). I cannot state with absolute certainty that the edge effects are there. But, my films are now being processed with reduced danger of the emulsion being scratched or damaged. There are no streaks or areas of uneven development. My negatives seem to have a sparkle that I was unable to obtain with any of the other methods of development I had previously used.
After discussing some of the details of this simple dip-and-dunk method of processing sheet film with a few of my fellow photographers, some of them remarked that they have an aversion to developing film in complete darkness. No matter what method they use for processing their sheet films, there is a period of time when their film must be loaded into a daylight type tank, tube, or rotary-type film holder, in total darkness. The only method that allows for complete daylight processing of large format negatives, that I am aware of, is Polaroid Type 55 P/N film. If Polaroid ever produces a higher speed P/N film, I will be among the first to use it. Working in the dark for the fifteen, or twenty minute period of time that it takes to process sheet film, using this dip-and-dunk method, is not a drawback for me. IÕm in my own little world, doing something that I really enjoy. I anticipate seeing the final results, realizing that those results will be well worth all of my efforts. With my favorite music playing in the background, the time in the darkroom seems to pass very quickly.
Loading:The films are loaded into the rack, in the dark, using the removable loading bars. After loading the films, the loading bars are set aside and the film retaining clip is slipped down over the tab on the top of the rack.
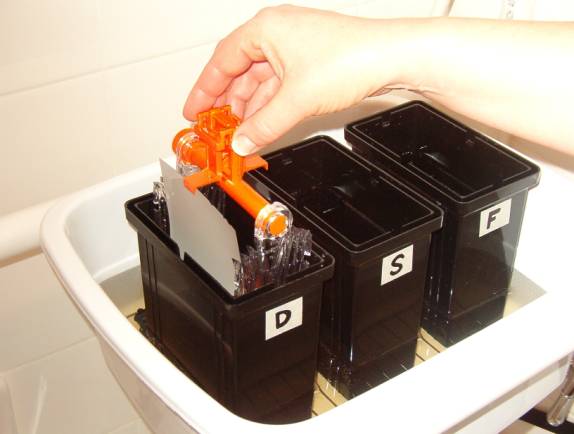
Dipping::The three tanks are held in a water tempering bath. The film rack is dipped into the developer tank and lifted up and down, continuously, for the first thirty seconds. Occasionally, the rack is tapped against the tank to dislodge the air bubbles. The film retaining clip is shown in the installed position on top of the rack. It serves as a handy handle.

Washing:The film is allowed to remain on the rack during the washing sequence. The tube from the five micron water filter is attached to the inlet connector on the tank. The tank then becomes a film washer. The two other empty tanks can be used for the wash aid and wetting agent treatments.