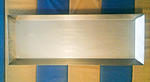
Actually, while having two trays set up side by side is nice, if you work carefully only a single tray is needed in which case the op would need a sink a bit over 50" long and at least 18" deep (6" of extra width for gallon containers holding the rest of the processing baths). Using the dev. and stop as one-shots means you'll be manually dumping the tray after every step of your process. This is not a bad thing as it guarantees consistent chemistry activity - an essential aspect to getting to the fine print with large material. I see investing in a s.s. tray as a necessity, especially if working in a small space. At school where I learned mural technique we had the job shop weld half-inch acrylic sheet. They were heavy, slippery, sharp-edged and retained chemistry due to the double walling needed to make them stiff. I can't imagine working in acrylic is much cheaper than s.s. But certainly if you do go custom, your best off working with a local sheet metal job shop to avoid high shipping costs. I got four like the one pictured for less than a grand. They are a joy to work with. The gymnastics mat that it's set against was ideal for preprocessing warm-ups.


 Reply With Quote

 ). Appreciating that the OP has actually questioned a larger 47", the functional limit for me in my lab for both enlarging and processing, as well as presentation, is 42" maximum. At a healthy 38"x19'12", I designed my
Bookmarks