
Digital camera's see also "in-between" the RGB LED peaks.Originally Posted by Daniel Moore


Digital camera's see also "in-between" the RGB LED peaks.
Rudi, thanks so much for helping us out on this! I am a complete amateur and I dont understand the scientific words you mention but I understand "7 led". At least i think so. Could you descibe a bit more in depth how one could put together something like that? I have mostly been doing research into negatives but reversal medium is also very important. I have done some tests with combining r,g,b leds with warmwhite an coldwhite leds to fill in the gaps. It is kind of tricky to dial it in becouse I dint know the spectrum of the white leds. I guess a spectrometer would help? Is there cheap ones of any use to us you think?
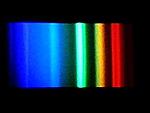
Here's the best image I could obtain of the spectrum for the Armacost RGB LED strip lights were using:
This is taken with a one of these spectroscopes:
http://www.ebay.com/itm/Diffraction-...item4a999ea3a9
strapped to a Logitech C525 webcam.
So starting to see a couple results from this Armacost RGB LED light source and firstly I'll say that I've haven't ever had such an easy time arriving at pleasing color from color negative scans. Peter made an early test and found dialing in a neutral value on an image containing a good grey target makes a huge difference in the correctibility of color and that neutralizing using the film base didn't. A benefit of using this controller is the ability to establish the optimal grey balance and color range consequently. Based on his advice I dialed in a nearly neutralized aged wood in Skyler's chair. Even with many years of ownership of an Epson V700, dissatisfied, I eventually tossed every scan in the garbage. These scans take seconds to tweak to a good starting point.
Thank's Peter for your perspicacity.
Edit: I should mention this is a 9 image 500MB 8 bit stitch of a 6x7cm color neg with stitch control point errors of less than a single pixel.
This is a good time to be careful with posting results but it's looking promising.

Last edited by Daniel Moore; 29-Jul-2013 at 01:19.
Looks great Daniel-
I've gone back over a few pages, but these scanner threads are split up into so many sections now it's difficult to get a grip on a single machine. Now that you're putting such nice stitches together, might it be time to show your scanner in a single thread? Just wondering...
This looks very good!
I have some questions for you if thats alright?
How long time do you estimate a scan takes? With mounting, taking the pictures and postprocessing(stitching)?
Do you happen to have access to another scanner, like a Nikon or your V700? Would be very interesting to see the difference in color and dynamic range also resolution. I guess this will beat the v700 at resolution.
Did you use Vuescan or similar for negative to positive or did you do it in Pshop?

We do have access to other scanners, and down the road we'll do comparison scans. Right now, though, I'm working on getting my scanner operational. The new light source is bigger than I originally planned with a 6x8" light source size, and this requires making some adjustments to the system. After that is done, we have lens testing and other types of refinements to do before it makes sense to do some comparisons.
I invert my images in a RAW processor. I think Daniel uses Capture 1, but he'll have to verify that. You guys should talk him into showing a video of his prototype in action. It's a very elegant and compact design. Of course it shows the typical prototype battle scars.
You often feel tired, not because you've done too much, but because you've done too little of what sparks a light in you.
― Alexander Den Heijer, Nothing You Don't Already Know
I will create a video of it in action once I complete my most recent modifications, new motors and upgraded belt clamp. I took a wild leap and attempted to make an X/Y stage from two stacked IGUS Drylin rails. They are anything but precise in their build, in fact they are sloppy, but seem to be precise enough in the resulting travel. Peter is using rails and bearings that are capable of far greater precision. Still a lot of tests to perform as he mentioned. I no longer own the V700, I feel a curse has been lifted being free of it. I know lots of folks are happy with it though.
I am using Capture One at this stage, tethered to a D800E. I find it's sharpening to be excellent, the main reason for using it right now.
I'm wet mounting with lighter fluid for now (I have plenty of less than stellar film exposures to test with : ). I lay a spacer on the glass, squirt the glass, lay the film against the spacer which aligns the film edge and centers it at the same time, no taping, squirt the film, lay a sheet of mylar down. That takes a minute or so. A 9 shot 6x7cm scan takes about 45 seconds give or take with delays programmed for settling the carriage motion and another for a 2 second exposure delay mode. For the image I posted I inverted in C1 with the levels slider and then adjusted the color by pulling the white and black points for each of the three channels until they touch the histogram curve. That's all for the Raw files, which takes maybe 30 seconds. Processing for these Raw files takes less than a minute on a new build with a 500MB/s SSD and i7-4770 CPU. Stitching the Tif output in PTGui using Sinc36 takes another minute. Using Sinc256 takes a few minutes. No intervention has been required as of yet to get a good stitch but that's undoubtedly coming up with featureless areas.
I'll post details of the build in a few days, still ironing out some things. I will say that wet mounting makes the impossible possible. All of the tests I've done so far are on a roll of film that was in a tube for a year and has a terrible curl which was easily tamed by wet mounting. DOF is so incredibly shallow that it may even be mandatory.
Resolution with this camera at 1:1 is a little more than twice the V700 if one takes the widely accepted V700 2100 spi as a given. 7cm turns into 47.5" @ 300 dpi with this camera.
I'm eagerly waiting for comparisons myself! Drop me an email if you'd like to arrange for me to scan a sheet of your film, this seems a good way to get a range of comparisons. All I know at this point is I'm over the moon with my color neg scans for the first time ever, and I'm amazed at how easily they were obtained. All those hours I spent with different programs tweaking tweaking tweaking. God.
For your edification, here's the spectrum from the V700 bulb:
A friend of mine has a V700 that we can use to do comparison scans.
Ignoring film flatness for the moment, how do the wet-mount versus dry-mount scans compare quality wise?
You often feel tired, not because you've done too much, but because you've done too little of what sparks a light in you.
― Alexander Den Heijer, Nothing You Don't Already Know
 Posting Permissions

 Reply With Quote
Bookmarks