
can we see a quick and dirty mobile phone pic of the negs ? But also guessing that your scan settings are why the images look very flat.


can we see a quick and dirty mobile phone pic of the negs ? But also guessing that your scan settings are why the images look very flat.
notch codes ? I only use one film...
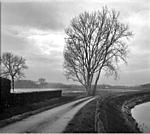
Ok, by popular demand:
First a photo of the negative on a small light table, so the difference in edge luminosity is due to the light table being uneven. This is Foma400, incident measured for 400iso, developed in HC110 dilution B for 7 minutes. Photo taken with the camera (5DII) at 800iso, rest automatic.
These are the scanner settings. Scanner is a V500, software is the one that came with the scanner.
And in Gimp 2.8 it looks like this once imported and flipped, I scan with the emulsion down. (I don't have the 2.9 as this isn't in the repository yet, still in "testing")

Expert in non-working solutions.
I'd say you should give at least one stop more of exposure and one minute more of developing time (although you should test to find your developing time).Originally Posted by Havoc

Best,
Pau
Enviat des del meu X98 Air III(M5C5) usant Tapatalk
I looked up the datasheet for Foma400 and found there the following graph:
Now my reading of this is:
- if I develop in Ilford Microphen at 20°C
- and I develop for 9 minutes
- then I have to expose for 320 iso in daylight
- and I get a gamma of 0.8
- and I get a Dmin of 0.3 and a bit
The inverse, if I want a gamma of 0.7
- then I develop in Ilford Microphen for 7 minutes
- I expose for 280 iso in daylight
- and I get a Dmin of 0.3
Correct?
Expert in non-working solutions.

Oh, just give up following charts and make some exposures using one, repeat one developer and go to the darkroom. Yes, that is the next complexity, but not so much. Develop negatives with a steady practice, print and adapt again if necessary.
Gamma, logarithmic charts don't mean shit except to internet impressionists or lab guys who don't give a damn about the image itself.

In addition to the above I would suggest that when scanning, you move the left (black level) Input Levels slider to just a bit to the left of
the black end of the histogram, and the right (white level) Input Levels slider to just to right of the histogram. You can use the
preview picture to get a rough idea of when you are close enough (e.g., you don't want the high values to look blown out).
This will allow the scanner to map the full density range of your negative to a range of (approximately) 0 to 255 in the output
file. (The Output Levels are correctly set in the screen shots you show here.)
Scanning is basically an analog-to-digital (A/D) conversion process. When we design an A/D system, once we decide on
the number of bits of resolution (8- or 16 bits in this case) we have to offset and scale the analog input so that the
minimum input signal (i.e., near-black) is represented by output codes near 0, and the maximum input signal maps to
full-scale (255 or 65535, depending on the number of bits). Those sliders basically adjust the zero offset and scaling gain
of the A/D converter in the scanner.
As it is, you are "wasting" quite a bit of the scanner's dynamic range, since the negative's range doesn't fully occupy it.

4800 dpi is probably a waste of time as well. Unless you have a massive print in mind, 1200 DPI is probably plenty for modest prints and just the right amount of overkill for later scaling down for web use.
neg looks fine. I also like to scan a bit flat (but not this flat) and do more work in PS. But if you want to do more in the scan, drag the right slider over to the left a bit more. Too much and the values are blown out. Basically I'd compress the histogram much more than what you have. You'll need to play around to find what feels right for you.
notch codes ? I only use one film...
Since I am just making a transition from darkroom to light room (small "L"), I find this thread very helpful. Thanks to all!
And, like Havoc (above) I am accomplished in roads that should not be taken....
Peter Collins
On the intent of the First Amendment: The press was to serve the governed, not the governors --Opinion, Hugo Black, Judge, Supreme Court, 1971 re the "Pentagon Papers."
You have a good negative, you can adjust levels in the Epson scan software to take all DR, like red bars show, this is very important when you scan 8bit to avoid banding, if you scan 16 bits and you take all scanner range then you have to adjust levels in Ps.
Then you can adjust tonality as you want
Shadows at bottom left cannot be well recovered from the screen shot, if wanting more detail there you would need more exposure and perhaps less development to not burn sky, those shadows perhaps can be recovered better from the 16bit scan than from the screenshot...
Foma it's easier to burn than TMX...
 Posting Permissions

 Reply With Quote


Bookmarks