Page 2 of 3 FirstFirst 123 LastLast
Results 11 to 20 of 21

Thread: Wood camera restoration

  1. #11
    altb
    Join Date
    Aug 2017
    Location
    Vancouver BC
    Posts
    109

    Re: Wood camera restoration

    and, at the risk of being annoying...here's some other pictures for reference. I took the black paint off the front and this is what is there now. There is a crack in the front piece that someone tried to fix but it's out of whack and sticks out on one side, so I was thinking of just sanding it on one side so it will match. The view from the top is the brass bar without black paint (took a while to get off). The third picture is what the camera looks like generally.
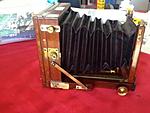
Click image for larger version. 

Name:	front of camera.jpg 
Views:	67 
Size:	18.5 KB 
ID:	170331Click image for larger version. 

Name:	top of camera.jpg 
Views:	60 
Size:	20.1 KB 
ID:	170332Click image for larger version. 

Name:	Challenge.JPG 
Views:	67 
Size:	36.4 KB 
ID:	170333

  2. #12

    Join Date
    Jan 2009
    Location
    Denmark
    Posts
    6,251

    Re: Wood camera restoration

    The break across the right rear standard where it is joined to the bottom timber is so clean that I think a system of dowels with glueing will work. Matching mahogany is a very difficult process as the wood in even adjacent trees from the same forest/plantation can be be very different in grain and finished colours!

    Now these dowels would have to be of smaller diameter than the usual type available at shops. Perhaps they should be of other materials than wood, but must still be capable of glueing. I think you will have to remove the damaged right-hand side piece, otherwise you can't do any drilling work on the short piece attached to the bottom. You, or your "employee!" will have to be careful about where the holes for the dowels (3?) are placed due to the small square being, in fact, made of de facto "laminated" timbers! The three brass screws through the edge brass fitment should give some sort of stability, but will also dictate where the drilling for the dowels should be.

    The joints should be held at the moment with water soluble hide glue.

    I hope others will contribute, as I havn't actually been through this process with these sort of dimension timbers!

    By the way, it is looking very good and the series of brass screw heads on the front are very impressive!

    I can't comment about the front reglue possibility as I (we) need nearer photos.

    A later thought.

    With this kind of dramatic wood shear, there is no way of telling whether the bottom piece has received hidden damage. Trying to replace the whole side piece may reveal that the end of this bottom piece has cracks etc. This would not be a problem with the system I suggested as a first step would be to clean the broken end and the saturate this piece with thin flowing water soluble glue which would hold everything together!

  3. #13
    altb
    Join Date
    Aug 2017
    Location
    Vancouver BC
    Posts
    109

    Re: Wood camera restoration

    What I understand from this is it's wise to be conservative and clean the broken end before glueing with thinned glue. I agree that this may be best. Drilling holes into a possibly cracked piece of wood would not be good, I think, and since it is only an inch wide and the other side has a perfectly useable mortise and tenon I think I'll go for glueing it as is.

  4. #14

    Join Date
    Jan 2009
    Location
    Denmark
    Posts
    6,251

    Re: Wood camera restoration

    It is worth a try - it is certainly the easiest and least intrusive method of fixing it. There are a couple of "stumps" that will guide alignment and give some lateral stability when glued. Of course, all loose fibres and debris have to be removed and a dry run assembly is necessary to ensure wood to wood contact everywhere.

  5. #15
    altb
    Join Date
    Aug 2017
    Location
    Vancouver BC
    Posts
    109

    Re: Wood camera restoration

    The old glue is the toughest. Spending a lot of time with toothpicks and a strong light...even when I've softened it with warm water it is hard to get out
    Last edited by altb44; 29-Sep-2017 at 19:29. Reason: didn't finish my sentence

  6. #16
    Pastafarian supremo Rick A's Avatar
    Join Date
    Feb 2010
    Location
    Laurel Highlands, Pa., USA
    Posts
    793

    Re: Wood camera restoration

    If it's hide glue, some denatured alcohol should dissolve it. Hot water only returns hide glue to a usable state, that's why it appears "gummy". Hot vinegar will dissolve PVA glues.
    Rick Allen

    Argentum Aevum

    practicing Pastafarian

  7. #17
    Jac@stafford.net's Avatar
    Join Date
    Dec 2012
    Location
    Winona, Minnesota
    Posts
    5,413

    Re: Wood camera restoration

    To separate animal-glued wood parts, first remove any metal.
    Place the wood parts in a microwave.
    Turn it on high, and set for ten seconds.
    Test the parts - do they pull apart?
    If they do not, then repeat the ten-second exposure until the parts separate easily.

    It works. It is safe, quick and easy.

  8. #18

    Join Date
    Aug 2013
    Location
    Chicago
    Posts
    1,856

    Re: Wood camera restoration

    A couple of points:

    1/ Water dissolves hide glue; alcohol does not. Alcohol dehydrates it which makes it less resistant to impact, and the way alcohol is used is to first dry the joint and the glue and then one subjects it to shock. This probably won't work if the alcohol can't reach deep enough to dry out the glue on the interior of the joint or if the interior glue surface is so good and large that the wood may break first.

    2/ The microwave works by generating steam within the wood, which dissolves the glue. If the wood is dry (if you live in Arizona, for instance), this may not work. In Seattle, it might.

    3/ Any cross-grain reinforcement (i.e., dowels) weakens a joint. Your best strategy for fixing something is always to get it perfectly realigned and glue it with a good glue. Epoxy and super glue would be my last choices for this. I'd use hide glue because I'm a violin maker/restorer and have it at hand. Gorilla glue would be permanent, but you have no idea how messy! Yellow glue is preferable to white, if you shop at the hardware store.

    4/ Vinegar does dissolve white glue and yellow glue to a lesser extent. The stronger the acetic acid, the better--I might mix a 10% batch for this, and use it outside.

    5/ In any repair, you can never be sure what the previous person used, which means you don't know what will work. Regardless, it will almost never be really easy to open a previously-glued joint

    6/ Don't use liquid hide glue (cold, from a bottle, as opposed to made up hot from dry bits) for any joint you want to last.

    If something isn't floppy-broken, it's often best to leave it alone. Scraping or sanding mistakes level is bad practice in my world. I'd rather see something poorly glued than something poorly glued and sanded because the first always has the hope of being correctly fixed later by someone with adequate knowledge.

    A good color to match old camera finish: Rembrandt artist's oil paint, Transparent Oxide Brown, is often a perfect match. That brand, only--others won't necessarily match. Lay it on thin and rub it in.You can't put lacquer over this, but after it dries completely, several days at least, you can spray shellac over it. Zinnser spray shellac is good for this. Your color will probably lighten when shellacked, but you can repeat as necessary. Anything but shellac over oil paint may never dry, so don't do that.

    Any finish previous to about 1915-1920 is likely to be shellac; after that, lacquer.

    Be aware that wood in a microwave heats center first. Too long and the inside starts to char and burn. By the time you see smoke coming out, it is too late. I use 15 second blasts, then rest for a few moments. In my microwave burning starts in less than a minute! There's no need to rush.
    Last edited by mdarnton; 30-Sep-2017 at 14:07.
    Thanks, but I'd rather just watch:
    Large format: http://flickr.com/michaeldarnton
    Mostly 35mm: http://flickr.com/mdarnton
    You want digital, color, etc?: http://www.flickr.com/photos/stradofear

  9. #19
    Jac@stafford.net's Avatar
    Join Date
    Dec 2012
    Location
    Winona, Minnesota
    Posts
    5,413

    Re: Wood camera restoration

    MDarton's post would be a good article for the main info page.

  10. #20
    altb
    Join Date
    Aug 2017
    Location
    Vancouver BC
    Posts
    109

    Re: Wood camera restoration

    Very good point about sanding. I'm going to just leave that piece alone. It functions fine. Thanks for the advice, very useful.
    So I plan to be very conservative and glue the two parts and refinish the wood that had the paint on it. Since it's the front standard hopefully my refinishing job will be close enough.
    Thanks again

Similar Threads

  1. Crown Graphic Restoration - anyone to wood?
    By Mike Kovacs in forum Cameras & Camera Accessories
    Replies: 19
    Last Post: 17-Oct-2015, 23:01
  2. Conley camera restoration.
    By peebs in forum Cameras & Camera Accessories
    Replies: 11
    Last Post: 23-Feb-2015, 20:15
  3. KODAK 2D 8x10 camera restoration
    By hooverramone in forum Cameras & Camera Accessories
    Replies: 5
    Last Post: 16-Mar-2007, 22:18
  4. Camera restoration
    By Tim Ward in forum Cameras & Camera Accessories
    Replies: 3
    Last Post: 11-Feb-1999, 22:39

Bookmarks

Posting Permissions

  • You may not post new threads
  • You may not post replies
  • You may not post attachments
  • You may not edit your posts
  •