


I bought a rather beat-up Rittreck View a couple of months ago, and I've been working to make it my own. I made a 5x7 back for it, and an adapter for using lenses in Graphic boards. And yesterday, new blue bellows arrived, which I had made by the seller called Tokyophoto on eBay. They are amazingly good people for several reasons, and I cannot say enough good about them. I know that these are not very common cameras, so maybe my detailed descriptions won't help many folks out there, but I like to share, and some of what I write might be helpful for other cameras. I apologize to those in other lands for my references to products available here in the US, and to stores here as well. I can only describe what I know!
I'll start at the end, by explaining the bellows. Tokyophoto sends them to you with the front plate already attached, and asks that you then ship them the plate you remove from your camera when getting rid of the old bellows. The front plate arrives glued to the front of the bellows, and you need to remove the eight tiny machine screws that hold your own plate to the front standard, and then re-screw them in through the 'new' plate (it's actually one sent to them by someone else, spreading the good). I decided that it made sense to do the front first, because reaching through the back of the camera would make getting at these tiny screws very difficult (thanks to someone here in another thread who wrote that he wished he had done this with his!). The front standard slides right off the camera by lifting it upward. This made it easy to simply set it flat on a table to work on.
I was fortunate in that I had some glue on hand that seemed like a good fit for attaching the rear of the bellows to the metal frame of the rear standard. It's a silicone based adhesive that seems a lot like caulk, but it adheres to a wide variety of materials, including both metal and fabric. I bought it for gluing telescope mirrors to their cells. It gives a lot of working time, never hardens completely, and is fairly easy to remove once dry, if it ever becomes necessary. I don't have it in front of me, but could supply more information if someone wanted me to.
I had already completely removed the old bellows material and glue from the rear frame. It was, fortunately, not too difficult. I don't know what the old bellows were made of, but it sure seemed like some kind of paper! I was able to scrape it off with my (luckily for me) substantial thumbnails, and the glue residue came right off with Goo-Gone.
I knew that I needed to spread a bead of adhesive all the way around the frame, and then clamp the back end of the fabric of the bellows in such a way that there would be no wrinkles or open spots. I went to Office Depot and found -- in a clearance rack, no less! -- a big tub of paper binder clips. I knew they'd fit into the tight slot within the pleats of the bellows. I also figured I'd need some kind of flat stick to use as a brace for the clips to grip against. ?I made some out of thin plywood scraps I had, but they were too thick. Then I noticed an old band saw blade hanging on the wall. It was too dull to ever use again, and I don't know why I hadn't thrown it into recycling long ago, but it worked perfectly, and was easily cut to the proper length with tin snips (see the first photo).
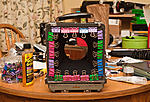
The other photo shows the clips in place. It sat on our dining room table. But the photo will show why I call it the 'camera crap table' for now. I'm putting together my LF kit there, for the trip I'm taking with my son in August. We're gng out west to see the total eclipse of the sn on Augist 21st, but just in case there are clouds that day, I'm planning lots of fun before and after. LF is one of the things I want to do.

 Reply With Quote


Bookmarks