Page 2 of 5 FirstFirst 1234 ... LastLast
Results 11 to 20 of 49

Thread: Need advice for engaging dry plate.

  1. #11

    Join Date
    Jul 2016
    Posts
    4,566

    Re: Need advice for engaging dry plate.

    Quote Originally Posted by DHodson View Post
    It's nice that you can read the book on the Blurb site if you want to have a look at the section on coating glass negatives (P46).
    Yes, really nice, still it is a book to have at home. I guess that coating station it's all one can ever need. Upon your tip I've read it again, and now I think it's the way to go.

    IMHO the TLF 2 emulsion is just the place to start, but I feel the emulsion is something that it may be improved a lot in the future.

  2. #12

    Join Date
    Dec 2010
    Location
    Arlington, Mass.
    Posts
    214

    Re: Need advice for engaging dry plate.

    Thanks for the nice comments, John, Pere Casals.

    I should say that I recommend Denise's book as well; I found it to be a nice supplement to the materials from the Eastman workshop, particularly with respect to some practical alternatives for coating and examples of the results gained from tweaking. Plus she's planning a second volume to come.

    That having been said, I thoroughly enjoyed the time spent with Mark and Nick at Eastman, and there's nothing like hands-on work with someone at your elbow to give guidance for making rapid progress, plus the fun of learning with the other participants, some of whom have become good friends. I've signed up for the intermediate class they're doing this summer as well, which should get into some of the topics being discussed here (improved speed, perhaps ortho). It will be a bit of a reunion for my class also, which is a real win for me.

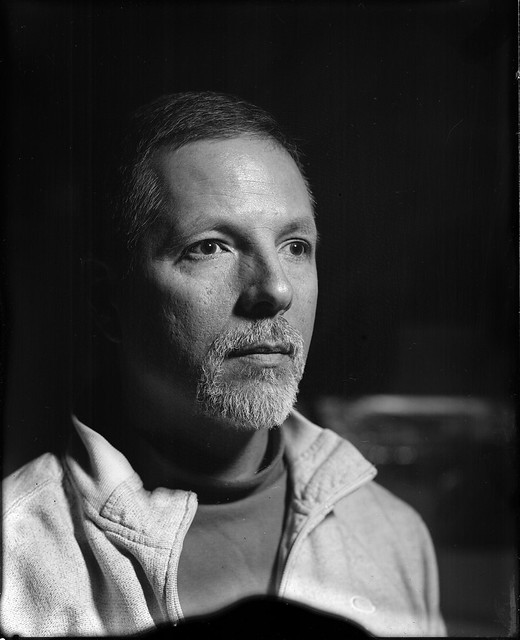
    A plate from yesterday (need a better model, but this one works cheap):


    BP-010, One light + dish by Robert Brazile, on Flickr

    Robert

  3. #13

    Join Date
    Dec 2010
    Location
    Arlington, Mass.
    Posts
    214

    Re: Need advice for engaging dry plate.

    Oh, also meant to say that I endorse the idea of building a drying cabinet. In the interest of getting started quickly, you can just put them on a rack in a large cardboard box (provided of course that the corners and seams are well taped) and that will work well enough with an overnight wait. But I have learned that one key to good results is to arrange things so that you progress through the steps with efficiency -- i.e., minimal messing around -- and that this is greatly aided by having things laid out in advance (i.e., mise en place) and set up so you can move the plates through the various steps without having to stop and do anything else, such as opening and closing boxes, fussing with the plates already in the rack, etc. Otherwise you will (well, at least, I will/did) have avoidable mishaps.

    I find everything works best if you can move in a slow, steady, controlled fashion, especially during the pour. In my case, for example, I discovered that I do a much better job of pouring if I have a) good (safe) light on the action, and b) do it over a large tray with a bit of water in it so I can avoid worrying about spillage. Once I did the latter, in fact, I stopped spilling as much off the edges because I could concentrate on what I was doing. Pour enough on the plate so the mass moves easily to the edges/corners without having to tilt it much, and it happens much more cleanly and smoothly, which just the slightest tilting of the plate required. Then pour it off from the corner, and rock it back to pour a little off the opposite corner to get the mass of (rapidly cooling) emulsion more evenly centered. A little rocking to move the still-wet emulsion around the plate evenly is nice, but not absolutely required. Then put it down on your leveled drying table (piece of granite or marble, larger means more plate capacity, which helps) with the edge of the plate off the edge of the table -- it may stick a bit from the poured-off emulsion on the back of the plate, so you'll want an edge to grab.

    Once I've done 4 or 5 4x5s, the first in the series are usually set enough to put in the drying box. At the moment, I'm using a granite counter cut-off salvaged from a stone and tile place, about 1.5" thick, 6" wide and 24" long. Once filled, I pull the oldest one off the far end, move each plate down one spot, and make a place for the newest one at the near end. That way I figure there's a sort of gradient of heat from one end to the other, and it's worked well enough for me. Although the granite piece is thick enough that it seems to stay cold enough just fine without such considerations.

    Best of luck with your learning -- I'd recommend jumping right in. I spent a long time after the workshop overthinking the process and trying to acquire a lot of equipment...too long, really, needlessly wasted a lot of time.

    Once I got up the nerve to get going, though, I found that I was generally able to overcome most obstacles on the fly with stuff I had around the house, and it taught me a lot about what was really important to getting good results. Nothing like experience to teach you...

    Robert

  4. #14

    Join Date
    Jul 2016
    Posts
    4,566

    Re: Need advice for engaging dry plate.

    Quote Originally Posted by Robert Brazile View Post
    Oh, also meant to say that I endorse the idea of building a drying cabinet...

    Robert
    Thanks for detailing your workflow, this information is very encouraging to me in order go straight to mix and coat. Today I coated a glass with gelatin only, to get some practice while waiting for the silver nitrate to arrive.

    Also I've tested dust control, I use a cheap Honeywell HAP-16200E and it works perfect, I was using it for scanning but I wanted to know if it was also enough for coating. I discovered that it removes all dust in air of a 8m2 room in some 10 min, but it is also important to wear clothes that are not prone to emit dust.


    I feel that adding erythrosine will be an easy improvement to have ortho, and still the convenience of working with safe light. I'm thinking to use the pinacyanol in a sensitizing bath after coating, in this way the plate can be coated under safe light, and later sensitized to red in total darkness. But first is making the first coating !!!!!

    Thanks again for sharing your workflow.

  5. #15
    multiplex
    Join Date
    Feb 2001
    Location
    local
    Posts
    5,380

    Re: Need advice for engaging dry plate.

    make sure your level slab is COLD
    i didn't do this when i started out, and i
    wasted a lot of effort teaching myself about
    binding agents / sub layers which are not needed.
    the cold stone sets the gelatin from the emulsion on the plate ..

    good luck !

  6. #16

    Join Date
    Jul 2016
    Posts
    4,566

    Re: Need advice for engaging dry plate.

    Quote Originally Posted by jnanian View Post
    make sure your level slab is COLD
    i didn't do this when i started out, and i
    wasted a lot of effort teaching myself about
    binding agents / sub layers which are not needed.
    the cold stone sets the gelatin from the emulsion on the plate ..

    good luck !


    OK, thanks for the advice.

  7. #17
    Nodda Duma's Avatar
    Join Date
    Nov 2014
    Location
    Batesville, Arkansas
    Posts
    1,116

    Need advice for engaging dry plate.

    Go look through the emulsion section of the APUG forum. Lot of good info there.

    I've been doing this for a while now and have the process down. I use the basic recipe on unblinkingeye.com. Very rewarding. You'll want to figure out how to test for ISO speed of the emulsion. I do this, and generated an EV / exposure conversion chart in MS Excel for the emulsion's ISO so I can use my iphone light meter app out in the field. I print the chart on a piece of paper and take it with me. So if I meter EV 11, then I just look at my sheet to see what exposure for the f/# I want to use. In general, the difference in spectral response between the emulsion and phone camera can be corrected in the darkroom.

    The attached photo is of a 16"x20" silver gelatin print enlarged from a 4"x5" plate. It hangs on our living room wall. The photog at work got wind of what I was doing, so now there's one hanging up in a hallway there along with a short blurb on the process. Every so often someone stops me and says it's pretty cool.


    Btw, I divvy up and store the emulsion in cheese crocks in my beer fridge prior to coating. I stay so busy that I don't get to use the emulsion right away. It keeps for several months if the equipment is sanitized (no preservatives added).


    I'll reiterate about the cold slab. Make sure it's level! I use a machinist's bubble level. You'll know the emulsion is set because there will be a subtle "wrinkling" or texture to the emulsion surface when you view the reflection of your safelight off the plate surface. When the emulsion hasn't yet set, it's smooth as glass. When you see this texture you can move it off the slab. Should only take a few minutes to set...depends on how diluted the gelatin is (avoid over-dilution by keeping the washing water as cold as possible).

    I use a 10cc syringe to apply the emulsion to the plate. Works well for me.


    Finally, only other advice is don't skimp on prepping your plates. Clean the glass so that water sheets off the glass rather than beading up. I use a sponge with rottenstone and dish soap to scrub both sides. I have to be extra diligent since I cut my own plates from larger surplus thin Schott borosilicate plates that I bought for cheap.
    Newly made large format dry plates available! Look:
    https://www.pictoriographica.com

  8. #18

    Join Date
    Jul 2016
    Posts
    4,566

    Re: Need advice for engaging dry plate.

    Quote Originally Posted by Nodda Duma View Post
    Go look through the emulsion section of the APUG forum. Lot of good info there.

    I've been doing this for a while now and have the process down. I use the basic recipe on unblinkingeye.com. Very rewarding. You'll want to figure out how to test for ISO speed of the emulsion. I do this, and generated an EV / exposure conversion chart in MS Excel for the emulsion's ISO so I can use my iphone light meter app out in the field. I print the chart on a piece of paper and take it with me. So if I meter EV 11, then I just look at my sheet to see what exposure for the f/# I want to use. In general, the difference in spectral response between the emulsion and phone camera can be corrected in the darkroom.

    The attached photo is of a 16"x20" silver gelatin print enlarged from a 4"x5" plate. It hangs on our living room wall. The photog at work got wind of what I was doing, so now there's one hanging up in a hallway there along with a short blurb on the process. Every so often someone stops me and says it's pretty cool.


    Btw, I divvy up and store the emulsion in in my beer fridge prior to coating. I stay so busy that I don't get to use the emulsion right away. It keeps for several months if the equipment is sanitized (no preservatives added).


    I'll reiterate about the cold slab. Make sure it's level! I use a machinist's bubble level. You'll know the emulsion is set because there will be a subtle "wrinkling" or texture to the emulsion surface when you view the reflection of your safelight off the plate surface. When the emulsion hasn't yet set, it's smooth as glass. When you see this texture you can move it off the slab. Should only take a few minutes to set...depends on how diluted the gelatin is (avoid over-dilution by keeping the washing water as cold as possible).

    I use a 10cc syringe to apply the emulsion to the plate. Works well for me.
    Your image cannot be seen, anyway I visited your Flickr.

    Thanks for the advice, I was also considering unblinkingeye recipe, good to know it is very rewarding. I'll remember the workflow details you mention, I found new practical advices I was not well aware.

    For the speed calibration I was to follow the BTZS guidelines, I guess that at the end it's what you used. Thanks for the information, this encourages me to go forward, thanks !

  9. #19
    Nodda Duma's Avatar
    Join Date
    Nov 2014
    Location
    Batesville, Arkansas
    Posts
    1,116

    Need advice for engaging dry plate.

    Wierd about the photo..shows up fine for me. Modern technology...

    Anyhow, to test ISO I created several exposures against a black & white target (construction paper) so I could see response to shadows and highlights. I metered against the B & W subject as a reference, then developed in my favorite developer noting which exposure looked best. Once I had the "best" exposure, I backed out the ISO based on calculations available in the public domain. Very subjective yet scientific in all the right places.

    Not sure this is the method you describe, but it works for me. My latest batch was ISO 0.25 because I didn't ripen it as much. Ok tho because I planned for a lot of landscape photos.
    Newly made large format dry plates available! Look:
    https://www.pictoriographica.com

  10. #20

    Join Date
    Jul 2016
    Posts
    4,566

    Re: Need advice for engaging dry plate.

    Quote Originally Posted by Nodda Duma View Post
    Wierd about the photo..shows up fine for me. Modern technology...

    Anyhow, to test ISO I created several exposures against a black & white target (construction paper) so I could see response to shadows and highlights. I metered against the B & W subject as a reference, then developed in my favorite developer noting which exposure looked best. Once I had the "best" exposure, I backed out the ISO based on calculations available in the public domain. Very subjective yet scientific in all the right places.

    Not sure this is the method you describe, but it works for me. My latest batch was ISO 0.25 because I didn't ripen it as much. Ok tho because I planned for a lot of landscape photos.
    Your method is way straight, a simple bracketing may determine a personal ISO that's perfectly operative. This is also the way I think I'll use first. Later I plan to plot the "Lux·Second vs Density" graphs.

    I envision making faster emulsions panchro in the future, and mixing fast with slow emulsions (perhaps the slower one in a layer under the faster) to get wide latitude, so at that point I would need to use the charts as described in the Beyond The Zone System book. But first, let's start with the basics !!!


    The unblinkingeye recipe has a digestion times table related to speeds, I ask my self what ISO can be achieved with that recipe and proper digestion...

Similar Threads

  1. General advice on quarter plate film holders needed
    By antonroland in forum LF DIY (Do It Yourself)
    Replies: 1
    Last Post: 12-Dec-2012, 08:54
  2. Advice required and quarter plate film inserts?
    By antonroland in forum Cameras & Camera Accessories
    Replies: 8
    Last Post: 9-Dec-2012, 12:43
  3. Gandolfi half-plate camera...advice needed
    By Robert999 in forum Cameras & Camera Accessories
    Replies: 17
    Last Post: 6-Jul-2008, 22:16

Bookmarks

Posting Permissions

  • You may not post new threads
  • You may not post replies
  • You may not post attachments
  • You may not edit your posts
  •