
Terrific write up, Sergey!


Terrific write up, Sergey!
You often feel tired, not because you've done too much, but because you've done too little of what sparks a light in you.
― Alexander Den Heijer, Nothing You Don't Already Know

SergeyT, this is excellent! Thank you!
Regarding the scanner color space, do you have any recommendations or experience for the Epson V-series (for example V750) and Epson Scan software? I looked at the settings and did some searching, and it is not obvious how to use this setting. Thanks again.

Originally Posted by chassis

With the V750 first make sure you have chosen Professional Mode. Then, click on Configuration at the bottom of the page. This will take you to a new dialog box where one of the selections is Color. Click on Color Synch and this gives you some selection of gama as well as source and target color settings.
Sandy
For discussion and information about carbon transfer please visit the carbon group at groups.io
[url]https://groups.io/g/carbon
I tired scanning some 4x5 negatives as positive. Major struggle color correcting the images. Could t get them anywhere close to what the scanners interpolation could do. Guess I'd better practice some more..
Color Perfect is meant to be good for negs scanned as positives but I've not been able to get good results from it.
Playing with Silverfast has worked better for me (although it's always been a frustrating program).
I like Vuescan for b/w
Sent from my iPhone using Tapatalk
Today I scanned some Ektar in 120 size. Followed the general steps listed above, which is to scan as positive, invert, trim unused portions of the histogram (channel by channel), then additional smaller adjustments to the client's and my liking. Results were good in the client's eyes. Film was exposed with strobe at box speed.
Hello Bruce,
It is not the first time that you give that lecture, and I find it interesting. But - because there is always a "But" - you do not give a lot more. You even say that we have to work it down. I can understand it. If you are given the recipe in the nest...
My understanding of your saying is that
First, we have to get all the information but only the information. Go in each channel wich it not always possible for two main reasons one human : one need to see what happens when fixing black & white points on each channel without inducing color balance shift and there come the need of experience. One technical : ccd scanners do not work like drum scanners : they do not have a beam splitter with RG&B filters so the color separation is more efficient.
Second, we have to get rid of the orange mask. You say that this mask is a color, not contrast mask. So I understand that we need to go in the Lab mode to "neutralize" - read pull the color back to the center point.
My question is, simple. Did I get what you meant ?
You say that throwing the orange mask away is "you've thrown out the corrections". But if I neutralize it, do I "throw it away" ?
Thanks for your answer.
Jérôme
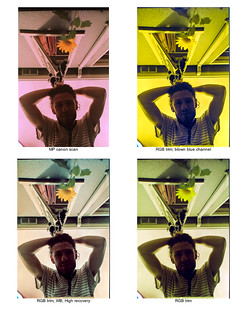
greetings all, I have been playing with old ektachrome and thought I would share some playing around I did a week or so ago. Here are variations of two images:
the MP navigator for the canon scanner doesn't have too many options and I havn't been able to figure out vuescan. So I have been using my sony nex to 'scan'. I played with exposure, seems that blowing out the blue channel is easy and not so good (super yellow cast).
I then did variations of: slider adjustments, WB (which maxs out at 50k), RGB channel trimming in Lightroom vs Photoshop. When using the advanced auto trim in PS the clipping value is important - (negs without heavy scratches are also important).
feel free to comment here or at flickr where you can see the images larger.
How do you scan Ektachrome developed in c41
This is the first I've seen of this thread. Wish I had seen it earlier. Scanning color negative material is an important skill/art, especially with the availability of new Kodak Ektra films, which are the best I have ever experienced. I hope my comments can add to the process.
As I was reading through the early posts about which software to use, my brain was preparing my reply, of which the main theme was "just get the image into Photoshop, pretty much unclipped and in 16 bits, then do everything there."
I've been a professional drum scanner operator for a long time and have used just about every machine and program available. For my purposes, Silverfast on Howtek machines has been the best, but even that leaves so much to be desired. There was one recommendation for Trident for the D4000. Yes it had all the controls, but was primitive. Silverfast is far better. But none is as good as Photoshop.
Photoshop can accomplish every edit that can be imagined on a digital file. There is nothing in any other program, including scanning software that is beyond Photoshop's capability. Other programs simply combine manipulations or actions which are otherwise routine, but tedious Photoshop moves. And the Adobe user interface is light years better than any other piece of software. Hence the advice to get the scan into photoshop with all its bits intact and work there.
Then I came to SergeyT's advice with which I completely agree. However, there are some important steps left out. I'll use his work flow and add my own parts. At the end, I'll describe my experiences with using a Nikon D800e as the scanner. Sergey's advice in italics:
* There is no one button click solution as each frame requires its own interpretation (or in some cases more than one)
* Scanners "see" color negatives just as humans do on a light table, the rest is done by the algorithms embedded into the scanners software. The algorithms work better for some images than for others but they are almost never perfect(regardless of names)
* Beside the difference in optical resolution and flare induced issues it is often possible to obtain "equally" good results from a color negative scanned on any scanner suitable for scanning film
* On a drum scanner - always wet-mount your film. Not so important with CCD scanners with no-glass carriers or with ANR glass.
* It is important to have the scanner properly calibrated and profiled (using transparency targets)
* Scan as a positive
Of course this brings the scan in as a negative image with its orange mask. You must capture enough of the "full strength" orange band outside the image area (unexposed film) in the framing of the scan to allow you to obtain an eyedropper sample. The orange mask is just that - a mask. It's not an overlay. It exists mostly in the lower midtones and shadows, but not in the highlights. If you try to remove it by "color balancing" it away - a global adjustment (as described in Sergey's steps) or by applying a corrective complementary color - also a global adjustment, you will be adding unwanted color to the highlights. The mask removal must be accomplished by applying the correction only where the mask exists. See below.
-- Use the correct input color profile
-- Set the output color space as either LAB (if your scanner software supports it) or Prophoto RGB
-- Disable all auto-enhancememts or corrections in the scanner software
-- Carefully set the endpoints so there is absolutely no clipping in any of the channels (use probes or eye-dropper tool)
-- Sharpening off
-- Max optical
-- Always output to 16-bit TIF files (I have never tried 8-bit for color negs due to amount of data manipulation required in after scanning phase)
* Bring a copy of the scanned image into Photoshop
Sergey's next step is to invert. Don't do that yet. Instead, use the eye dropper tool to sample the mask color where it is strongest - outside the image area.
-- Invert
Add a layer above the image and fill it with the sampled mask color. Set the layer Mode to Divide. The effect of the mask will be removed.
From this point, you will be working, "by the seat of your pants" to color correct the image. There are many ways to yank the settings around and Sergey describes them well enough. There are other methods as well. Trust me, it can be done to rival the richness of color positive material. But you can't do it "alone." Your eye and brain will go crazy trying to maintain color constancy and you will be all over the place. You must use an on screen color reference to keep your color sense anchored.
Get this image http://www.inkjetcarts.us/support/as...t-DCPHiRes.jpg or any similar color reference image (search for PDI Test Image) and keep it visible while you're color correcting. Glance back and forth between your scan and the reference frequently. Take a break frequently, look away from the screen for a few seconds, then look back at the reference before looking at your scan. If there are people in your image, look at the 4 kids at the bottom of the image a lot. If you have a lot of people images, there are lots of other reference images available that will be a big help.
-- If in LAB place 3 adjustment Curve layers on top of the base layer, one for each L, a and b channels.
--- Use L for fine-tuning the luminosity range (endpoints) as well as initial contrast.
--- Use a and b to color balance the image
-- If in RGB place 4 adjustment Curve layers. One for Dark point one for White point, one for Contrast, one for Color balance
--- Use individual R, B and G channels on the Dark point and White point layers to fine tune their values. Having "Show clipping" checked helps to do that.
--- Adjust the tone curve on the "Contrast" layer to bring the tones close to where they should be. Don't worry if they are not perfect yet
--- Use individual R, B and G channels on the "Color balance" layer to color balance the image. Use eye-dropper to check the neutrality of neutral tones.
At this point the image should look close to good (or very good)
-- Use as many other adjustment layers of different types as needed to fine tune the image
-- Save the image as a PSD file
-- Make a copy
-- Flatten (from here you can make a copy of the image in RGB and try applying Auto-color to see how far the white balance is from where Photoshop thinks it should be)
-- Crop
-- Resize
-- Sharpen for output
-- Print or publish
Lately I've been "scanning" with a Nikon D800e DSLR, using an AF Micro Nikkor 105mm f/2.8 D. The light source is a cheap 9" x 12" LED "light table" to which I run a custom white balance in the camera.
I scan 35mm at "same size." I scan medium format and 4x5 by acquiring four overlapping quadrants and stitching them in Photoshop. The results in every respect have been superior to anything I have ever been able to capture on any drum scanner. And it takes only seconds per scan vs 15 minutes for 35 mm drum scans and an hour for 4x5. To say nothing of the mounting time and cleanup on the drum. This topic is related, but a little afield of the main topic of scanning color negatives. However, the main point is that the raw captures are brought into Photoshop via Adobe Camera Raw (ACR) which makes color negative correction a breeze compared to any other software.
Rich
Great post, Rich!
You often feel tired, not because you've done too much, but because you've done too little of what sparks a light in you.
― Alexander Den Heijer, Nothing You Don't Already Know
 Posting Permissions

 Reply With Quote
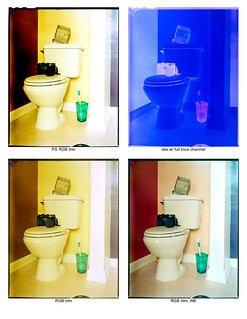
Bookmarks