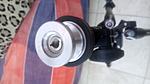
Now the technical bit: inside the top of the ball joint support is a nice long hole just the right size to take a 3/8" Whitworth thread (or indeed, the metric thread of the Allen bolt, but don't go there; there's method in my madness).
Step 3: tap out the hole with a 3/8" Whitworth taper tap. This is the standard large photographic size, which means that if you want to use a pan and tilt head, you can drop a short length of studding in that tapped hole. Alternatively, you can drop in one of those cheap-as-chips 3/8" to 1/4" adaptors, as I did.
Step 2: attach the quick release plate using a 1/4" * 1" Whitworth screw. This fits through the hole on the plate without modification.
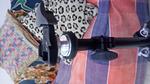
Now the camera can be mounted using the other half of the quick release.

All the usual disadvantages of no pan and tilt adjustment, so any levelling has to be done with the tripod legs, but I can live with that. And because it's reversible (the screw adaptor doesn't need to be replaced) there's no issue if I do decide I need the balljoint. But immediately, no chance of the camera suddenly deciding to be vertical instead of horizontal...
Neil
p.s. sorry about the sideways phone images. Something is ignoring the exif data...


 Reply With Quote

Bookmarks