
I measured this up today for a member, and figured I might as well post the drawing in case anyone else ever has the same question.
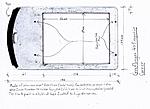


I measured this up today for a member, and figured I might as well post the drawing in case anyone else ever has the same question.

Thanks Tim, I made one from black matt board for my 2x3 Graflarger, which I only recently got and I never realized they use an Aristo Cold Lite Grid as light source. Fancy stuff for me!
However, I didn't measure much, just traced and cut with box knife.
Perhaps I will improve mine to be more like your very nice one.
So you have a 5x7 Graflarger also? I infer that from your writing about a prior masonite negative carrier on the drawing.
Tin Can
Hi Randy. No, I made a 5x7 enlarger based on the graflarger model. I have a post on it in DIY thread if you are interested. Here it is: http://www.largeformatphotography.in...e-5x7-enlarger
Nice job. I always like DIY!Originally Posted by Tim Meisburger

Tin Can
I'm a DIY guy. Not much I cannot cobble together somehow, unlike the current generation. Asked my son recently if he wanted to learn how to change the tire on a motorcycle and he said no; if he ever needed that information he would just check the youtube video. What the hell is the world coming to?
Tim (feeling crotchety) Meisburger
I feel if you cannot fix your motorcycle flat tire, you should not ride.
My first bike at age 16, 1967 got a flat and I soon found nobody would fix it for a week. So I did and since then I always do all my own bike repair. I won't let a shop touch my new bike. old bike, any bike. Trust yourself only when on 2 wheels.
Buy him this book, it even taught me a few tricks and I have my copy right here.
http://www.amazon.com/How-Install-Ti.../dp/0916367770
I have owned, licensed, restored well over 200 motorcycles. I lost count of how many, years ago.
I like bikes a lot...hate cars! Of course I was an automotive test mechanic for 30 years and that's why I hate cars. So last century. I don't own one.
Autonomous cars are coming and will eliminate 90% of urban private cars. Nobody believes me.
Tin Can
I believe you, and in the not too distant future for sure. Also, the skill of reading will disappear, as cursive already has. Why read when you can watch, or there are apps that will allow you to listen to any old book you might run across. I keep telling people this, but no one believes me...
Its is amazing, but also a sign of the times, that there is actually a book on changing tires and fixing flats. When I was a kid you started on your bicycle when you were seven or eight and never stopped till you were twenty and changing truck tires or fixing the track on a front-end loader. Walk down my street on a Saturday morning when I was a kid and every third house had a guy, or several guys, working on a car. Meanwhile, teh women were inside knocking out dresses and pantsuits in between baking pies from scratch.
As kid in the 50's in Minnesota I was nearly never inside in any weather.
Dad, was working and mom said go outside, come back for dinner.
We had a blast.
I didn't like kindergarten, I sure didn't want a nap and why was I with these smelly kids. Ugh.
Maybe I sleep on the roof tonight.
Tin Can
(Knock, Knock...) Is this the Graflarger party... Good, I brought the beer!!!!
Yo, Tim & Randy!!!!
I'm stoked to see someone still using these!!! I keep mine around so, come the revolution, I can be down in some burned-out basement making prints... (Just add AC power, water, and there will be PLENTY of dark then!!! Anyone got a generator and a beret!?!!!)
Actually, I just had to restore my 45 P-51 (green phosphor) Graflarger (as I moved recently into a new place, and have a spare bathroom that got claimed for film ops, but have not set up a printing room yet, so calling Graflarger!!!!)
Here is a recollection of the restoration;
Plugged it in and it worked... But I moved the AC cord a few inches, and I heard a loud POP... Seems that the AC cord insulation had COMPLETELY dried-up and turned to dust... OK, new cord needed... So that means I have to pop open the P/S unit... Screws off, but the cover's stuck on... What up??? In the seam, I see a little tar... Yea, it's potted inside so I takes 'me ole rusty butterknife, (am I talking like Popeye, yet!?!!!) and work the seams, then try to pry on the plate... A few grunts later, and the plate pops of with a sucking sound, flys into the air, and lands on the floor with a CLANG!!! First light inside it (since prop airliners) shows me the primordial ooze of tar potting the transformer... (Looked like the La Brea tar pits before the comet hit, or was that the Bayway, NJ oil refinery!?!!!) At least there's a chamber inside to wire a new AC cord, and space to add a safety fuse...
So with new cord and fuse added, I closed the time capsule up until the next ice age... (I was a little concerned if the head connecting cord might be in the same shape as the AC cord, but with the connections buried in the tar, I ain't going in there unless I have to!!! IF one does have to, some one would have to cut the cords, and put the housing in the oven with a pan under it to boil out the tar, AND figure a way to explain the stench and mess to their sig/other...)
So now is good as ever to do the head... I had been meaning to do an upgrade to it since I talked to the owner of Aristo back in about 1990, when I asked what could be done about the varying light output print to print with these... He had said that the max light output from the grid happened when the unit was warmest, but when turning it off, the glass would quickly transfer the heat out (as it was a poor insulator)... He said you can add a heater to it, or find a way to insulate the housing better, and maybe put foil or something under the grid to reflect heat back...
So I took the head apart, and carefully removed the wire nuts holding the thin grid leads to the connection cable... (Luckily, the cable insulation was a different blend than the AC cable, and still supple... I measured the voltage from the P/S and it was 570VAC (so IF I had to replace the transformer, I could pirate one from something old and tube)...
The inside was as brown as the wall at a cigar smoker's club from outgassing from the rubber cable, so everything inside was repainted flat white...
I had figured to make a new mounting plate for the grid, out of something that would warm up and hold heat, like a metal... I decided to use (thick copper clad) blank double sided printed circuit board material as it would be easy to cut, and transfer the holes from the old plate... (Doppelganger to the old plate, in fact I almost installed the old one by mistake!!!) The old rubber spacers holding up the grid were simply electronic cabinet feet (from my electronic parts hell stash), and some old copper magnet wire to hold the grid on...
I thought about adding a heater, and even went as far as to pull out a jar full of power resistors (that could bolt to the plate) and hooked them up to a 12VDC bench power supply to see how warm they would get (about 500ohm got moderately hot, but not too hot)... Then add a big wall wart P/S??? But I decided to let it ride for now, and see how much heat the housing would hold if I ran it for 15 mins or so before starting printing...
I noticed the opal (milk glass) diffuser had a clear "pinhole" in it, so I raided my stash of plexiglass cut-offs, (that I found dumpster diving) and cut a new white diffuser out...
Painted all 3 carriers flat black with my new fav blackout paint, (Rust-oleum "Chalk Board") and put it together (with a little 1/2" block of styrofoam sheet in the top of the housing for good heat insulating luck) and fired it up... Worked, so I left it on for 20mins, and measured it on then with a cool off several times with my Minolta flash/ambi meter, and the reading stayed the same!!! Cool!!!
So, haven't printed on it yet, so no even illumination test yet, but I need to print a bunch of 6X9's now so that might be easier on it than 4X5's but will check/upgrade that...
Sorry if this got so long... I'm processing several film runs in the other room, and just kept adding to this on every break!!! (And I get punchy when I'm tired!!!!)
Steve K
ps
I rather be hanging out with the DIY shop sweathogs, than the "bling/bling" gold Leica/Rollei/Hassy fetish society!!!!!!!
Great info Steve! I got into Graflarger because it was all I could afford to ship to Thailand (I actually have a regular enlarger in storage in the States). I recently bid $35 on another one and accidentally won, so I will be picking that up when I visit the US this summer.
 Posting Permissions

 Reply With Quote
Bookmarks