
I think you have some explaining to do here!Originally Posted by Jmarmck

I hope you'll tell us what happened – probably a lesson for the rest of us.
It sounds like it happened on your solo road trip out West.


I think you have some explaining to do here!
I hope you'll tell us what happened – probably a lesson for the rest of us.
It sounds like it happened on your solo road trip out West.
Here is the link to the thread
http://www.largeformatphotography.in...ted-my-Zone-VI
In short I turned to get a film holder when the wind took down the Zone VI shattering the front rail and front standard.
Luckily, I had a Horseman L45 as a backup but it changed my trip to one where I did not wander far from the truck.
In some ways this was for the better as the movements on the Horseman are more easily controlled via the gearing.
In Death Valley I felt like Nanook of the North trudging across the sand dunes mile after mile, lugging a metal camera
on my shoulder, mile after mile. (No, I did not find the parish of St. Alfonzo).
Regards
Marty
Wow, I'm glad the wind didn't carry you and your truck away too.
When you said "I have the splinters to prove why," I thought you meant splinters in your hand or body, like in a lion's paw.
Glad you're okay – those high desert winds can be as dangerous as the flash floods.
It's worthwhile to just take your camera in your lap while watching American Idol and practice finding all of the knobs and movements without looking. Richard and I call it "Camera Cuddle," and it works. Do it for a half hour and you'll know your camera better than you ever dreamed. This is valuable in the field - why be distracted by the mechanics when you're trying to wrestle a decent image into the groundglass? I do this now before going on a trip when I haven't played with the camera for a while. Fifteen minutes gets me totally bored, and totally facile.
I tray develop, and when I went to 8x10, I took three sheets a a sacrifice and practiced loading and unloading holders, and shuffling them in a tray of water in the light, then in the dark, until it was completely comfortable, and I knew how many I could comfortably shuffle in 30 seconds. That told me how many sheets I could develop at one time. I'm proud to have never scratched a negative.
You can also cuddle your lenses, making sure you know what each of the levers and thingies do, and, especially, knowing when the lens is open and when it's shut without looking. When I'm really in practice, I can set the aperture on the shutter within about a half-stop, which is useful under the cloth for previewing depth-of-field. You're in the ballpark without coming out-from-under, which is good enough for the moment. I then get more accurate before making the exposure.
I also have a lens ritual, including closing the lens, setting the speed, setting the f-stop, cocking the shutter, test-firing, and recocking. That's another thing to practice while watching JLo, so that it becomes automatic and you don't have to think about it.
The last thing worth doing is guessing the exposure before you meter the scene. It's highly useful to have a sense of what the light is before you find it out for sure. After a while, you'll find that you might not even need the meter, which is a good thing for when batteries fail, or your meter meets an unfortunately placed rock.
Bruce Barlow
author of "Finely Focused" and "Exercises in Photographic Composition"
www.brucewbarlow.com

The film notches are always on your lower right if right-handed or upper left if left handed when loading a film holder; and there is only one orientation the holder can assume if you're going to load it - you can only load it from the bottom and as long as the notches are on the bottom right (or top left if left-handed) the emulsion will be facing the lens regardless of what side is being loaded.I've noticed that instructions for loading sheet film often fail here. When they say "film notches on upper right," they almost always forget to mention the orientation of the film holder so the "notches upper right" comment is actually correct.
Thomas
NOW I'm confused.
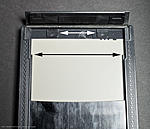
Depends how you orient the film holder. For those of us who load film holders with the open (hinged) end up, the notch code should be in the upper right corner, like in this photo.
I load similarly, but load from the side.
To clear up the confusion:
It is important to find the emulsion side of the film and make sure that it is facing up in the holder. To find the emulsion side, find the code notches and orient them so that they are at the upper right-hand corner of the film on the short side with the film in "portrait orientation," i.e., short sides top and bottom (these latter being the tidbits of info usually left out from descriptions) as in the picture djdister supplied above, and the emulsion side will be facing you.
Really, however, there are four orientations for code notches when the emulsion side is up, two in "portrait orientation," and two in "landscape orientation." This explains a lot of the confusion. The "code notches upper right on the short side in portrait orientation" is only one of the four possibilities. The others are: code notches on the lower left-hand short side in portrait orientation (turned 180° from above), and two for landscape orientation (long sides top and bottom), code notches upper left on the short side, or bottom right on the short side. The only real important thing is that you can find the emulsion side.
Once you have found the emulsion side, make sure that it is facing outward (or upward, if you prefer) when you load your holders. That's all there is to it. The notches can go on the top of the holder or the bottom, no problems. I personally prefer the notches to be on the flap end of the holder (again, as in djdister's photo) since they can often impinge on the image area when loaded the other way and the film slides down in the holder a bit (which often happens with older holders).
To complicate things furtherI load my holders from the right side, therefore, my film is in landscape orientation when it slides into the holder. When loading, I first make a stack (or stacks) of empty holders, leaving room for a "loaded stack" to the left of this. Film is on the right, working space is in the middle. With lights out, I take a holder from the empty stack and place it in the working area in front of me. The holder lies on the table with the darkslides to the left and the flap to the right. My film stack is always emulsion-side down and located to the right of the filmholder. This prevents dust from settling on the film's emulsion side. When loading, I pull the darkslide halfway, take a sheet of film from the stack, turn it vertical and tap the edge of the film on the countertop a few times to remove dust, etc. I then continue turning the film so the emulsion side is up and the code notches are at the bottom right on the short side with the film in landscape orientation. This puts the code notches on the flap end of the holder. I load the holder, then lift the corners of the film to make sure that it is correctly positioned under the guides. I also double-check the code notches to make sure they are correctly positioned too. I then slide the darkslide closed, flip the holder and repeat for the other side. The loaded holder is placed in the loaded stack I then take another holder from the unloaded stack...
Best,
Doremus
Per post #4, I think we need an image of Vaughn, holder + film sheet in hand, saying:
"It goes in THIS way."
A video would be even better, esp. if he was teaching a beautiful young female student.
Marty, if I may, you can get those black bags from B&H and download the film into those....if you don't have boxes, or till you get enough of them. Nevertheless, I'd keep those "pockets" in the dark, as well. Indeed, without indicating which box has the exposed film, you will likely be facing some disappointments - I know I would. If you don't have some sort of "screamer" tape that it will remind you of it....then have some v. colorful rubber bands, which would immediately distinguish it from the film stock box.
If it's been a long time since you loaded the film...and needing a reminder, I'd copy the book and have the pages stashed in the camera case.
Les
 Posting Permissions

 Reply With Quote
Bookmarks