
Thanks for the advice! I'll look into both.Originally Posted by Ron Stowell

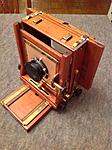
Just realized the attachments on my last reply didn't post. Here's where I am today:


Thanks for the advice! I'll look into both.
Just realized the attachments on my last reply didn't post. Here's where I am today:

On your lens board cut a correspondingly smaller piece of thin maple and glue it to the back of your lens board to form a rabbet. You can also cut a bigger hole in the board to form a rabbet for the retaining lens retaining ring.
Here's another source for handles. http://www.brettunsvillage.com/trunk...ts/handles.htm
It's really nice to see this camera coming back to life. Looks great!
Roger
Nice work! I love how old wood and brass come back to life but still retain a feeling of age and use.
's Avatar")
Really impressive resurrection. Could you please reveal how you treated the wood?
Sure. Most of the work is in the sanding and preparation. I removed as much of the brass hardware as I could, and sanded off the old paint and finish. I used 150 grit, or sometimes 100 grit paper for more troublesome areas. Once I was down to the bare wood, I used 220 grit sandpaper until all the surfaces were smooth to the touch. Getting to this point is over 90% of the work.
I then stained the wood with 1-2 coats of wood stain, and once dried, I rubbed on 2-3 coats of polyurethane by hand, letting it dry between coats.
I am sure there are any number of other finishes that would work equally well. In my opinion, good preparation is the most important step of the work.
This is great, I was just given exactly the same model of camera, maybe a few years older since the knobs are brass on mine which I hope to restore. I'd be very interested if you have any suggestions of things which worked for you with the disassembly and what glue you used for the repairs. Mine is in a bit better shape than yours was but also has some wood cracks and unglued joints.
That's neat! I really like the brass knobs!
One very good suggestion that's been mentioned is to keep parts together while dissembling, otherwise you might not remember how it goes back together. I would actually get a single section (e.g. the rear standard) completely finished before moving on to the next.
Also, I took a lot of pictures as I disassembled. That helped me a few times when I wasn't completely sure how something went back together.
Take your time - and know that it's going to take some time. And budget your time accordingly.
In most of my woodworking in the past, I have just used plain wood glue. I didn't this time; don't really have a good reason why. I used Gorilla glue instead, which is supposed to be very strong, though my experience is that the glued sections aren't generally the weak link usually. Also, Gorilla glue is more of a pain to work with - it doesn't clean up with water, and it expands as it dries. In hindsight, I'd probably just use wood glue if doing it again.
Thanks Lffbug, I'm wondering how you got the rear square out of the brass uprights, it looks almost like they're riveted in there?
Also any advice on stripping the old shellac would be very helpful. Especially in the tight corners…
I didn't remove the riveted sections, I just worked them in place as good as I could. Those are some of the slow going sections. I just was not confident that I could get it apart and back together without causing damage.
I don't think it is possible to get all of the shellac out of the inside corners without over sanding the surrounding wood. I didn't strip anything, I just sanded. My intent was to get the camera to "fully functional" rather than "like new", but also want it to look good in the end. I don't mind if it looks old, after all, it is. In my opinion, it is not necessary to get to perfect as minor imperfections and colorations provide a little patina and character. What I found is that on those pesky tight corners, even though I couldn't get all of the shellac off, it still sanded smooth and accepted stain. YMMV.
Jeremy
 Posting Permissions

 Reply With Quote
Bookmarks